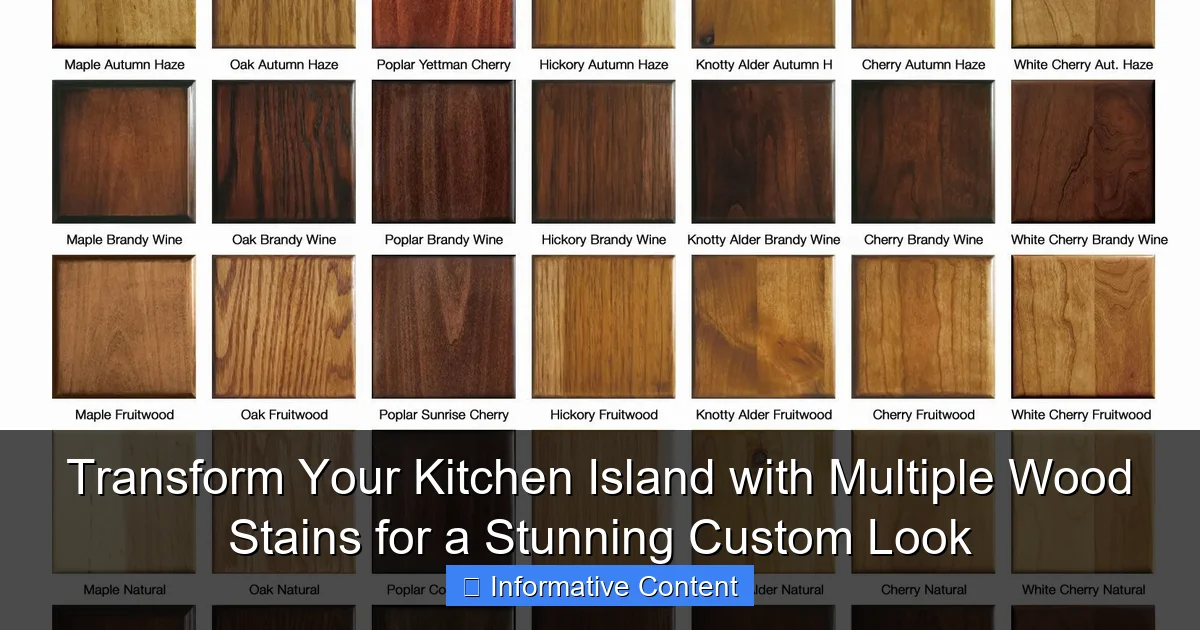
Featured image for multiple wood stains kitchen island
Image source: i.pinimg.com
Transform your kitchen island into a one-of-a-kind centerpiece by using multiple wood stains to highlight architectural details and add rich visual depth. This custom technique elevates ordinary wood surfaces with contrasting tones, creating a high-end, designer look that complements any kitchen style.
Key Takeaways
- Choose contrasting stains: Combine light and dark tones for visual depth and dimension.
- Test samples first: Always trial stains on scrap wood to perfect your color blend.
- Highlight architectural details: Use darker stains to accentuate carvings or trim work.
- Balance wood grains: Match stain intensity to grain pattern for cohesive, natural appeal.
- Seal thoroughly: Apply high-quality topcoat to protect multi-stain finishes from wear.
- Mix techniques creatively: Layer glazes or whitewash for unique, custom island finishes.
📑 Table of Contents
- Why Your Kitchen Island Deserves More Than Just One Stain
- What Are Multiple Wood Stains—And Why They Work
- Choosing the Right Stains for Your Island
- Step-by-Step: How to Apply Multiple Stains
- Creative Ideas for Multiple Wood Stain Designs
- Common Mistakes (And How to Avoid Them)
- Data Table: Popular Wood Stain Combinations
- Final Thoughts: Make Your Island Uniquely Yours
Why Your Kitchen Island Deserves More Than Just One Stain
Let’s be honest—your kitchen island is the heart of your home. It’s where coffee gets brewed at 7 a.m., where kids do homework, and where friends gather for wine and charcuterie. But too often, it’s also a design afterthought: a single wood tone, a predictable finish, a “safe” choice that fades into the background.
I remember visiting a friend’s kitchen last year. The island was stunning—not because it was huge or expensive, but because it told a story. One side was rich espresso, the other a warm honey oak, with a subtle walnut inlay tracing the edge. It felt custom, intentional, and alive. When I asked her what she’d done, she smiled and said, “Multiple wood stains. It changed everything.”
That moment stuck with me. Using multiple wood stains on a kitchen island isn’t just a trend—it’s a design strategy. It adds depth, contrast, and personality. And the best part? You don’t need to be a pro to pull it off. With a little planning and the right techniques, you can transform your island into a showpiece that feels truly yours.
What Are Multiple Wood Stains—And Why They Work
So, what exactly does “multiple wood stains” mean? Simply put, it’s applying two or more different stain colors to the same piece of furniture—in this case, your kitchen island. Think of it like layering paint, but with wood. The result? A dynamic, textured look that highlights different parts of the island and creates visual interest.
Visual guide about multiple wood stains kitchen island
Image source: 4.bp.blogspot.com
How It Differs from Single-Stain Finishes
Most kitchen islands are stained uniformly—same color, same tone, everywhere. And that’s fine. But uniformity can feel flat, especially in open-concept kitchens where the island is a focal point. Multiple wood stains break that monotony. You might stain the legs a dark espresso, the countertop a warm pecan, and the trim a soft gray wash. Each element stands out, yet they work together.
It’s like wearing a neutral outfit with a bold accessory. The contrast draws the eye, but the harmony keeps it balanced.
The Psychology of Contrast in Kitchen Design
Our brains love contrast. It helps us focus, remember, and feel engaged. In design, contrast creates movement. On a kitchen island, using multiple stains can:
- Define zones: Darker legs ground the island; a lighter top feels airy and inviting.
- Highlight craftsmanship: Inlays, carvings, or turned legs pop when stained differently.
- Add warmth or drama: A mix of warm and cool tones can make a space feel cozy yet modern.
One homeowner I spoke with used a charcoal stain on the base and a whitewashed oak on the top. “It’s like the island has a shadow,” she said. “It makes the whole kitchen feel taller.”
Real-World Example: The “Two-Tone Island” Trend
You’ve probably seen this: a white or gray island base with a natural wood countertop. That’s a basic form of multiple staining. But take it further. A reader in Portland used three stains on her island:
- Base: Weathered gray (for a rustic, grounded feel)
- Countertop: Light honey oak (to reflect light and feel warm)
- Edge banding: Dark walnut (to frame and add sophistication)
“People always ask if it’s a custom piece,” she told me. “It’s just a stock island from IKEA—I just stained it smarter.”
Choosing the Right Stains for Your Island
Picking stains isn’t just about color—it’s about tone, sheen, and how the wood reacts. Here’s how to make choices that work together, not clash.
Understanding Stain Types: Oil, Water, and Gel
Not all stains are created equal. Here’s a quick breakdown:
- Oil-based stains: Deep penetration, rich color, longer drying time. Great for dark stains and hardwoods.
- Water-based stains: Low odor, quick drying, lighter color. Ideal for light or gray washes. Less likely to yellow.
- Gel stains: Thick, easy to control, less drippy. Perfect for vertical surfaces or when you want a more opaque look.
Pro tip: Mixing types is okay, but test on scrap wood first. Oil and water don’t always play nice.
Matching Stains to Your Kitchen’s Style
Your kitchen’s overall vibe should guide your choices. Here’s how:
- Modern/Minimalist: Pair a matte black base with a bleached oak top. Use a satin finish for subtlety.
- Rustic/Farmhouse: Try a weathered gray base and a warm cherry top. Add a chiseled edge for texture.
- Coastal: Combine a driftwood gray with a whitewashed finish. Keep sheens consistent (all matte or all satin).
- Traditional: Use dark walnut on legs, medium oak on the top. Add a cherry inlay for elegance.
One couple in Austin went bold: navy-blue-stained legs with a natural walnut top. “It’s unexpected,” they said, “but it works because the rest of the kitchen is neutral.”
Creating a Color Palette That Works
Here’s a simple rule: limit to three stains max. Too many, and it feels chaotic. Stick to:
- One dominant color (e.g., the countertop)
- One secondary color (e.g., the legs or base)
- One accent color (e.g., trim, inlay, or a small detail)
Use a color wheel. Complementary colors (opposite sides) create drama. Analogous colors (next to each other) feel harmonious. For example:
- Drama: Dark espresso + honey oak
- Harmony: Medium oak + golden pine
- Surprise: Charcoal + whitewashed maple
Test stains on scrap wood from your island. Natural light changes how colors look. A stain that’s perfect at noon might feel too dark at 6 p.m.
Step-by-Step: How to Apply Multiple Stains
Ready to get your hands dirty? This isn’t as hard as it sounds. With patience and the right prep, you can achieve a pro-level finish.
Prepping the Island: The Foundation of a Great Finish
Skipping prep is the #1 mistake. Here’s what to do:
- Remove hardware: Knobs, hinges, and brackets. Label them so you don’t lose track.
- Clean thoroughly: Use a degreaser to remove kitchen grime. Even tiny oil spots can affect stain absorption.
- Sand, sand, sand: Start with 120-grit to remove old finish. Finish with 220-grit for a smooth base. Sand with the grain.
- Fill gaps or dents: Use wood filler. Let dry, then sand flush.
- Wipe with tack cloth: Removes dust. Don’t skip this—dust ruins the finish.
One DIYer told me, “I rushed the sanding. The stain looked patchy. I had to sand it all off and start over. Lesson learned.”
Masking and Protecting Areas
This is where precision matters. You’re not painting a wall—you’re creating clean lines between stains.
- Use painter’s tape: Blue tape is low-tack. Apply it to areas you want to protect (e.g., the edge of the countertop if staining the legs separately).
- Protect adjacent surfaces: Cover countertops, walls, and floors with drop cloths. Stain drips happen.
- Use a barrier product: For complex shapes (like turned legs), apply a clear wax or shellac along the edge to prevent bleed.
Pro tip: Test your tape on a small area first. Some tapes leave residue on bare wood.
Staining Order: What to Do First
Order matters. Here’s the best sequence:
- Stain the accent areas first (e.g., trim, inlays, or small details). These are often the trickiest.
- Stain the secondary areas (e.g., legs, base, or apron). These are large but less visible.
- Stain the dominant area last (e.g., the countertop). This is the focal point.
Why? If you drip stain on an already-finished area, you’ll see it. Staining the accent first means any drip on the larger area can be covered later.
Apply stain with a lint-free cloth or foam brush. Wipe off excess after 5–10 minutes (follow product instructions). Let dry fully between coats.
Sealing and Protecting Your Work
Stain alone won’t protect your island from spills, heat, or scratches. You need a topcoat.
- Polyurethane: Durable, water-resistant. Available in gloss, satin, or matte. Best for countertops.
- Wax: Natural look, easy to repair. Less durable. Good for legs or base.
- Shellac: Fast-drying, good for sealing between stains. Not food-safe for countertops.
Apply 2–3 thin coats of polyurethane, sanding lightly with 320-grit between coats. For wax, apply with a soft cloth, then buff.
One homeowner used a matte poly on the base but a satin on the top. “The difference in sheen adds another layer of depth,” she said. “It’s subtle, but it works.”
Creative Ideas for Multiple Wood Stain Designs
Now for the fun part—design! Here are ideas to spark your creativity.
Two-Tone: Base and Top
The most popular approach. Dark base + light top creates balance. Or vice versa.
- Example: Espresso-stained legs with a whitewashed oak top. Add black metal brackets for contrast.
- Tip: Use a contrasting edge. Stain the top’s edge a different color to frame it.
Accent Trim and Inlays
Highlight details with a third stain. Turn a simple island into a work of art.
- Example: Medium oak base, with walnut-stained trim around the countertop edge.
- Pro move: Use a herringbone pattern in a darker stain on the island’s apron.
Ombre or Gradient Effects
Blend stains for a soft transition. Best for long, rectangular islands.
- How-to: Start with a light stain at one end, gradually mix in a darker stain toward the other. Wipe with a cloth to soften the line.
- Caution: This takes practice. Test on scrap first.
Geometric Patterns
For the bold. Create stripes, chevrons, or even a “floating” center section.
- Example: Paint the base white, then stain a rectangular center section in walnut. Looks like a wood “insert.”
- Tip: Use tape to create sharp lines. A steady hand helps.
Reclaimed or Mixed Wood Islands
Got an island made of different wood types? Embrace it. Stain each section to highlight its grain.
- Example: A pine base stained gray, paired with a reclaimed barnwood top in honey oak.
- Bonus: The mix of textures adds character.
Common Mistakes (And How to Avoid Them)
Even the best plans can go sideways. Here’s what to watch for.
Uneven Color or Blotchiness
Caused by poor prep or cheap stain. Fix it:
- Always sand thoroughly.
- Use a wood conditioner before staining (especially on softwoods like pine).
- Test stain on scrap wood first.
Stain Bleed or Tape Marks
When stain seeps under tape or leaves a residue. Prevent it:
- Burnish the tape edge with a plastic card before staining.
- Use a barrier product (like shellac) along the tape line.
- Remove tape while the stain is still wet.
Mismatched Sheens
Mixing gloss and matte can look sloppy. Solution:
- Choose one sheen for the entire island, or use it intentionally (e.g., matte base, satin top).
- Apply the same topcoat to all areas for consistency.
Ignoring Grain Direction
Staining against the grain creates streaks. Always wipe with the grain.
Not Sealing Properly
A kitchen island takes a beating. Skipping the topcoat means stains will wear fast. Seal every stained area.
Data Table: Popular Wood Stain Combinations
| Style | Base/Stain 1 | Top/Stain 2 | Accent/Stain 3 (Optional) | Best For |
|---|---|---|---|---|
| Modern | Matte black (oil-based) | Bleached oak (water-based) | Charcoal inlay | Open-concept kitchens |
| Rustic | Weathered gray (gel) | Warm cherry (oil) | Natural wood trim | Farmhouse or cottage |
| Coastal | Driftwood gray (water) | Whitewashed maple (water) | None | Beach houses, light spaces |
| Traditional | Dark walnut (oil) | Medium oak (oil) | Cherry inlay | Classic kitchens |
| Eclectic | Navy blue (gel) | Natural walnut (oil) | Brass inlay | Bold, artistic spaces |
Final Thoughts: Make Your Island Uniquely Yours
Your kitchen island isn’t just a surface—it’s a statement. And using multiple wood stains is one of the easiest ways to make that statement bold, personal, and unforgettable.
I’ve seen islands transformed from “meh” to “magnificent” with just a few cans of stain and a Saturday morning. It’s not about perfection. It’s about intention. It’s about saying, “This space matters. I made it mine.”
So don’t be afraid to mix, match, and experiment. Try a dark leg with a light top. Add a walnut frame. Go bold with a blue base. And remember: the best design isn’t the one that follows the rules—it’s the one that feels right to you.
Start small. Test stains. Prep well. Seal thoroughly. And when you step back and see that island—rich, layered, alive—you’ll know it was worth it. Because your kitchen isn’t just a room. It’s where life happens. And it deserves to look the part.
Frequently Asked Questions
Can I use multiple wood stains on my kitchen island for a custom look?
Absolutely! Combining multiple wood stains on your kitchen island adds depth and a personalized touch. Just ensure proper surface prep and test the stains first for color harmony and consistency.
What are the best techniques for applying multiple wood stains to a kitchen island?
Start by staining larger sections with one color, then use glazes or a second stain on details like edges or grooves. Use painter’s tape to create clean lines between different stain colors.
How do I choose complementary wood stains for my kitchen island?
Consider your existing cabinetry and flooring—opposite tones (e.g., warm walnut and cool gray) add contrast, while analogous shades create cohesion. Test samples on scrap wood to visualize the final effect.
Will multiple wood stains on my kitchen island require special maintenance?
No—once sealed properly with polyurethane or wax, a multi-stain kitchen island is as durable as a single-stain finish. Just avoid harsh cleaners and reapply sealant every 1–2 years for protection.
Can I DIY multiple wood stains on a kitchen island, or should I hire a pro?
DIY is feasible for beginners with patience and proper tools (brushes, sandpaper, sealant). However, intricate designs or large islands may benefit from a pro’s precision and equipment.
Does using multiple wood stains increase the cost of my kitchen island project?
It depends—additional stains and sealants add minor material costs, but labor is the bigger factor. DIY keeps costs low, while hiring a pro for detailed work will raise the price.