
Featured image for this comprehensive guide about Gluten-free baking tips for beginners
Image source: imademycake.com
Gluten-Free Baking for Beginners: 10 Essential Tips for Success
Stepping into the world of gluten-free baking can feel a lot like learning a new language. You’re presented with unfamiliar ingredients, different techniques, and the occasional crumbly disaster that leaves you wondering if delicious, perfectly textured gluten-free treats are even possible. We get it! The absence of gluten – the protein that gives traditional baked goods their structure, elasticity, and chewiness – fundamentally changes the rules of the game.
But here’s the good news: with a little knowledge, the right tools, and these essential gluten-free baking tips for beginners, you can absolutely master the art. Whether you’re baking for yourself, a family member with Celiac disease or gluten sensitivity, or simply exploring healthier lifestyle choices, success is within your reach. Gone are the days of dense, dry, or crumbly gluten-free goods. Today’s innovations in ingredients and techniques mean you can create delectable breads, cakes, cookies, and pastries that rival their gluten-containing counterparts.
This comprehensive guide is designed to demystify the process and equip you with the foundational understanding and practical advice you need to embark on your gluten-free baking journey with confidence. We’ll cover everything from understanding gluten-free flours to preventing cross-contamination, ensuring your first forays into baking without gluten are not just edible, but truly enjoyable. Let’s dive into the 10 essential tips that will transform your kitchen into a gluten-free haven!
Quick Answers to Common Questions
What’s the #1 thing I need to know about gluten-free baking?
The biggest shift in gluten-free baking is understanding the absence of gluten, which normally gives structure and elasticity. This means we’ll use different flour blends and often add binders to get that perfect texture.
Can I just swap regular flour for gluten-free flour in my old recipes?
While tempting, a direct 1:1 swap rarely works perfectly. Gluten-free flours behave differently, so for best results, look for recipes specifically developed for gluten-free baking or be prepared to make adjustments like adding binders or extra liquid.
My gluten-free baked goods are dry and crumbly – what am I doing wrong?
It’s a common challenge! Without gluten, it’s easy for treats to lack moisture and fall apart. Try incorporating more moisture-rich ingredients like yogurt or applesauce, and ensure you’re using a good all-purpose gluten-free flour blend with added binders.
Do I need to buy a ton of special ingredients for gluten-free baking?
Not necessarily! While some specialized gluten-free flours exist, you can start with a reliable all-purpose gluten-free flour blend and common pantry staples. Build your gluten-free ingredient collection gradually as you explore new recipes.
What’s a great beginner-friendly gluten-free recipe to start with?
Ease into gluten-free baking with something forgiving like gluten-free cookies, muffins, or quick breads. These don’t rely as heavily on gluten for structure, making them perfect for building your confidence and skills.
📋 Table of Contents
Understanding Gluten and Its Role in Baking
Before we jump into the “how-to,” it’s crucial to understand the “why.” What exactly is gluten, and why does its absence make baking so different?

Learn more about Gluten-free baking tips for beginners – Gluten-Free Baking for Beginners: 10 Essential Tips for Success
Image source: aanmc.org
What is Gluten?
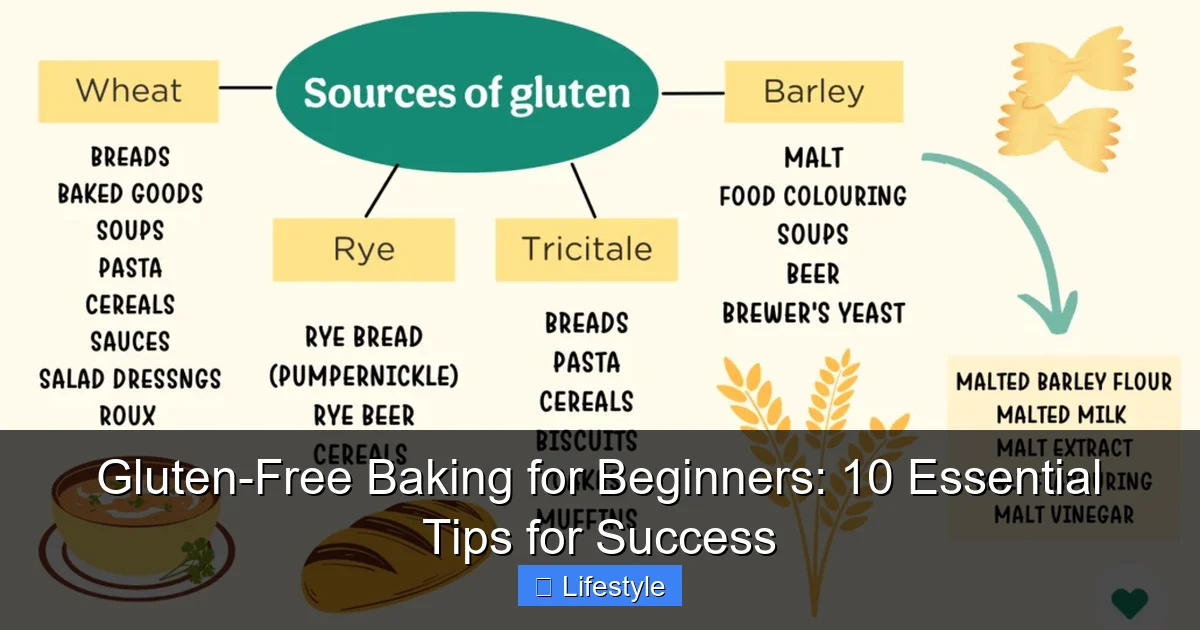
Gluten is a composite protein found in wheat, barley, rye, and triticale. When flour made from these grains is mixed with water, the gluten proteins form an elastic network. This network is what gives dough its strength, elasticity, and ability to rise. Think of it as the invisible scaffolding that holds your bread together, allows it to chew, and traps the gas bubbles produced by yeast, giving it that airy, light texture. In cakes and cookies, gluten provides structure without being overly chewy.
| Essential GF Baking Tip | Why It’s Crucial for GF Success | Beginner’s Action Plan & Recommendation |
|---|---|---|
| **1. Use a Quality GF Flour Blend** | Gluten-free flours lack the natural elasticity and structure of wheat gluten. A balanced blend of specific starches and grains is vital for texture, rise, and crumb. Single-ingredient GF flours often yield poor results. | For beginners, start with a reputable pre-made GF all-purpose flour blend (e.g., Bob’s Red Mill 1-to-1, King Arthur Gluten-Free Measure for Measure). Ensure the blend already contains xanthan gum for convenience. |
| **2. Measure Precisely** | GF baking is more sensitive to ingredient ratios. Slight variations in flour, liquid, or leavening can drastically alter the final product due to the lack of gluten’s forgiving nature. | Invest in a digital kitchen scale and measure all dry ingredients by weight (grams) whenever possible. If using cups, spoon flour lightly into the measuring cup and level off; do not pack. |
| **3. Incorporate Gums (Xanthan/Guar)** | Without gluten’s elasticity, baked goods can be crumbly, dense, or fall apart. Gums act as a binder, providing structure, elasticity, and preventing crumbling, mimicking some of gluten’s properties. | If your GF flour blend doesn’t contain it, add 1/4 to 1/2 tsp xanthan gum per cup of GF flour for cakes/muffins, or 3/4 to 1 tsp per cup for breads. Start with less and adjust based on recipe or results. |
| **4. Adjust Hydration Levels** | Gluten-free flours absorb liquids differently and often require more moisture than wheat flours. They can lead to dry, crumbly results if not adequately hydrated, but too much can make them gummy. | GF batters/doughs will often appear thicker than their wheat counterparts. Don’t be afraid to add an extra tablespoon of liquid at a time until the mixture reaches a consistency similar to a thick regular batter/dough. |
| **5. Allow Dough/Batter to Rest** | Gluten-free flours need time to fully absorb liquids, hydrate, and for the starches to properly gel. Rushing this step can result in a gritty texture, dry crumbs, and reduced rise. | For recipes like cookies, muffins, or quick breads, let the mixed batter/dough rest for 10-30 minutes before baking. For yeast breads, follow the standard proofing times, ensuring a warm, humid environment. |
Why Go Gluten-Free?
The decision to bake gluten-free often stems from health needs. Approximately 1% of the global population has Celiac disease, an autoimmune condition where gluten consumption damages the small intestine. For these individuals, a strict gluten-free diet is medically necessary. Beyond Celiac disease, many people experience non-celiac gluten sensitivity (NCGS) or wheat allergy, leading to digestive issues, fatigue, or other symptoms. Furthermore, a growing number of individuals choose a gluten-free lifestyle for perceived health benefits or simply to explore diverse culinary options. Regardless of the reason, the demand for delicious, high-quality gluten-free baked goods is higher than ever.
The Foundation: Mastering Gluten-Free Flours and Blends
One of the biggest shifts in gluten-free baking is the flour. You’re no longer relying on a single all-purpose wheat flour. Instead, you’ll be working with a diverse palette of single-ingredient gluten-free flours, often combined to create balanced blends.
Learn more about Gluten-free baking tips for beginners – Gluten-Free Baking for Beginners: 10 Essential Tips for Success
Image source: cdn.shopify.com
Single Gluten-Free Flours: A Diverse Palette
Understanding the characteristics of individual gluten-free flours is key to successful baking. Each flour brings unique properties to the table:
- Rice Flour (White & Brown): These are staples. White rice flour is fine, neutral-tasting, and light. Brown rice flour is more absorbent, has a nuttier flavor, and adds fiber. They provide structure but can be gritty if not finely ground.
- Almond Flour: Made from ground almonds, it’s high in protein, fat, and moisture. It adds a rich flavor and tender texture but is low in carbohydrates and doesn’t absorb liquids as readily as grain flours.
- Oat Flour (Certified GF): Offers a mild, slightly sweet flavor and a chewy texture. Ensure it’s certified gluten-free to avoid cross-contamination from oat processing facilities. It’s excellent for muffins, cookies, and quick breads.
- Buckwheat Flour: Despite its name, buckwheat is not related to wheat and is gluten-free. It has an earthy, robust flavor and creates a denser texture, often used in pancakes or savory applications.
- Tapioca Starch/Flour & Arrowroot Starch: These are starches that provide elasticity, chewiness, and a crisp crust. They are essential for lightening the texture of baked goods and for binding.
- Cornstarch: A common thickening agent that can also contribute to a tender crumb in baked goods.
- Coconut Flour: Highly absorbent and high in fiber, it imparts a distinct coconut flavor. It requires a lot of liquid and is often used in smaller quantities in blends due to its absorbency.
The Magic of Gluten-Free Flour Blends
Because no single gluten-free flour can perfectly mimic wheat flour, successful gluten-free baking often relies on carefully crafted blends. These blends combine different flours and starches to achieve the right balance of structure, flavor, and texture. You can either buy commercial blends or create your own.
- Tip 1: Choose a reliable gluten-free flour blend.
For beginners, starting with a high-quality, pre-made gluten-free all-purpose flour blend is a game-changer. Brands like Bob’s Red Mill 1-to-1 Baking Flour or King Arthur Gluten-Free Measure for Measure Flour are formulated to perform similarly to wheat flour in many recipes. They often already contain binders (like xanthan gum), simplifying the process significantly. As you gain confidence, you can experiment with making your own blends, typically combining 60% grain flours (like rice, oat) with 40% starches (like tapioca, potato) and a binder.
The Secret Weapons: Binders and Moisture Boosters
Without gluten, your baked goods can fall apart or be too dry. This is where binders and moisture-enhancing ingredients become your best friends.
The Role of Gums: Your Invisible Scaffolding
Since there’s no gluten to provide elasticity and structure, you need to add something to replicate that function. This is where gums come in.
- Xanthan Gum: The most common and effective binder in gluten-free baking. It provides elasticity and prevents crumbling. A general rule of thumb is to use about 1/4 teaspoon per cup of gluten-free flour blend for cakes and muffins, and 1/2 teaspoon per cup for breads and pizzas. Too much can make your baked goods gummy, so measure carefully!
- Guar Gum: Similar to xanthan gum but generally creates a softer, less chewy texture. Some bakers prefer it, or use a combination of both.
- Tip 2: Always add a binder like xanthan or guar gum (unless your blend already contains it).
This is arguably the most critical tip for structural integrity in gluten-free baking. Without a binder, your bread will crumble, and your cookies will spread excessively. Check your chosen gluten-free flour blend – if it doesn’t list xanthan or guar gum in its ingredients, you’ll need to add it separately. Pay attention to the recommended amounts, as they vary based on the type of baked good.
Enhancing Moisture and Structure: Beyond Water
Gluten-free flours tend to be very absorbent and can lead to dry baked goods if not properly hydrated. You’ll often need more liquid and fat than in traditional recipes.
- Eggs: Act as both a binder and a leavening agent, providing structure and moisture. They also add richness and help with browning.
- Chia or Flax Eggs: For vegan gluten-free baking, a “chia egg” (1 tbsp chia seeds + 3 tbsp water, let sit for 5-10 minutes) or “flax egg” (1 tbsp ground flaxseed + 3 tbsp water) can serve as a binder and provide some moisture.
- Fruit/Vegetable Purees: Ingredients like applesauce, mashed banana, pumpkin puree, or sweet potato puree add incredible moisture, natural sweetness, and often, healthy fiber. They can replace some fat or sugar.
- Dairy (or Alternatives): Buttermilk, yogurt, or sour cream (and their dairy-free counterparts) add tang, moisture, and tenderize the crumb.
- Fats: Butter, oil, or coconut oil are crucial for flavor, richness, and tenderness, preventing a dry or crumbly texture.
- Tip 3: Incorporate extra moisture.
Don’t be surprised if gluten-free recipes call for more liquid, fat, or moistening agents than you’re used to. This is essential to prevent dry, crumbly results. Ingredients like extra eggs, milk, oil, applesauce, or yogurt are often key. Your batter might look thinner than traditional batters, but that’s often a good sign for moisture retention.
Essential Techniques for Gluten-Free Baking Success
Beyond ingredients, mastering a few key techniques will significantly elevate your gluten-free baking game. Precision, patience, and preventing contamination are paramount.
Precision is Key
Baking is a science, and gluten-free baking even more so. Small deviations can have big consequences.
- Tip 4: Measure ingredients precisely (ideally by weight).
Unlike traditional baking where a little extra flour might not ruin a recipe, in gluten-free baking, precision is non-negotiable. Gluten-free flours vary greatly in density. Measuring by weight (using a kitchen scale) is always more accurate than by volume (using measuring cups). If you must use measuring cups, ensure you’re using the correct type: dry measuring cups for flours, and liquid measuring cups for liquids, with the liquid read at eye level. Avoid scooping flour directly with a measuring cup, which can pack it down and add too much. Instead, spoon flour into the cup and level it off.
Preventing Cross-Contamination
For those with Celiac disease or severe gluten sensitivity, preventing cross-contamination is as important as the ingredients themselves.
- Tip 5: Avoid cross-contamination.
If you’re baking for someone with Celiac disease or severe gluten sensitivity, this tip is critical. Even a tiny amount of gluten can cause a reaction.- Use dedicated gluten-free cutting boards, spatulas, and baking pans if possible.
- Thoroughly clean all surfaces, utensils, and mixing bowls before you start.
- Use a separate toaster for gluten-free bread.
- Be mindful of shared condiment jars (like butter, peanut butter) where gluten-containing crumbs might be present.
Creating a clearly marked “gluten-free zone” in your kitchen can be very helpful.
Mixing and Resting
The way you handle your batter and dough also impacts the final product.
- Tip 6: Don’t overmix, but ensure full hydration.
While overmixing can develop gluten in traditional baking (leading to tough results), it’s less of a concern in gluten-free baking. However, you still want to mix just enough to combine ingredients thoroughly. The key is to ensure all the gluten-free flours are fully hydrated. This means mixing until there are no dry streaks of flour, but not beating the mixture excessively. Gluten-free batters often look thicker and stiffer than their gluten-containing counterparts; don’t be tempted to add too much liquid unless the recipe specifically advises it.
- Tip 7: Allow batters and doughs to rest.
Many gluten-free recipes benefit from a short resting period after mixing (15-30 minutes for batters, longer for doughs). This allows the starches in the flours to fully hydrate, the flavors to meld, and the binders (like xanthan gum) to fully activate. This often leads to a less gritty texture and a more cohesive, pliable dough or smoother batter, making for a better final product.
Baking Temperatures and Times
The oven can be a tricky environment for gluten-free goods.
- Tip 8: Adjust baking times and temperatures.
Gluten-free baked goods often brown faster than traditional ones due to different sugar and protein content in the flours. However, they may also need more time to cook through to develop their full structure. It’s common to bake at a slightly lower temperature (e.g., 350°F instead of 375°F) for a longer period. Always use a kitchen thermometer to check for doneness, especially in breads and cakes. A wooden skewer or toothpick inserted into the center should come out clean. If the top is browning too quickly, loosely tent it with aluminum foil.
The Cool Down
The baking process isn’t truly complete until your creation is properly cooled.
- Tip 9: Be patient during cooling.
This is a critical, yet often overlooked, step in gluten-free baking. Gluten-free baked goods are often more fragile when hot. Their structure continues to set and solidify as they cool. Cutting into a warm gluten-free cake or bread too soon can result in it falling apart or having a gummy texture. Always let them cool completely on a wire rack before slicing or serving. For most items, this means letting them sit for at least an hour, or even several hours for dense cakes or breads.
Troubleshooting and Recipe Adaptation
Even with the best tips, you might encounter bumps along the road. Don’t worry, every baker does! Understanding common issues and how to adapt recipes will make you a more confident gluten-free baker.
Common Gluten-Free Baking Issues
- Crumbliness: Often a sign of insufficient binder (xanthan/guar gum) or not enough moisture/fat. Review your recipe’s binder amount or consider adding a tablespoon or two of extra liquid.
- Denseness/Heaviness: Could be due to too much liquid, too much heavy grain flour, or simply under-leavening. Ensure your leavening agents (baking powder/soda) are fresh and that your recipe has the right balance of flours and starches.
- Gummy Texture: Usually a result of too much starch, too much binder, or underbaking. Ensure proper baking time and don’t overload on starches in your blend.
- Dryness: Not enough fat or moisture, or too much absorbent flour (like coconut flour). Consider increasing fat or using a moistening agent like applesauce.
Adapting Traditional Recipes
Once you’re comfortable with gluten-free baking, you might want to try converting your favorite traditional recipes. This can be tricky and isn’t a simple 1:1 substitution for all recipes.
- Tip 10: Start with trusted gluten-free recipes, then experiment with adaptation.
For beginners, it’s best to use recipes specifically developed for gluten-free baking. These recipes have been tested and balanced for the unique properties of gluten-free flours and binders. Once you have a few successes under your belt and understand the principles, you can start experimenting with converting traditional recipes.- Flour Substitution: For every cup of all-purpose wheat flour, replace it with 1 cup of a good quality gluten-free all-purpose blend that contains xanthan gum. If your blend doesn’t have it, add 1/4 tsp xanthan gum per cup of flour for cakes/muffins, or 1/2 tsp for breads.
- Liquid Adjustment: You might need to add 1-2 tablespoons more liquid per cup of gluten-free flour, as these flours are often more absorbent.
- Extra Egg/Fat: Sometimes an extra egg or a bit more fat can improve texture and moisture.
- Small Batches: When adapting, start with a smaller batch to minimize waste if it doesn’t turn out perfectly.
Remember that some recipes, like puff pastry or highly structured breads, are much harder to convert successfully for a beginner.
Common Gluten-Free Flour Properties & Uses
To help you navigate the world of gluten-free flours, here’s a quick reference guide:
| Gluten-Free Flour/Ingredient | Key Properties | Best Uses |
|---|---|---|
| Brown Rice Flour | Nutty flavor, high protein, absorbent, slightly gritty | Cookies, breads, general baking blends, adds structure |
| White Rice Flour | Neutral flavor, fine texture, less absorbent than brown rice flour | Cakes, cookies, thickening sauces, delicate baked goods |
| Almond Flour | Moist, rich, high protein, low carb, adds tenderness | Macarons, cakes, muffins, quick breads, crusts |
| Oat Flour (Certified GF) | Chewy, mild flavor, absorbent, adds a rustic touch | Cookies, muffins, pancakes, quick breads, breading |
| Tapioca Starch/Flour | Chewy, crispy crust, excellent binder, adds elasticity | Pies, sauces, crispy coatings, essential in blends for chewiness |
| Potato Starch | Lightens texture, adds moisture, good thickener | Cakes, cookies, breads, often used with tapioca starch |
| Xanthan Gum | Strong binder, provides elasticity and structure, mimics gluten | Essential for almost all GF baking, crucial for preventing crumbling |
Conclusion
Embarking on your gluten-free baking journey might seem daunting at first, but with these 10 essential tips, you’re well on your way to becoming a confident and successful baker. Remember, gluten-free baking is an art form that requires a slightly different approach than traditional baking, but the rewards are incredibly satisfying.
From understanding the unique properties of gluten-free flours and the critical role of binders like xanthan gum, to mastering precision in measurement and patiently cooling your delicious creations, each tip builds a foundation for success. Don’t be afraid to experiment, learn from your experiences, and most importantly, enjoy the process. The world of gluten-free treats is vast and delicious, waiting for you to explore!
So, gather your ingredients, set up your kitchen, and get ready to create amazing gluten-free baked goods that will delight everyone, whether they follow a gluten-free diet or not. Happy baking!
“`
Frequently Asked Questions
Is gluten-free baking much different from traditional baking, and what should beginners know?
Yes, gluten-free baking has some key differences, mainly due to the absence of gluten, which provides structure and elasticity. Beginners should understand that gluten-free flours behave differently and often require binders like xanthan gum to achieve desired textures and prevent crumbling.
Can I simply substitute regular flour with a gluten-free flour blend in any recipe?
While some simple recipes might work with a 1:1 gluten-free flour blend, it’s generally not a direct substitute for all traditional recipes. Gluten-free blends absorb liquids differently and lack the elasticity of wheat flour, which can significantly affect the final texture and structure. For best results in gluten-free baking, it’s often better to start with recipes specifically developed for gluten-free ingredients.
Why does my gluten-free baking sometimes turn out dry or crumbly?
Gluten-free flours tend to absorb more liquid than wheat flour, which can lead to dry or crumbly results if not properly hydrated. Using a good gluten-free flour blend, adding sufficient moisture, and incorporating binders like xanthan gum or psyllium husk can help improve texture and keep your gluten-free baked goods moist and cohesive.
What essential ingredients should I stock for successful gluten-free baking?
Beyond individual gluten-free flours like rice flour, almond flour, and tapioca starch, a good all-purpose gluten-free flour blend is a must-have. You’ll also want binders like xanthan gum or psyllium husk powder, and often ingredients like apple cider vinegar or extra eggs to aid with leavening and structure in gluten-free recipes.
What are some easy gluten-free recipes ideal for beginners to start with?
To build confidence, start with naturally gluten-free items or simple substitutions. Gluten-free cookies, brownies, quick breads, or muffins are great starting points because their texture is often more forgiving. Look for gluten-free recipes specifically labeled “beginner-friendly” from reputable sources to ensure they’ve been tested for optimal results.
Do I need to use multiple types of gluten-free flours, or can I stick to one blend?
While an all-purpose gluten-free flour blend is convenient and works for many recipes, understanding individual gluten-free flours can significantly elevate your baking. Different flours like oat, almond, or tapioca offer unique flavors, textures, and nutritional profiles, allowing for more tailored and delicious results in various gluten-free baked goods as you become more experienced.