Featured image for free standing rustic kitchen island ideas
Transform your kitchen with free standing rustic kitchen islands that blend timeless charm with practical functionality—no renovation required. From reclaimed wood carts to vintage-inspired designs with open shelving, these versatile pieces add warmth, storage, and style, making them a perfect upgrade for farmhouse, cottage, or eclectic spaces.
Key Takeaways
- Choose reclaimed wood: Opt for sustainable, weathered materials to enhance rustic charm effortlessly.
- Add open shelving: Display cookware and decor for a functional, inviting focal point.
- Mix textures: Combine metal accents with wood for authentic, tactile appeal.
- Prioritize mobility: Select islands with casters for easy repositioning and flexibility.
- Embrace imperfections: Highlight natural flaws in materials for genuine rustic character.
- Use neutral tones: Stick to earthy colors to harmonize with existing kitchen palettes.
📑 Table of Contents
- Why a Free Standing Rustic Kitchen Island is the Heart of Your Home
- What Makes a Kitchen Island “Rustic”? Key Design Elements
- Top 5 Free Standing Rustic Kitchen Island Ideas (With Real-World Examples)
- How to Choose the Right Size, Shape, and Placement
- Storage Solutions: Maximize Function Without Losing Style
- Finishing Touches: Lighting, Seating, and Decor
- Comparing Rustic Island Materials: A Quick Reference
- Final Thoughts: Make It Yours
Why a Free Standing Rustic Kitchen Island is the Heart of Your Home
There’s something undeniably warm and inviting about a rustic kitchen. It feels lived-in, cozy, and full of character—like the kind of space where memories are made over shared meals and late-night conversations. If you’re looking to upgrade your kitchen without a full renovation, a free standing rustic kitchen island might be the perfect solution. It’s more than just extra counter space; it’s a statement piece that can transform the entire vibe of your room.
I remember visiting a friend’s farmhouse-style home last winter. The centerpiece? A weathered wood island with a butcher block top and iron legs. Her kids were perched on stools, helping her roll out pie crusts, while the scent of cinnamon and apples filled the air. That moment stuck with me—not because of the pie, but because the island wasn’t just functional. It was a gathering place, a conversation starter, and a symbol of home. That’s the magic a well-chosen free standing rustic kitchen island can bring.
What Makes a Kitchen Island “Rustic”? Key Design Elements
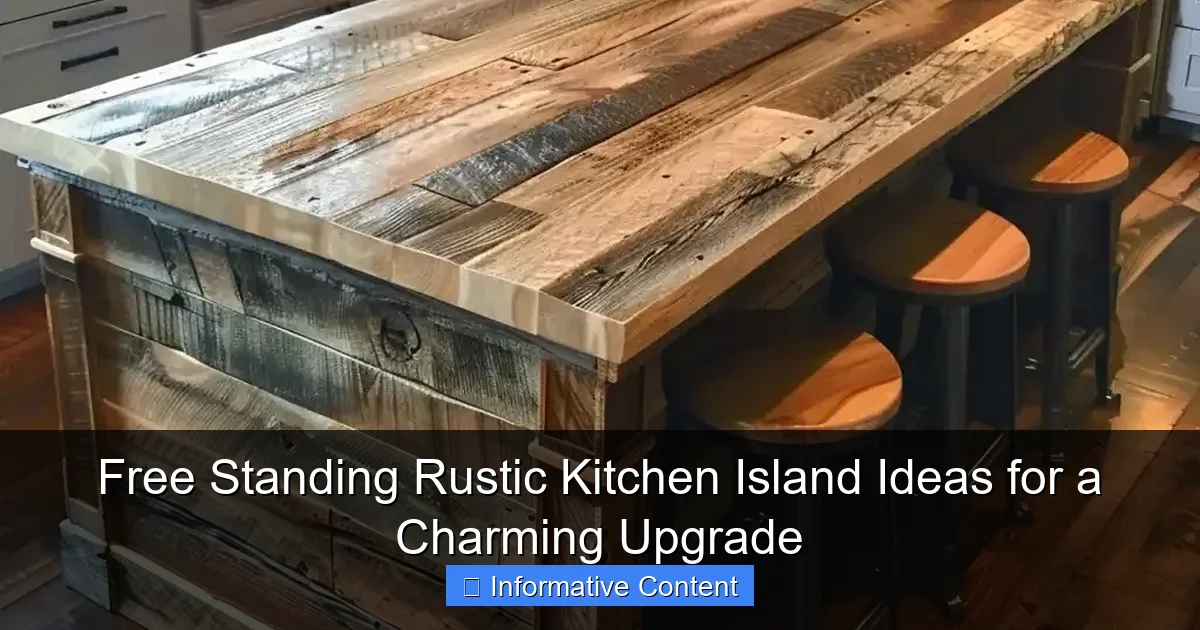
Before diving into specific ideas, let’s break down what gives a kitchen island its rustic charm. It’s not just about using old wood or adding a few barn-style details. Rustic design is a feeling—a blend of natural materials, weathered textures, and timeless craftsmanship. When you’re choosing or building a free standing rustic kitchen island, focus on authenticity and character.
Visual guide about free standing rustic kitchen island ideas
Image source: woodworkly.com
Materials That Define Rustic Style
- Reclaimed wood: Nothing says rustic like wood with a past. Reclaimed barn wood, old fence planks, or salvaged floorboards add history and texture. Look for knots, grain patterns, and subtle imperfections—these aren’t flaws, they’re features.
- Butcher block countertops: These offer a warm, natural surface perfect for food prep. Opt for maple, walnut, or cherry, and let the wood age naturally or finish with food-safe oil for protection.
- Metal accents: Wrought iron legs, rivets, or hardware add an industrial edge that balances the softness of wood. Blackened steel or matte black iron works especially well.
- Stone or concrete: While less common in free standing models, a concrete top or stone inlay can add rugged elegance. Just keep weight in mind—concrete islands can be heavy.
Design Details That Add Character
It’s the little things that make a rustic island feel authentic. Think of it like a well-worn leather jacket—each scuff tells a story.
- Distressed finishes: Light sanding, wire brushing, or even a bit of white washing can mimic years of wear.
- Open shelving: Display mason jars, cast iron skillets, or vintage enamelware. Open storage keeps things accessible and adds visual interest.
- Farmhouse sink integration: If you’re up for it, a deep, apron-front sink in fireclay or copper can be a stunning addition.
- Hand-forged hardware: Look for drawer pulls and knobs made from iron, bronze, or even repurposed farm tools.
Pro tip: Don’t overdo it. One or two standout details—like a reclaimed wood top with iron legs—are enough to set the tone. Too many rustic elements can feel cluttered or theme-park-ish.
Top 5 Free Standing Rustic Kitchen Island Ideas (With Real-World Examples)
Now that we know what makes a rustic island tick, let’s explore five practical, inspiring ideas you can adapt to your space. These aren’t just pretty pictures—they’re real solutions for real kitchens, big and small.
1. The Salvaged Barn Wood Island with Iron Base
This is the classic. Picture a thick, uneven top made from reclaimed barn wood, supported by sturdy iron legs or a black metal frame. The wood might have nail holes, faded paint, or even a few old carvings—each adding to the story.
Why it works: It’s visually striking, durable, and full of personality. The iron base keeps it from feeling too heavy, while the wood brings warmth.
Best for: Medium to large kitchens with a farmhouse or industrial-rustic vibe. Works well in open-concept homes where the island acts as a room divider.
DIY tip: You can buy reclaimed wood from salvage yards or online marketplaces. Sand lightly—don’t over-polish. Seal with tung oil for a natural, matte finish.
2. The Butcher Block Cart with Open Shelving
Think of this as a rustic kitchen island on wheels. A thick butcher block top sits on a simple wooden frame with open shelves below. Add casters (lockable ones!) for mobility.
Why it works: It’s flexible. Roll it out when you need extra prep space, then tuck it against a wall when not in use. The open shelves are perfect for storing cutting boards, mixing bowls, or your favorite cookbooks.
Best for: Small kitchens, apartments, or anyone who wants a movable island without a permanent footprint.
Pro tip: Choose casters rated for at least 200 pounds. And don’t forget to oil the butcher block every few months—it’ll last longer and look better.
3. The Vintage Dresser Turned Island
Yes, really. An old wooden dresser—especially one with dovetail joints or a marble top—can become a stunning island. Just add a new countertop (butcher block or stone) and maybe a backsplash.
Why it works: It’s a sustainable, budget-friendly option with built-in storage. The drawers are perfect for utensils, linens, or small appliances.
Best for: Cottages, vintage-style kitchens, or anyone who loves upcycling. Bonus points if you keep the original hardware.
Watch out: Make sure the dresser is structurally sound. Reinforce the frame if needed, and seal the wood to prevent warping from kitchen humidity.
4. The Concrete-Top Island with Wooden Frame
For a more modern-rustic look, pair a smooth concrete top with a rough-sawn wood base. The contrast is striking—industrial meets earthy.
Why it works: Concrete is heat-resistant, easy to clean, and ages beautifully. The wood base softens the look, making it feel less cold.
Best for: Kitchens with a contemporary edge or those that need a durable, low-maintenance surface.
DIY tip: You can buy pre-cast concrete countertops or make your own using a mold and concrete mix. Just be sure to seal it properly to prevent staining.
5. The Multi-Level Island with Bar Seating
This one’s for entertainers. A raised section (usually 42 inches high) with bar stools on one side, and a lower prep area on the other. Use different materials—like a stone top for the bar and butcher block for the prep zone—to define the spaces.
Why it works: It creates a natural gathering spot. Guests can sit and chat while you cook, and the lower section is perfect for rolling dough or chopping veggies.
Best for: Large kitchens or open layouts where the island is a focal point.
Pro tip: Make sure the bar overhang is at least 10–12 inches so knees don’t hit the base. And choose stools that match the rustic vibe—wood and iron are ideal.
How to Choose the Right Size, Shape, and Placement
A free standing rustic kitchen island should enhance your space, not dominate it. Getting the size, shape, and placement right is crucial—especially in smaller kitchens.
Measuring Your Space: The Golden Rule
- Leave at least 36–42 inches of clearance around the island on all sides. You need enough room to open cabinets, drawers, and the dishwasher without bumping into the island.
- For seating: Allow 24–30 inches per person at a bar or overhang. If you have stools, make sure they can tuck under when not in use.
- Island size: A good rule of thumb is that the island should take up no more than 10% of your kitchen’s total floor space. For a 100 sq ft kitchen, that’s about 10 sq ft—roughly 3×3 feet.
Shape Matters: Rectangular vs. Square vs. L-Shaped
- Rectangular: Best for most kitchens. It maximizes counter space and fits well in long, narrow layouts.
- Square: Works in compact spaces. A 3×3 ft island is perfect for a galley kitchen.
- L-shaped: Great for corner placement or when you need extra storage. Just make sure the “L” doesn’t block traffic flow.
Placement Tips for Maximum Functionality
- Near the stove or sink: If you plan to use the island for prep, place it close to your main appliances. This keeps your work triangle efficient.
- Center of the room: In open kitchens, a centrally placed island creates a natural hub. Just ensure there’s enough space to move around it.
- Against a wall: For small spaces, a wall-mounted or backless island (like a cart) can add storage without blocking light.
Real talk: I once helped a neighbor fit an island into a 12×12 ft kitchen. We went with a 36-inch-wide rectangular model with open shelves. It gave her extra prep space, storage, and a place for her kids to do homework—all without making the room feel cramped.
Storage Solutions: Maximize Function Without Losing Style
A rustic kitchen island isn’t just for looks—it needs to work hard. The right storage solutions can keep your kitchen clutter-free while staying true to the rustic aesthetic.
Smart Storage Ideas That Blend In
- Deep drawers: Ideal for pots, pans, and baking sheets. Use wooden drawer fronts with iron pulls for a cohesive look.
- Open cubbies: Perfect for baskets of onions, potatoes, or cookbooks. Use woven baskets or wooden crates to enhance the rustic feel.
- Pull-out shelves: Great for spices, oils, or small appliances. They’re hidden when not in use, so they don’t ruin the clean lines.
- Lazy Susans: Use in corner cabinets or as a rotating spice rack. A wooden turntable with iron accents looks right at home.
- Wine rack or bottle storage: Add a built-in wine rack or a few hooks for hanging mugs or towels.
Hidden Storage for a Clean Look
Not everything needs to be on display. A rustic island can have secret compartments:
- False drawer fronts: A drawer that looks real but opens to reveal a trash can or recycling bin.
- Hinged countertop: Lift the butcher block to access a hidden compartment (great for storing rarely used items).
- Under-shelf hooks: Install small hooks under the countertop to hang kitchen towels or utensils.
Pro tip: Use soft-close hinges and drawer glides. They’re not visible, but they make a huge difference in daily use. No more slamming drawers!
Finishing Touches: Lighting, Seating, and Decor
The final details turn a functional island into a true centerpiece. Here’s how to add warmth, comfort, and personality.
Lighting That Sets the Mood
- Pendant lights: Hang 2–3 rustic pendants over the island. Look for wrought iron, mason jar, or Edison bulb styles. Aim for 30–36 inches between the countertop and the bottom of the fixture.
- Track lighting: For a more modern-rustic mix, use track lights with adjustable heads to highlight prep areas.
- Under-cabinet lighting: If your island has a backsplash or open shelves, add LED strips for a soft glow.
Choosing the Right Seating
- Bar stools: Wooden stools with iron frames match the rustic theme. Add leather or fabric cushions for comfort.
- Backless stools: Save space and keep the view clear. Look for stools with a footrest for ergonomics.
- Swivel seats: Great for chatting with guests while cooking.
Note: Measure the height of your island before buying stools. A 36-inch island needs 24-inch stools; a 42-inch bar needs 30-inch stools.
Decor That Tells a Story
- Centerpiece: A wooden bowl with apples, a potted herb garden, or a vintage scale adds charm.
- Textiles: A woven runner, linen placemats, or a hand-thrown ceramic pitcher bring texture.
- Personal touches: Display family photos in rustic frames, or hang a chalkboard for grocery lists.
Comparing Rustic Island Materials: A Quick Reference
Choosing materials can be overwhelming. Here’s a simple table to compare the most common options for your free standing rustic kitchen island.
| Material | Pros | Cons | Best For |
|---|---|---|---|
| Reclaimed Wood | Unique character, eco-friendly, ages beautifully | Can be expensive, may need sealing | Statement tops, vintage kitchens |
| Butcher Block | Warm, food-safe, easy to DIY | Needs regular oiling, can stain | Prep areas, small islands |
| Concrete | Durable, heat-resistant, modern-rustic look | Heavy, can crack, needs sealing | High-traffic kitchens, bar seating |
| Wrought Iron | Strong, timeless, pairs well with wood | Can rust, less comfortable for sitting | Bases, legs, hardware |
| Stone (e.g., slate, granite) | Natural, heat-resistant, low maintenance | Expensive, heavy, can be slippery | High-end rustic, farmhouse sinks |
Final Thoughts: Make It Yours
A free standing rustic kitchen island isn’t just a piece of furniture—it’s an investment in your home’s soul. Whether you go for a reclaimed wood beauty, a vintage dresser makeover, or a sleek concrete-top model, the key is to choose something that feels authentic to you. It should be practical, yes, but also a place where you want to linger.
I’ll never forget that pie-making moment in my friend’s kitchen. The island wasn’t perfect—the wood was scarred, the legs slightly uneven—but it was alive with memories. That’s the power of rustic design. It doesn’t need to be flawless to be beautiful. It just needs to feel like home.
So, take your time. Measure twice, dream big, and don’t be afraid to mix old and new. A little imperfection? That’s character. A few scuffs? That’s life. When you find (or build) the right island, you’re not just upgrading your kitchen—you’re creating a new heart for your home.
Frequently Asked Questions
What are some popular materials for free standing rustic kitchen islands?
Reclaimed wood, distressed pine, and butcher block countertops are top choices for achieving an authentic rustic look. These materials add warmth and character while being durable enough for daily kitchen use.
How can I incorporate storage into a free standing rustic kitchen island?
Opt for open shelving, wire baskets, or antique-style cabinets to blend functionality with rustic charm. Adding hooks for utensils or towel racks maximizes utility without sacrificing style.
Are free standing rustic kitchen islands easy to move or relocate?
Yes, their freestanding design allows for easy repositioning, making them ideal for renters or those who like to refresh their kitchen layout. Just ensure the island has sturdy casters or a lightweight base for effortless mobility.
What size should my rustic kitchen island be for optimal use?
Measure your kitchen space to allow at least 36–42 inches of clearance around the island for comfortable movement. A 30×48-inch island is a popular choice for small to medium kitchens, while larger spaces can accommodate 4×6-foot islands.
Can I DIY a free standing rustic kitchen island on a budget?
Absolutely! Salvage old furniture like dressers or barn doors and repurpose them into a custom island. Pair with affordable hardware and a DIY butcher block top to save costs while creating a unique focal point.
How do I style a rustic kitchen island to enhance its charm?
Add vintage-inspired barstools, mason jar lighting, or a farmhouse sink to amplify the rustic vibe. Decorate with woven baskets, fresh herbs, or a wooden cutting board for a lived-in, inviting feel.