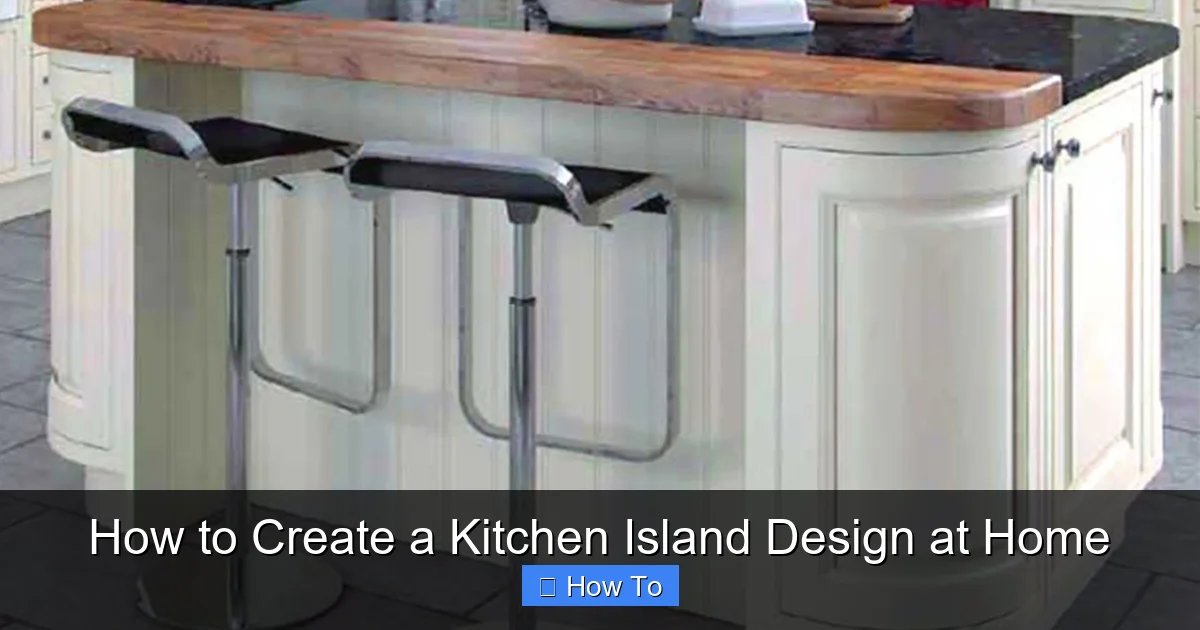
Featured image for this comprehensive guide about how to create a kitchen island
Image source: advice.diy-kitchens.com
How to Create a Kitchen Island Design at Home
The kitchen, often called the heart of the home, is where culinary magic happens, families gather, and memories are made. As living spaces evolve, the demand for multifunctional and stylish kitchens has skyrocketed. At the center of this transformation often sits the humble, yet incredibly versatile, kitchen island. More than just an extra countertop, a well-designed island can revolutionize your kitchen's functionality, aesthetics, and overall flow.
Perhaps you’ve found yourself yearning for more prep space while chopping vegetables, a dedicated spot for the kids to do homework while you cook, or an inviting area for guests to mingle during parties. If you’ve ever scrolled through Pinterest, admiring beautiful kitchen setups, chances are a stunning island caught your eye. The good news? You don't necessarily need to embark on a full-scale renovation or hire expensive contractors to achieve this dream. With a bit of planning, the right tools, and a dash of DIY spirit, you can learn how to create a kitchen island that perfectly suits your needs and style, right in your own home.
This comprehensive guide will walk you through every step of the journey, from initial planning and design choices to the actual construction and finishing touches. Whether you’re a seasoned DIY enthusiast or a motivated beginner, we’ll provide actionable tips, insights, and expert advice to help you successfully create a kitchen island that becomes the focal point of your home. Get ready to roll up your sleeves and embark on a rewarding project that will not only enhance your kitchen but also add significant value to your home!
Quick Answers to Common Questions
What's the very first step to create a kitchen island?
Start by assessing your kitchen's available space. Measure carefully to ensure your new kitchen island won't make the area feel cramped and will allow for comfortable movement around it.
Do I really need a detailed plan to create a kitchen island?
Absolutely! Sketching out your desired kitchen island design, including dimensions, features like storage or seating, and material choices, is crucial for a smooth building process.
What are some common materials used when you create a kitchen island?
You can use everything from base cabinets for a solid foundation, to lumber for custom framing, and various countertop materials like butcher block or laminate. Choose materials that fit your style and budget for your custom kitchen island.
How do I decide on the right size for my new kitchen island?
Consider both the available floor space and your intended use. A good rule of thumb is to leave at least 36-42 inches of clearance around your kitchen island for easy movement and appliance access.
Is creating a kitchen island a DIY project a beginner can tackle?
With proper planning, the right tools, and a bit of patience, creating a kitchen island can definitely be a rewarding DIY project! Many resources and pre-made components can help simplify the process.
📋 Table of Contents
- Why a Kitchen Island? Unveiling the Benefits
- Planning Your Perfect Kitchen Island: The Foundation of Success
- Design & Material Choices: Bringing Your Vision to Life
- Step-by-Step Construction Guide: Building Your Dream Island
- Electrical, Plumbing, and Finishing Touches: The Details That Matter
- Safety, Maintenance, and Maximizing Your Island's Potential
- Common Kitchen Island Dimensions and Clearances
- Conclusion
Why a Kitchen Island? Unveiling the Benefits
Before diving into the nuts and bolts of construction, let's solidify why investing time and effort into a kitchen island design is such a brilliant idea. The benefits extend far beyond just extra counter space, transforming your kitchen into a more efficient, enjoyable, and attractive environment.
Learn more about how to create a kitchen island - How to Create a Kitchen Island Design at Home
Image source: cochaser.com
- Expanded Workspace: This is arguably the most immediate and appreciated benefit. A kitchen island provides a dedicated surface for meal prep, baking, or simply staging dishes before serving. No more cramped countertops or jostling for space!
- Increased Storage: Most islands incorporate cabinets, drawers, or open shelving beneath the countertop. This translates to invaluable storage for pots, pans, small appliances, cookbooks, or even a hidden waste bin. A well-designed custom kitchen island can significantly declutter your main kitchen cabinets.
- Casual Seating & Dining Area: With an overhang, your island can transform into a breakfast bar or a casual dining spot. This is perfect for quick meals, entertaining guests, or providing a comfortable perch for family members to chat while you cook. It fosters a more social kitchen environment.
- Defined Zones & Flow: In open-plan living spaces, an island naturally defines the kitchen area, separating it from the dining or living room without creating physical barriers. It improves the "kitchen triangle" by optimizing the flow between the sink, refrigerator, and range.
- Central Hub for Entertaining: Islands naturally draw people in. They become a central point for serving appetizers, setting up a buffet, or simply gathering around during parties. It’s an ideal spot for guests to relax and engage with the host.
- Enhanced Aesthetics & Home Value: A beautifully designed DIY kitchen island acts as a focal point, adding a touch of sophistication and style to your kitchen. Beyond the visual appeal, a functional and attractive kitchen island can significantly increase your home's resale value, appealing to potential buyers looking for modern, well-equipped kitchens.
- Appliance Integration: Islands offer an opportunity to integrate additional appliances like a prep sink, a dishwasher, a microwave drawer, or even a wine fridge, further boosting your kitchen's functionality.
Considering these numerous advantages, it's clear that a well-executed kitchen island construction project is a worthwhile endeavor for almost any home.
| Key Aspect | Considerations / Options | Estimated DIY Cost Range | Estimated DIY Time |
|---|---|---|---|
| Planning & Design | Determine size, layout (storage, seating), desired features, and workflow. Sketch plans and measure space accurately. | $0 - $50 (for measuring tools, graph paper) | 4 - 8 hours |
| Base Structure & Cabinets | Use new or reclaimed base cabinets, build a custom wood frame, or combine. Ensure it's level and securely anchored to the floor. | $300 - $1500 (pre-made cabinets, lumber, hardware) | 8 - 24 hours |
| Countertop Selection & Installation | Laminate (most affordable), butcher block (DIY-friendly), or more expensive options like granite/quartz (often require professional cutting/install). | $100 - $800 (laminate or butcher block slabs) | 4 - 12 hours (for DIY-friendly materials) |
| Electrical & Plumbing (Optional) | Adding a sink, dishwasher, or electrical outlets usually requires professional installation to meet safety codes and prevent costly errors. | $500 - $2500+ (professional labor, materials, permits) | 0 hours (professional work advised) |
| Finishing & Aesthetics | Apply paint or stain, add decorative trim, toe kicks, end panels, and install hardware (knobs/pulls) for a polished look. | $50 - $300 (paint, primer, trim, hardware) | 6 - 18 hours |
Planning Your Perfect Kitchen Island: The Foundation of Success
The success of your how to create a kitchen island project hinges entirely on thorough planning. Skimping on this stage can lead to costly mistakes, functional issues, and aesthetic disappointments. Take your time to measure, conceptualize, and budget effectively.

Learn more about how to create a kitchen island - How to Create a Kitchen Island Design at Home
Image source: 4.bp.blogspot.com
Assessing Your Space and Layout
Before you even think about designs, you need to understand your kitchen's existing layout and dimensions. The most critical factor is ensuring adequate clearance around the island. For comfortable movement, industry standards recommend:
- Minimum Clearance: At least 36 inches (approx. 90 cm) of clear space around all sides of the island.
- Recommended Clearance: Ideally, 42-48 inches (approx. 105-120 cm) for high-traffic areas or if you plan to have seating.
Use painter's tape on the floor to mark out the proposed dimensions of your island. Walk around it, open cabinet doors and appliances, and ensure there's enough room. A common mistake is to build an island that's too large, making the kitchen feel cramped rather than spacious. The island should complement, not overwhelm, your kitchen.
Defining Your Island's Purpose
What primary functions will your custom kitchen island serve? This decision will heavily influence its size, design, and features.
- Main Prep Area: If primarily for chopping and mixing, you'll need ample counter space.
- Eating/Dining Area: Requires an overhang for knee space (typically 12-18 inches for comfortable seating) and possibly a lower height.
- Storage Hub: Focus on cabinets, drawers, and shelving.
- Cooking Zone: If including a stovetop, you'll need power, proper ventilation, and heat-resistant countertops.
- Washing Station: A prep sink requires plumbing lines.
- Combination Island: Most islands serve multiple purposes, but prioritize the most important ones.
Knowing your island's main purpose will guide your material and feature selections for your kitchen island design.
Budgeting for Your Island Project
A detailed budget will help manage expectations and avoid overspending. When planning to build a kitchen island, consider these cost components:
- Materials for the Base: Lumber, plywood, cabinet carcasses.
- Countertop Material: This can be the most significant expense.
- Finishing Materials: Paint, stain, trim, hardware (handles, pulls).
- Appliances: Sink, faucet, stovetop, microwave, disposal, wine fridge.
- Electrical and Plumbing: If adding utilities, factor in professional installation costs (highly recommended for safety and code compliance).
- Tools: If you don't own them already (e.g., circular saw, drill, level).
- Miscellaneous: Fasteners, adhesive, sandpaper, safety gear.
A DIY kitchen island project can save you significant money on labor, often 30-50% compared to professional installation, but be realistic about material costs.
Design & Material Choices: Bringing Your Vision to Life
With your planning complete, it's time to delve into the exciting part: making your kitchen island design aesthetically pleasing and highly functional. This involves selecting the right materials for the base and countertop, and integrating smart storage solutions.
Countertop Considerations
The countertop is the most visible and heavily used part of your island. Choose a material that suits your budget, style, and functional needs. Here are popular options:
- Quartz: Engineered stone, highly durable, non-porous (stain-resistant), wide range of colors and patterns. Mid-to-high price point.
- Granite: Natural stone, very durable, heat-resistant, unique patterns. Requires sealing. Mid-to-high price point.
- Butcher Block: Warm, natural wood surface. Excellent for food prep (can be cut on), but requires regular oiling and sealing to prevent water damage. Mid-range price. A popular choice for a DIY kitchen island.
- Laminate: Most affordable option, wide variety of patterns and colors, easy to clean. Less durable against heat and scratches. Low price point.
- Stainless Steel: Industrial look, very durable, heat-resistant, hygienic. Can scratch and show fingerprints. High price point.
- Concrete: Customizable, modern aesthetic, durable. Can be poured in place or pre-fabricated. Requires sealing. Mid-to-high price point.
When selecting your kitchen island countertop, consider how it will complement your existing kitchen countertops and overall decor. Do you want it to match or offer a contrasting focal point?
Base Cabinetry and Frame Options
The base provides the structure, support, and often the storage for your island. You have several options for building a kitchen island base:
- Pre-made Cabinets: The simplest approach for a DIY kitchen island. You can purchase standard base cabinets (like wall cabinets) from home improvement stores, arrange them back-to-back or in a line, and secure them together. This provides instant storage and a sturdy foundation.
- Custom Framing with Lumber: For a truly custom size or shape, you can construct a frame using 2x4s or 2x6s, similar to framing a wall. This method offers ultimate flexibility but requires more carpentry skill. You'll then clad the frame with plywood or drywall before finishing.
- Furniture-Style Base: For a more elegant look, consider using existing dressers, bookcases, or even sturdy tables as a base. These can be modified, painted, and topped with a new countertop.
- Mobile Carts: If you need flexibility, a sturdy kitchen cart on wheels can serve as a smaller, movable island.
Think about the island's style – do you want it to blend seamlessly with your existing cabinets, or stand out as a unique piece of furniture? This decision will guide your choice of base materials and finishes.
Storage and Feature Ideas
Maximize the utility of your kitchen island design by incorporating smart storage and features:
- Drawers: Essential for utensils, linens, and small appliances.
- Shelves: Open shelving can display cookbooks or decorative items, while closed shelving is great for larger kitchen items.
- Pull-out Bins: Perfect for recycling or trash.
- Wine Rack: A built-in wine rack adds a touch of sophistication.
- Microwave Nook: Keep your microwave off the main counters by integrating it into the island.
- Charging Station: Integrate outlets and USB ports for devices.
- Bookshelf: A small section for cookbooks or kids' activity books.
These thoughtful additions turn a simple island into a powerful command center for your kitchen.
Step-by-Step Construction Guide: Building Your Dream Island
Now, let’s get into the practical steps of how to create a kitchen island. This section will guide you through the actual construction process, assuming you’re building a fixed island with a cabinet or framed base.
Tools and Materials You'll Need
Gathering your tools and materials before you start will make the process much smoother for your kitchen island construction:
- Measuring Tape & Pencil: For accurate measurements.
- Level: Crucial for ensuring a plumb and level structure.
- Circular Saw or Miter Saw: For cutting lumber and plywood.
- Drill/Driver: For pre-drilling and driving screws.
- Wood Screws & Construction Adhesive: For securing components.
- 2x4 Lumber: For framing (if not using pre-made cabinets).
- Plywood or MDF: For cladding the frame and creating cabinet boxes.
- Cabinet Carcasses: If using pre-made bases.
- Shim Stock: For leveling.
- Jigsaw: For cutting out sink or stovetop openings (if applicable).
- Safety Glasses & Gloves: Always prioritize safety!
Building the Base Structure
- Mark the Layout: Use painter's tape on the floor to mark the exact footprint of your island, based on your planning. Double-check all clearances.
- Assemble Cabinets (if using): If using pre-made cabinets, place them in their intended positions. Secure them to each other using cabinet screws through the face frames or side panels. Ensure they are plumb and level using shims as needed.
- Construct Frame (if building from scratch):
- Cut 2x4s to create a rectangular base frame the exact dimensions of your island.
- Assemble the base frame using wood screws, ensuring it's square.
- Position the base frame on your marked layout on the floor.
- Build vertical studs from 2x4s at each corner and at regular intervals (every 16-24 inches) along the length. Secure them to the base frame.
- Add a top frame using 2x4s, connecting it to the vertical studs. This forms the skeletal structure.
- Add cross-bracing as needed for stability.
- Clad the frame with plywood or MDF, securing it with screws or nails.
- Secure to the Floor: For a permanent island, secure the base to the floor. If you have a concrete slab, use concrete anchors. If you have a wood subfloor, screw directly into the joists where possible. Use "L" brackets or toe-kicking methods to fasten the base securely. Ensure you're not drilling into any existing electrical or plumbing lines.
- Add Backing & Supports: If you plan an overhang for seating, add sturdy 2x4 supports cantilevered from the frame, or use steel support brackets, to support the countertop.
Installing the Countertop
This is often a two-person job, especially for heavy stone countertops.
- Prepare the Base: Ensure the top surface of your island base is perfectly level. Use shims if necessary.
- Templates (for custom cuts): If you have an irregular shape or need sink/stovetop cutouts, your countertop fabricator will usually create a precise template. For simpler shapes, you can make your own template from cardboard.
- Lift and Position: Carefully lift the countertop onto the base. Align it precisely, ensuring any overhangs are even.
- Secure the Countertop:
- Wood/Laminate/Butcher Block: Use wood screws driven up through the island's base frame or cabinet top panels into the underside of the countertop. Be careful not to use screws that are too long!
- Stone (Granite/Quartz): These are usually secured using silicone adhesive in strategic spots, allowing for slight expansion and contraction. Follow the manufacturer’s or fabricator’s recommendations.
- Cutouts (if applicable): If your countertop material allows for DIY cutting (like butcher block or laminate), use a jigsaw or router with a fine-tooth blade to create openings for sinks or cooktops. Always measure twice and cut once!
You're well on your way to enjoying your new home kitchen island!
Electrical, Plumbing, and Finishing Touches: The Details That Matter
Integrating utilities and adding the final aesthetic elements are crucial steps that elevate your kitchen island design from functional to fantastic. This stage often requires careful attention to detail and, for safety reasons, professional assistance for electrical and plumbing work.
Electrical Wiring for Outlets and Appliances
Adding electrical outlets to your island is incredibly convenient for small appliances, charging devices, or even a built-in microwave. However, working with electricity is dangerous and subject to strict building codes. It is highly recommended to hire a licensed electrician for this part of your how to create a kitchen island project.
- Planning Outlet Placement: Determine where you need outlets – typically on the side panels or ends, never directly on the countertop where water exposure is a risk. Consider pop-up outlets for a sleek look.
- Dedicated Circuits: Major appliances like a stovetop or oven will require their own dedicated circuits. Smaller appliances and general outlets can share.
- Conduit and Wiring: The electrician will run appropriate gauge wiring through conduit from your main electrical panel to the island, ensuring all connections are safe and up to code.
- GFCI Protection: Outlets near a sink or within reach of water should always be GFCI (Ground Fault Circuit Interrupter) protected for safety.
Plumbing for Sinks and Dishwashers
If your custom kitchen island includes a prep sink, full sink, or dishwasher, plumbing installation is necessary. Like electrical work, this is best left to a licensed plumber to ensure proper water supply, drainage, and code compliance, preventing leaks and water damage.
- Water Supply Lines: Hot and cold water lines will need to be run from existing plumbing to the island.
- Drainage System: A P-trap and drain line are essential for wastewater removal, connecting to your home's main drain system. Proper venting is also critical to prevent clogs and odors.
- Dishwasher Connection: If installing a dishwasher, it will require both hot water supply and a drain connection.
Adding Trim, Paint, and Hardware
Once the utilities are in and inspected, it's time to bring your island to life with aesthetic finishes.
- Trim and Moldings: Add baseboard molding around the bottom of the island, and decorative trim (e.g., chair rail, crown molding) to the sides or around the countertop edge. This gives a professional, built-in look to your DIY kitchen island.
- Sanding and Priming: Thoroughly sand all wood surfaces. Apply a good quality primer, especially if you're painting, to ensure excellent adhesion and a smooth finish.
- Painting or Staining:
- Paint: Choose a durable, washable paint suitable for kitchen environments. Apply multiple thin coats, sanding lightly between coats for a flawless finish. Consider a contrasting color to make your island pop, or match it to your existing cabinetry for a cohesive look.
- Stain: If using a natural wood base, apply wood conditioner before staining for an even absorption, then apply your chosen stain. Finish with several coats of polyurethane for protection.
- Hardware Installation: Attach cabinet handles, pulls, and hinges. This is where personal style really shines through. Ensure all hardware is aligned and level.
- Caulking and Sealing: Caulk any gaps between the island and the floor, or between trim pieces, for a clean, finished look. If you have a natural stone countertop, ensure it’s properly sealed according to the manufacturer’s recommendations.
These finishing touches will make your new kitchen island truly feel like a custom-designed piece.
Safety, Maintenance, and Maximizing Your Island's Potential
Congratulations! You've successfully learned how to create a kitchen island. Now, let's ensure it remains safe, beautiful, and fully functional for years to come, while also exploring ways to make the most of your new kitchen centerpiece.
Important Safety Considerations
- Electrical and Plumbing: As emphasized, always hire licensed professionals for any new electrical wiring or plumbing. Incorrect installations pose significant fire, shock, or water damage risks. Ensure all work is inspected and up to local building codes.
- Stability: A fixed island must be securely anchored to the floor to prevent tipping, especially if it will have an overhang or be used for seating. A wobbly island is a dangerous island.
- Clearance: Reiterate the importance of maintaining adequate clearance around the island. This isn't just about comfort; it's about safe movement, especially when carrying hot dishes or navigating with children.
- Heat Protection: If your island includes a cooktop, ensure proper ventilation is installed. Always use trivets or hot pads to protect your kitchen island countertop from extreme heat.
- Sharp Edges: If you have young children, consider rounded edges for countertops to minimize injury risk.
Maintaining Your Kitchen Island
Proper care will extend the life and beauty of your custom kitchen island:
- Countertop Care: Follow the manufacturer's recommendations for your specific countertop material. Butcher block needs regular oiling, natural stone requires periodic sealing, while quartz and laminate are relatively low maintenance. Always clean up spills promptly.
- Base Cleaning: Wipe down the island's base regularly with a damp cloth and mild cleaner. Touch up any paint chips or scratches as needed.
- Hardware: Periodically tighten screws on cabinet pulls and hinges.
- Check for Leaks: If you have plumbing in your island, regularly check beneath the sink for any signs of leaks.
Maximizing Your Island's Potential
Your new island is a blank canvas for productivity and enjoyment. Here are some ideas to truly make the most of it:
- Organizational Systems: Invest in drawer organizers, pull-out shelves, or cabinet inserts to keep your island's storage neat and efficient.
- Creative Lighting: Add pendant lights above the island to define the space, provide task lighting, and enhance the ambiance.
- Seasonal Decor: Use the island as a display area for seasonal decorations, fresh flowers, or a fruit bowl to add a touch of charm to your kitchen.
- Homework & Craft Station: With comfortable stools, the island can serve as an impromptu desk for homework or a creative space for crafts.
- Home Office Nook: Consider a discreet drawer for office supplies or a charging station for laptops and tablets if you sometimes work from the kitchen.
- Party Central: Designate a specific section of the island for drinks, appetizers, or desserts during gatherings to create a dedicated entertaining zone.
By keeping safety in mind, committing to regular maintenance, and getting creative with its use, your kitchen island design will serve as a cherished and integral part of your home for many years to come.
Common Kitchen Island Dimensions and Clearances
To aid in your planning, here’s a helpful table outlining common dimensions and recommended clearances for kitchen island designs. These are general guidelines, and your specific needs and kitchen size may lead to slight variations.
| Aspect | Minimum Recommendation | Standard Recommendation | Notes |
|---|---|---|---|
| Clearance Around Island | 36 inches (90 cm) | 42-48 inches (105-120 cm) | Crucial for traffic flow and opening appliances. Wider for high-traffic or seating areas. |
| Island Depth | 24 inches (60 cm) | 24-48 inches (60-120 cm) | Determined by purpose; 24" for single-sided cabinets, 48" for back-to-back. |
| Island Length | 48 inches (120 cm) | 60-84 inches (150-210 cm) | Should be proportionate to kitchen size; consider countertop slab limits for stone. |
| Countertop Overhang (Seating) | 12 inches (30 cm) | 15-18 inches (38-45 cm) | Essential for comfortable knee room. Ensure adequate support for overhangs. |
| Countertop Height (Standard) | 36 inches (90 cm) | 36 inches (90 cm) | Matches standard kitchen counter height for seamless workspace. |
| Countertop Height (Bar Height) | 42 inches (105 cm) | 42 inches (105 cm) | For higher bar stools, often a raised section. |
Conclusion
Embarking on the journey to create a kitchen island might seem daunting at first, but as you've seen, with careful planning, attention to detail, and a willingness to learn, it's a deeply rewarding project. From defining its purpose and selecting the perfect materials to the hands-on construction and the final, personal touches, each step brings you closer to a kitchen that truly reflects your lifestyle and needs.
Your new custom kitchen island won't just be an additional surface; it will be a dynamic hub for cooking, dining, entertaining, and daily life. It's a testament to your vision and effort, adding not only immense functionality and beauty but also significant value to your home. We hope this comprehensive guide has empowered you with the knowledge and confidence needed to tackle your own DIY kitchen island project.
So, take the first step, sketch out your ideas, gather your tools, and get ready to transform your kitchen into the efficient, stylish, and welcoming heart of your home you've always dreamed of. Happy building!
🎥 Related Video: Here’s how to build your own kitchen island! #kitchenremodel #homeimprovement #diyhome #kitchenreno
📺 Charleston Crafted
Frequently Asked Questions
What’s the first step in creating a kitchen island at home?
The initial step is thorough planning, which involves measuring your available space and clearly defining the primary function of your kitchen island. This foundational design phase helps determine the ideal size, layout, and specific features you’ll need.
Is building my own kitchen island a project a DIY beginner can tackle?
Many DIY kitchen island projects are indeed suitable for beginners, especially if you plan to use pre-made cabinet bases or adapt existing furniture. The complexity scales with features; a simple island for extra counter space is much easier than one requiring plumbing or electrical work.
How much does it typically cost to create a kitchen island yourself?
The cost to create a kitchen island can vary significantly, from a few hundred dollars for basic builds using repurposed materials to several thousand for more elaborate designs with custom countertops and integrated appliances. Your budget should account for lumber, countertop materials, hardware, and any finishing supplies.
What essential tools and materials will I need to build a kitchen island?
You’ll typically need basic tools like a tape measure, level, drill, saw (circular or miter), and appropriate safety gear. Key materials often include lumber (plywood, 2x4s), cabinet hardware, your chosen countertop material, and finishing supplies such as paint or stain.
How do I determine the best design and size for my kitchen island?
Consider your kitchen’s existing layout and maintain at least 36-42 inches of clearance around the island for comfortable movement. Think about its primary function—storage, seating, prep—and integrate features like shelves, drawers, or a breakfast bar to create a design that fits your needs.
Can I add electrical outlets or plumbing to my DIY kitchen island?
Yes, you can add electrical outlets or plumbing, but these features significantly increase the project’s complexity and may require professional assistance and permits. For both, ensure proper safety protocols are followed and consider the necessary supply and drain lines for plumbing connections.