
Featured image for this comprehensive guide about how to extend kitchen island with legs
Image source: i.pinimg.com
How to Extend Kitchen Island with Legs Ideas
Is your kitchen island feeling a little cramped? Do you dream of more counter space for meal prep, a dedicated spot for casual dining, or simply more room to spread out during family gatherings? You’re not alone! Many homeowners find their existing kitchen islands fall short of their evolving needs, especially in today’s open-plan living spaces where the kitchen often serves as the heart of the home.
Rather than embarking on a costly, full-scale kitchen renovation, there’s a practical, stylish, and surprisingly achievable solution: learning how to extend kitchen island with legs. This brilliant DIY or professionally-assisted project can transform your kitchen’s functionality and aesthetics, adding valuable real estate without the disruption and expense of tearing out and replacing your entire island. Imagine the possibilities – a larger surface for baking, a cozy breakfast bar, or an expanded work zone – all by intelligently adding new support and surface area to your existing structure.
This comprehensive guide will walk you through everything you need to know about successfully undertaking this exciting home improvement project. From crucial planning considerations and material selection to a detailed step-by-step installation process and creative design ideas, we’ll equip you with the knowledge and confidence to seamlessly extend your kitchen island with legs, creating a more spacious, functional, and beautiful kitchen environment.
Quick Answers to Common Questions
Why would I want to extend my kitchen island with legs?
Extending your island with legs is a fantastic way to add extra seating, provide more counter space for meal prep, or simply enhance its style, transforming your kitchen’s focal point.
What kind of legs should I look for when extending a kitchen island?
Choose legs that complement your existing island’s design and material, ensuring they are strong enough to support the new extension. Solid wood or sturdy metal legs are popular, durable choices.
How do I actually attach new legs when extending a kitchen island?
You’ll typically connect the new legs to a sturdy subframe or directly to the underside of your new countertop extension. Use robust mounting plates and screws for a secure, long-lasting build.
Do I need a new countertop piece to extend my kitchen island with legs?
Most likely, yes! You’ll need a new section of countertop to create the extended surface, which will then sit beautifully atop your newly installed legs.
How can I make sure my extended kitchen island with legs is super stable?
Focus on using heavy-duty hardware for attachment and ensure the legs are securely fastened to both the extension and, if possible, the existing island. This creates a solid, wobble-free surface for your new space.
📋 Table of Contents
- Why Extend Your Kitchen Island? Unlocking More Space and Functionality
- Planning Your Island Extension: Key Considerations Before You Start
- Step-by-Step Guide: How to Extend Kitchen Island with Legs Safely
- Creative Extension Ideas: Beyond the Basics
- Common Challenges and Troubleshooting Tips
- Maintaining Your Extended Island: Longevity and Care
- Conclusion
Why Extend Your Kitchen Island? Unlocking More Space and Functionality
The decision to extend your kitchen island with legs often stems from a desire to enhance various aspects of your kitchen’s utility and design. Understanding these motivations can help you clarify your project goals and ensure the extension perfectly meets your needs.

Learn more about how to extend kitchen island with legs – How to Extend Kitchen Island with Legs Ideas
Image source: woodfixes.com
The Allure of Extra Countertop Space
Perhaps the most immediate benefit of an island extension is the significant increase in usable countertop space. Modern kitchens are demanding, requiring ample room for chopping, mixing, plating, and even entertaining. An extended island provides:
| Extension Method | Leg Material/Style | Estimated Material Cost | DIY Difficulty |
|---|---|---|---|
| Simple Countertop Overhang Support | Solid wood (e.g., maple, oak), tapered or straight | $150 – $400 (legs, hardware, small countertop piece) | Moderate (requires precise cutting, secure attachment) |
| Attached Freestanding Table Section | Metal industrial pipe, painted wood, custom turned | $200 – $600 (legs, tabletop, mounting brackets) | Moderate to High (building new surface, strong bracing) |
| Integrated Dining/Bar Extension | Premium chrome steel, brushed brass, thick carved wood | $300 – $800+ (designer legs, custom large countertop) | High (often custom fabrication, heavy materials, perfect leveling) |
| Budget-Friendly Plywood/MDF Extension | Basic pine furniture legs, adjustable metal legs | $75 – $250 (plywood/MDF, basic legs, paint/veneer) | Easy to Moderate (straightforward assembly, finishing adds complexity) |
- Expanded Prep Area: More room to spread out ingredients, cutting boards, and small appliances, making meal preparation more efficient and enjoyable.
- Dedicated Appliance Zone: A perfect spot for your coffee machine, toaster, or stand mixer, keeping your main counters clutter-free.
- Buffet Service: An ideal surface for serving food and drinks when hosting, allowing guests easy access without crowding the main cooking zones.
Studies show that a well-designed kitchen can increase home value by 3-7%, and added functionality through extensions like these certainly contributes to that appeal.
Boosting Storage and Seating Potential
Beyond surface area, an island extension can dramatically improve your kitchen’s overall functionality:
- Additional Seating: One of the most popular reasons to add legs to kitchen island is to create a breakfast bar or casual dining area. This provides extra seating without needing a separate dining table, perfect for quick meals, homework, or socialising.
- Integrated Storage: Depending on the design, the extension can incorporate new cabinetry, open shelving, or even wine racks beneath the new countertop, providing much-needed storage for kitchen essentials.
Enhancing Kitchen Flow and Aesthetics
A thoughtfully executed island extension isn’t just about utility; it can also profoundly impact the look and feel of your kitchen:
- Improved Traffic Flow: A larger island, particularly one extended to create a defined eating or work zone, can help guide movement through the kitchen, preventing bottlenecks.
- Aesthetic Upgrade: A custom extension can be a design statement, seamlessly blending with your existing island or introducing a complementary style that elevates the entire kitchen’s decor. It offers an opportunity to refresh your kitchen’s look without a complete overhaul.
- Increased Perceived Value: A larger, more versatile island instantly makes your kitchen feel more luxurious and well-appointed, which can be a significant draw for potential buyers if you ever decide to sell.
Planning Your Island Extension: Key Considerations Before You Start
Successful execution of how to extend kitchen island with legs hinges on meticulous planning. Rushing this stage can lead to costly mistakes and a less-than-ideal outcome. Take your time to consider every detail.
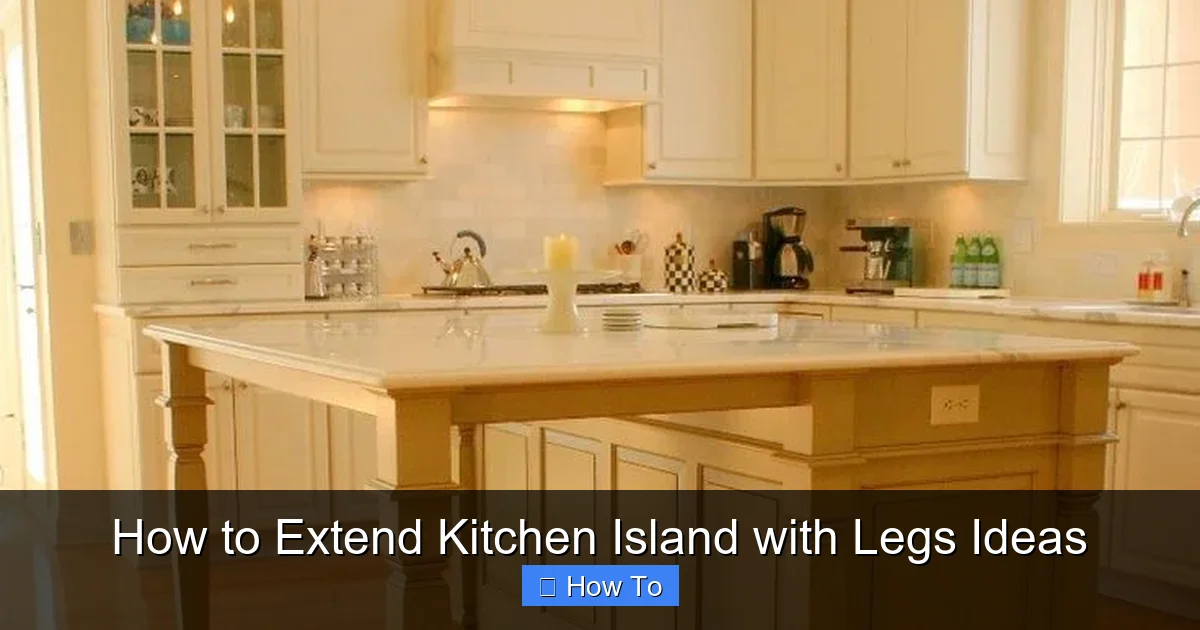
Learn more about how to extend kitchen island with legs – How to Extend Kitchen Island with Legs Ideas
Image source: i.pinimg.com
Assessing Your Current Island Structure
Before you begin, thoroughly examine your existing island. Is it a fixed, built-in unit, or a movable cart? What is its primary construction material (wood, particle board, metal frame)? You’ll need to understand how the existing countertop is secured and if the base cabinet or frame is robust enough to support an extension. For a permanent extension, you’ll likely be attaching to the existing island’s cabinet structure.
Measuring for Success: Dimensions and Proportions
Precision is paramount. Decide on the desired length and width of your extension. Consider:
- Walkways: Ensure you maintain at least 36 inches (ideally 42 inches) of clear walkway around the extended island for comfortable movement.
- Seating Clearance: If adding a breakfast bar, plan for 24-30 inches of width per person and 12-15 inches of overhang for comfortable leg room.
- Proportion: The extension should look balanced with your existing island and the overall kitchen space. A common mistake is to make the extension disproportionately large or small.
Sketch out your ideas, measure multiple times, and even use painter’s tape on the floor to visualize the new footprint.
Choosing the Right Legs: Style, Material, and Support
The legs are central to this project, both structurally and aesthetically. When considering kitchen island legs, think about:
- Material: Wood (oak, maple, cherry, pine) is popular for its versatility and warmth. Metal legs (steel, wrought iron) offer an industrial or modern look. Acrylic legs can provide a contemporary, almost invisible touch.
- Style: Tapered, turned, square, or custom carved – the leg style should complement your kitchen’s existing cabinetry and design theme.
- Strength and Stability: The legs must be sturdy enough to support the weight of the new countertop and any activities that will occur on it (e.g., leaning, cutting). Look for solid wood or heavy-gauge metal. For larger extensions, consider an additional support beam or even a central leg.
- Height: Standard counter height is 36 inches, while bar height is typically 42 inches. Ensure your chosen legs will achieve the desired finished height when combined with your new countertop thickness.
Matching Materials and Finishes
To create a seamless look, try to match the new countertop material and finish with your existing island. If an exact match isn’t possible (e.g., discontinued granite), consider a complementary material that contrasts tastefully, perhaps a butcher block or a different quartz pattern that pulls colors from your existing scheme. For the legs, aim to match or complement your existing island’s base cabinetry color or wood stain.
Budgeting for Your Extension Project
Costs can vary widely depending on materials, size, and whether you DIY or hire professionals. Here’s a general breakdown:
- Countertop Material: Can range from $20-$100+ per square foot for laminate to quartz/granite. Butcher block is a mid-range option.
- Island Legs: Typically $30-$200+ per leg, depending on material and craftsmanship.
- Support Framing & Hardware: $50-$200 for lumber, brackets, screws, and adhesive.
- Tools: If you don’t own them, factor in costs for saws, drills, levels, etc.
- Professional Help: If hiring, labor costs can add significantly, but ensure a professional finish.
A realistic budget helps avoid surprises and ensures you can afford quality materials for your kitchen island extension with legs.
Step-by-Step Guide: How to Extend Kitchen Island with Legs Safely
Once your planning is complete, it’s time to get hands-on. This step-by-step guide will help you understand how to extend kitchen island with legs safely and effectively.
Gathering Your Tools and Materials
Before you start, ensure you have all necessary items:
- New countertop section (cut to size)
- Kitchen island legs (2-4, depending on extension size)
- Lumber for a support frame (e.g., 2x4s or 2x6s)
- Drill/driver with various bits
- Measuring tape and pencil
- Level (long and short)
- Circular saw or jigsaw (if cutting your own countertop or support frame)
- Screws (wood screws for framing, longer screws for leg attachment, counter-sinking screws)
- Heavy-duty construction adhesive (e.g., Liquid Nails)
- Clamps (bar clamps or C-clamps)
- Safety glasses and gloves
- Sanding paper and wood filler/putty (if matching finishes)
- Caulk or sealant (for countertop seams)
Preparing Your Existing Island
The first step is to prepare the area where the new extension will attach. This might involve:
- Clearing the Area: Remove all items from your island.
- Cleaning: Thoroughly clean the underside and edges of your existing countertop and island base where the extension will connect.
- Marking: Use your measurements to mark the exact attachment points on your existing island’s base for the new support frame. Ensure these marks are level.
Attaching the Support Frame
This frame will be the backbone of your extension, providing a stable surface for the new countertop and a secure place to attach the legs.
- Cut Frame Pieces: Cut your 2x4s or 2x6s to create a sturdy frame that matches the dimensions of your new countertop section. This frame should be slightly smaller than the countertop to allow for an overhang.
- Assemble Frame: Assemble the frame using wood screws, ensuring it is perfectly square and level.
- Attach to Island: Using strong wood screws, attach the assembled frame to the side or back of your existing island’s cabinet or frame. Use a level extensively to ensure it’s perfectly horizontal and flush. If attaching to a cabinet, screw into the cabinet stiles or sturdy cross members for maximum hold. Consider using L-brackets for added reinforcement.
Installing the New Countertop Section
Carefully place your new countertop section onto the support frame. Ensure it’s perfectly aligned and has the desired overhang on all sides. Secure the countertop to the frame using:
- Construction Adhesive: Apply a generous bead of heavy-duty construction adhesive along the top of the support frame before placing the countertop.
- Countertop Fasteners: Depending on the countertop material and frame, use specialized fasteners (e.g., L-brackets, Z-clips) screwed into the underside of the countertop and into the support frame. If drilling through the countertop from above (e.g., for butcher block), pre-drill and countersink holes, then fill with plugs or wood filler.
Use clamps to hold the countertop firmly in place while the adhesive cures.
Securing the Legs
Now it’s time to add legs to kitchen island.
- Position Legs: Carefully position each leg at the outer corners of your new countertop extension, ensuring they are plumb (perfectly vertical) using a level.
- Attach Legs: There are several ways to attach legs:
- Mounting Plates: Many decorative legs come with pre-drilled mounting plates. Screw these plates securely to the underside of the support frame and into the countertop if possible. Then, attach the legs to the plates.
- Direct Attachment: For solid wood legs, you can often pre-drill pilot holes through the top of the leg and into the support frame/countertop, then secure with long, heavy-gauge screws. Always use washers.
- Brackets: Use sturdy metal L-brackets to attach the top of the leg to the underside of the support frame for extra stability.
- Check Stability: Once all legs are attached, gently shake the extension to check for any wobbling. Tighten all screws and add more fasteners if necessary.
Finishing Touches and Sealing
The final steps ensure a beautiful and durable finish.
- Seam Treatment: If your new countertop abuts an existing one, caulk the seam with a color-matched silicone caulk for a watertight and seamless transition.
- Finishing Legs: If your legs are raw wood, sand them smooth and apply stain, paint, or sealant to match your kitchen’s aesthetic.
- Clean Up: Wipe away any excess adhesive or caulk immediately.
Creative Extension Ideas: Beyond the Basics
Extending your island doesn’t have to be a simple rectangular addition. Here are some innovative ways to expand kitchen island functionality and style:
The Breakfast Bar Extension
This is arguably the most popular extension. By adding legs and a slightly raised or lower countertop section to one side of your island, you create a perfect spot for stools. This can be at standard counter height (36 inches) or a dedicated bar height (42 inches), offering a comfortable perch for casual meals, coffee, or quick conversations.
Integrated Storage Solutions
Don’t just add a top; think vertically! Design your extension so that it includes open shelving beneath the new countertop for cookbooks or decorative items, or add small base cabinets for extra storage of pots, pans, or seldom-used appliances. This approach maximizes utility while seamlessly blending with the existing island’s storage.
Mobile Extensions for Flexibility
For those who need flexibility, consider an extension that isn’t permanently fixed. This could involve a sturdy butcher block top on locking casters that can be pulled out from under the main island (if space allows) and then supported by legs when in use. This “hideaway” island extension offers dynamic functionality, easily reconfigured for different needs.
Multi-Level Island Designs
Create visual interest and distinct zones by designing a multi-level extension. For example, one section could remain at counter height for prep, while an adjacent section (supported by legs) is raised to bar height for seating, or even lowered to a table height for a more formal dining experience within the kitchen. This layered approach adds depth and sophisticated design.
Common Challenges and Troubleshooting Tips
While the process of extending a kitchen island with legs is manageable for many DIYers, certain challenges can arise. Being prepared can save you time and frustration.
Ensuring Stability and Weight Distribution
The biggest concern for any island extension is stability. A wobbly extension is not only annoying but also dangerous.
Troubleshooting:
- Reinforce Connections: Always use appropriate screws and construction adhesive. If attaching to particle board, use toggle bolts or ensure screws penetrate solid wood framing.
- Leg Placement: Ensure legs are placed at the outermost corners of the extension for maximum support. For very long extensions (over 4-5 feet), consider a third or even fourth leg, or a robust apron/skirt frame.
- Check for Plumb and Level: Use your level frequently during assembly. Legs that aren’t plumb will compromise stability.
Seamless Transitions Between Surfaces
Achieving a smooth, professional-looking seam where the new countertop meets the old can be tricky, especially with stone or solid surface materials.
Troubleshooting:
- Professional Seaming: For granite, quartz, or solid surface, it’s highly recommended to have a professional fabricator handle the cut and installation of the new piece, as they have specialized tools for precise cuts and epoxy color-matching for invisible seams.
- Caulking: For laminate or butcher block, a high-quality, color-matched silicone caulk is essential for sealing the seam against moisture and creating a finished look. Clean the area thoroughly before applying.
- Butt Joints vs. Overhangs: Sometimes, simply creating an overhang on the new section over the old can visually minimize the seam.
Dealing with Uneven Floors
Many homes, especially older ones, have slightly uneven floors. This can make a perfectly level island extension a challenge.
Troubleshooting:
- Adjustable Feet: Many island legs come with or can be fitted with adjustable leveling feet. These are invaluable for fine-tuning the height.
- Shims: If adjustable feet aren’t an option, discreetly use wood shims under the legs to achieve perfect level. Secure shims permanently with adhesive once the desired level is achieved.
- Start Level: Ensure your existing island and the initial support frame are perfectly level before attaching anything else.
When to Call a Professional
While DIY is empowering, know your limits. You might want to hire a professional if:
- You’re dealing with very expensive or delicate materials (e.g., granite slab).
- The extension requires rerouting electrical outlets or plumbing.
- You lack confidence in your carpentry skills for structural stability.
- The project is complex, involving intricate joinery or custom fabrication.
Even for a DIY project, consulting with a professional for specific aspects (like countertop fabrication) can be a smart move to ensure a high-quality finish for your DIY kitchen island extension.
Maintaining Your Extended Island: Longevity and Care
Once you’ve successfully completed your project to extend kitchen island with legs, proper maintenance will ensure its beauty and functionality endure for years to come.
Regular Cleaning and Protection
- Countertop Care: Follow manufacturer guidelines for cleaning your specific countertop material. For most surfaces, a mild soap and water solution is sufficient. Avoid abrasive cleaners or harsh chemicals that can damage the finish.
- Legs and Base: Dust and wipe down the legs and base cabinetry regularly. If painted, touch up any chips or scratches. If stained wood, consider applying a furniture polish or wax periodically to maintain its luster.
- Cutting Boards and Trivets: Always use cutting boards for food prep and trivets for hot pots and pans to protect your new countertop from scratches and heat damage.
Addressing Wear and Tear
Even with careful use, wear and tear are inevitable. Promptly addressing minor issues can prevent them from becoming major problems:
- Loose Connections: Periodically check all screws and fasteners, especially where the legs attach to the frame and the frame to the original island. Tighten any that have come loose.
- Seam Integrity: Inspect the seam between your old and new countertop sections. If the caulk is cracking or pulling away, clean the area and reapply new caulk to prevent moisture infiltration.
- Wood Damage: For wooden legs or countertops, promptly repair any dings, scratches, or water marks. Sanding and re-finishing small areas can restore their appearance.
Future-Proofing Your Investment
Consider these tips to maximize the lifespan and utility of your extended island:
- Sealant: Ensure all porous surfaces (like natural stone or butcher block) are properly sealed upon installation and re-sealed regularly according to product recommendations. This protects against stains and moisture.
- Regular Inspections: A quick visual inspection every few months can help you catch potential issues before they escalate. Look for any signs of water damage, instability, or unusual wear.
- Adaptability: Think about future needs. Could your extension easily be re-purposed? For instance, if you added a breakfast bar, could it later accommodate small storage cubbies if your needs change?
By investing a little time in maintenance, your newly extended kitchen island will remain a beautiful and functional centerpiece of your home for many years to come.
Conclusion
Learning how to extend kitchen island with legs is a fantastic way to revitalize your kitchen without the immense cost and disruption of a full renovation. It’s a project that offers a remarkable return in terms of added functionality, aesthetic appeal, and increased enjoyment of your home’s most social space.
Whether you’re yearning for more prep area, a dedicated breakfast nook, or simply a more expansive surface for entertaining, adding a well-supported extension with carefully chosen legs can transform your current island into the versatile centerpiece you’ve always wanted. By taking the time to plan meticulously, select the right materials, and follow a systematic approach, you can achieve a professional and durable result that seamlessly integrates with your existing kitchen design.
Embrace the possibilities of a larger, more functional kitchen island. With the actionable tips and detailed guidance provided here, you’re well on your way to successfully undertaking this rewarding home improvement project and enjoying the expanded heart of your home.
Frequently Asked Questions
Why should I consider extending my kitchen island with legs?
Extending your kitchen island with legs can significantly increase usable counter space, providing more room for food prep, dining, or entertaining. It’s a fantastic way to update your kitchen’s functionality and aesthetic without a full renovation, often creating a more open and inviting feel.
What kind of legs are best to extend a kitchen island?
The best legs for extending a kitchen island depend on your existing island’s style and your desired aesthetic. Options include sturdy wooden legs (matching or contrasting finishes), sleek metal legs for an industrial or modern look, or decorative turned legs for a more traditional feel. Ensure they are robust enough to support the extended countertop and any planned seating.
How do you securely attach new legs when you extend a kitchen island?
Securely attaching new legs to extend a kitchen island often involves using sturdy mounting plates, L-brackets, or specialized hardware that connects the legs directly to the underside of the new countertop section and potentially the existing island structure. Proper alignment, strong fasteners, and considering the weight distribution are crucial for stability and safety.
How can I ensure the extended portion with legs matches my existing kitchen island?
To ensure a seamless look when you extend your kitchen island with legs, try to match the countertop material, color, and thickness as closely as possible to your existing island. For the legs themselves, you can either match the cabinetry’s finish, paint them to complement your kitchen’s palette, or choose a contrasting material that creates an intentional and cohesive design statement.
Is extending a kitchen island with legs a DIY project, or should I hire a professional?
While a handy DIYer can tackle extending a kitchen island with legs, it requires careful planning, precise measurements, and strong structural attachment for safety. If you’re unsure about carpentry, securing heavy countertops, or ensuring long-term stability, hiring a carpenter or kitchen remodeler is advisable to ensure a professional and safe result.
What considerations should I make for the new countertop when extending my kitchen island with legs?
When extending your kitchen island with legs, select a countertop material that is either identical to your existing one or a complementary material that enhances the design, ensuring thickness matches for a unified look. Consider the weight of the new countertop section and ensure your chosen legs are robust enough to support it safely, especially if you plan to add an overhang for seating.