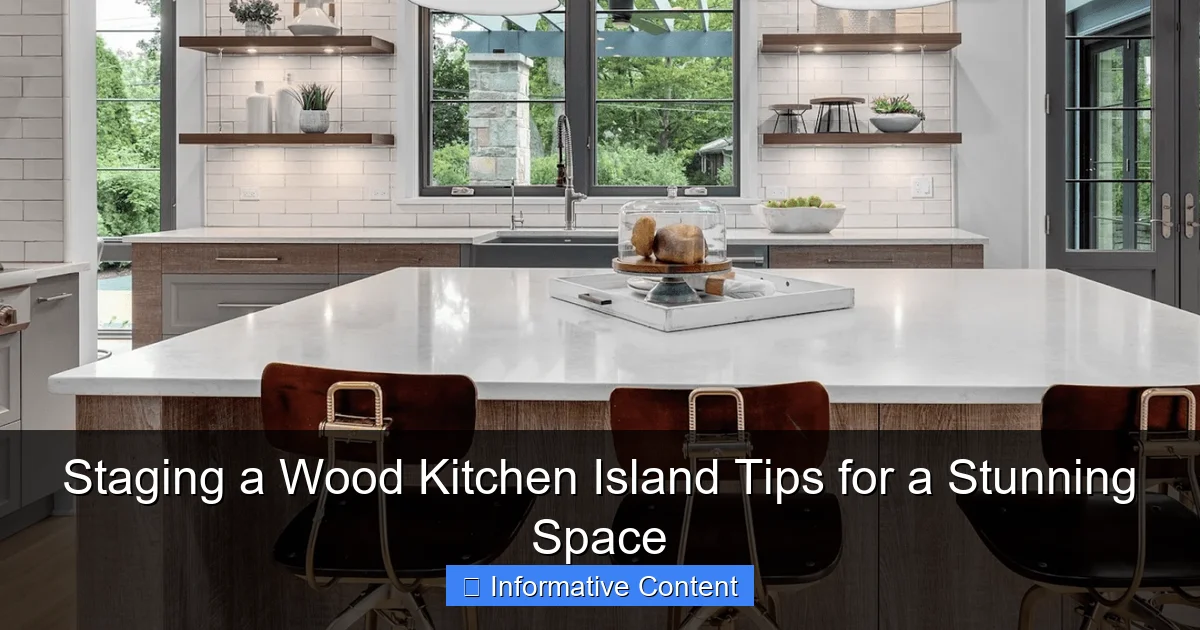
Featured image for staging a wood kitchen island
Image source: chsdesign.com
Staging a wood kitchen island begins with highlighting its natural grain and texture through strategic lighting and minimal, complementary decor. Keep countertops clutter-free with just a few curated items like a wooden cutting board, a small potted herb, or a stylish bowl to maintain warmth and functionality. This approach ensures the island remains the focal point while inviting both visual appeal and practical use.
Key Takeaways
- Declutter first: Clear the island to highlight its natural beauty and functionality.
- Embrace wood tones: Match decor to your island’s finish for visual harmony.
- Add functional decor: Use stylish baskets, trays, or cookbooks for practical appeal.
- Layer lighting: Combine overhead and under-island lights to enhance ambiance and use.
- Showcase textures: Pair wood with stone, metal, or textiles for depth and contrast.
- Keep it minimal: Avoid overcrowding—let the island’s craftsmanship take center stage.
📑 Table of Contents
- Why Staging a Wood Kitchen Island Matters
- 1. Understand the Power of a Wood Kitchen Island
- 2. Clear the Clutter: The #1 Rule of Staging
- 3. Lighting: The Secret Weapon for Wood Islands
- 4. Style with Texture and Contrast
- 5. Add Life with Greenery and Art
- 6. Maintenance Tips to Keep Your Island Looking Fresh
- Final Thoughts: Your Island, Your Story
Why Staging a Wood Kitchen Island Matters
Let’s be real—your kitchen is the heart of your home. It’s where coffee gets brewed, pancakes get flipped, and late-night conversations happen over a glass of water. So when it comes to staging your home for sale or just refreshing your space, the kitchen is a non-negotiable focal point. And if you’ve got a wood kitchen island, you’ve already got a leg up. Wood brings warmth, character, and timeless appeal. But here’s the catch: even the most beautiful wood island can fall flat if it’s not staged right.
I learned this the hard way during my first home staging project. I had a gorgeous reclaimed oak island, but it looked cluttered, cold, and—worst of all—forgettable. My realtor gently (but firmly) told me it was “too lived-in.” Ouch. But that moment taught me something crucial: staging a wood kitchen island isn’t about hiding its personality. It’s about amplifying it. Whether you’re selling your home or just want a kitchen that feels inviting, staging your island correctly can make all the difference. In this post, I’ll walk you through everything I’ve learned—what works, what doesn’t, and how to make your wood island the star of the room.
1. Understand the Power of a Wood Kitchen Island
Before we dive into the how-tos, let’s talk about why a wood kitchen island is such a powerful design element. Unlike stainless steel or quartz, wood has soul. It ages gracefully, tells a story, and adds a layer of authenticity that’s hard to replicate. But that doesn’t mean it’s always easy to style. Wood can feel heavy, rustic, or even dated if not handled with care. The key is understanding its strengths—and playing to them.

Visual guide about staging a wood kitchen island
Image source: atlaneandhigh.com
Wood vs. Other Materials: The Warmth Factor
Wood brings a warmth that synthetic materials can’t match. Think about it: when you walk into a kitchen with a wood island, you feel invited. It’s like a cozy hug. But that warmth can backfire if the space feels too dark or cluttered. For example, a deep walnut island in a small kitchen with low lighting can feel cave-like. So your goal isn’t to fight the warmth—it’s to balance it with light, texture, and openness.
- Pro tip: Pair your wood island with light-colored walls, under-cabinet lighting, or a large mirror to reflect natural light.
- Example: A client once had a rich cherry wood island in a galley kitchen. We added a white quartz countertop (just on the island) and a glass pendant light. The contrast made the island feel luxe, not heavy.
Embrace the Natural Grain
One of the best things about wood is its grain—the unique lines, knots, and patterns that make each piece one-of-a-kind. Instead of hiding these features, highlight them. Use a clear or light stain to let the wood speak for itself. Avoid heavy finishes that look plastic-y or overly glossy. A matte or satin sealant preserves the wood’s natural texture while protecting it.
- Real-life insight: I once saw a pine island with a thick, amber-colored varnish. It looked like it belonged in a 1970s cabin. After sanding and resealing with a natural oil, the same island looked fresh and modern.
- Bonus: If your wood has visible knots or imperfections, lean into them. They add character—just like a well-worn leather jacket.
2. Clear the Clutter: The #1 Rule of Staging
Here’s a hard truth: no matter how beautiful your wood island is, it won’t shine if it’s buried under clutter. I’ve seen islands with everything from spice racks to mail organizers, and it always ends the same way: the island looks like a dumping ground, not a design feature.
Declutter Like a Pro
Start by removing everything from the island. Yes, everything. Then, ask yourself: “Does this item belong here?” If it’s not used daily or doesn’t enhance the aesthetic, it’s out. Keep only essentials like a knife block, a fruit bowl, or a small plant. Even these should be curated—choose items that complement the wood’s tone and the room’s style.
- Example: A client kept a bulky coffee grinder and a stack of cookbooks on her island. We swapped them for a minimalist ceramic mug and a single cookbook (open to a beautiful photo). The island instantly felt more open and intentional.
- Pro tip: If you need storage, use baskets or trays to group items. A woven seagrass tray holds keys and mail without looking messy.
Create Zones (Without Overcrowding)
A kitchen island isn’t just for food prep—it’s a multi-functional space. But that doesn’t mean it should look like a mini-office. Create clear zones for prep, dining, and display, but keep each zone simple.
- Prep zone: A cutting board, a knife, and a small bowl for scraps (hidden under the counter).
- Dining zone: Two or three stools (more on those later) with a small centerpiece like a succulent or a candle.
- Display zone: A single statement piece—think a ceramic vase, a stack of art books, or a small sculpture.
Key takeaway: Less is more. A clutter-free island feels spacious and inviting, which is exactly what buyers (or guests) want.
3. Lighting: The Secret Weapon for Wood Islands
Lighting can make or break a wood kitchen island. Too much light? It feels sterile. Too little? It feels dark and heavy. The goal is to create a warm, layered glow that highlights the wood’s beauty without overpowering it.
Layer Your Lights
Think of lighting in three layers: ambient, task, and accent.
- Ambient: Overhead lights (like recessed cans or a ceiling fixture) set the base level of brightness. For a wood island, choose warm-toned bulbs (2700K-3000K) to enhance the wood’s warmth.
- Task: Pendant lights over the island are a must. They provide focused light for cooking and dining while adding style. For wood islands, choose pendants that complement the wood’s tone:
- Light wood (pine, birch): Try brass or gold fixtures.
- Medium wood (oak, maple): Go for black iron or matte black.
- Dark wood (walnut, mahogany): Opt for clear glass or white ceramic.
- Accent: Under-cabinet lighting or small LED strips under the island’s overhang add a subtle glow that makes the wood look rich and dimensional.
Size and Spacing Matter
When hanging pendants, remember: the island is the star, not the lights. Here’s how to get it right:
- For a 6-foot island, use two pendants (spaced 30-36 inches apart).
- For an 8-foot island, use three pendants (spaced 24-30 inches apart).
- Hang pendants 30-36 inches above the island’s surface (or 66-72 inches from the floor).
Real-life example: A friend had a long, dark walnut island with three oversized brass pendants. They were too big and too low, making the space feel cramped. We swapped them for smaller, matte black pendants and raised them by 6 inches. The island suddenly felt airy and balanced.
4. Style with Texture and Contrast
Wood is warm, but it can also be flat. To make your island pop, add texture and contrast through accessories, seating, and nearby elements. The goal is to create visual interest without competing with the wood’s natural beauty.
Mix Materials Wisely
Pair your wood island with contrasting materials to keep the space dynamic:
- Metal: A stainless steel range hood or brass hardware adds a modern edge.
- Stone: A marble backsplash or quartz countertop creates a luxe contrast.
- Textiles: A linen runner or a woven stool cushion adds softness.
Pro tip: Avoid matching the island’s wood tone exactly. For example, if your island is oak, don’t pair it with oak floors. Instead, go for a lighter or darker wood (like ash or ebony) to create contrast.
Choose the Right Stools
Stools are the unsung heroes of island staging. They define the dining zone, add style, and (most importantly) make the space feel usable. But choosing the wrong stools can throw off the whole look.
- Height: Counter-height stools (24-26 inches) for a standard 36-inch island; bar-height (28-30 inches) for a 42-inch island.
- Material: Match the stool’s material to the room’s style:
- Farmhouse: Woven or wood stools.
- Modern: Metal or acrylic stools.
- Eclectic: Mix materials (e.g., wood seats with metal legs).
- Color: Neutral tones (black, white, gray) let the wood island shine. For a bolder look, try a pop of color (like navy or rust).
Example: A client had a light pine island with four bulky, dark leather stools. We swapped them for two white metal stools and two woven ones. The mix felt lighter and more inviting.
5. Add Life with Greenery and Art
A wood kitchen island can feel heavy or static without a touch of life. That’s where greenery, art, and personal touches come in. These elements add energy, color, and a sense of home.
Greenery: Small but Mighty
Plants are the easiest way to soften a wood island. Choose low-maintenance options that thrive in kitchens:
- Succulents: Perfect for sunny spots (like near a window).
- Herbs: A small pot of basil or mint adds function and fragrance.
- Air plants: No soil needed—just pop them in a small dish or hang them from a wall nearby.
Pro tip: Avoid large plants that block sightlines. A single 6-inch succulent or a small herb trio is plenty.
Art and Personal Touches
Don’t underestimate the power of a small piece of art or a curated object. It adds personality and tells a story. Try:
- A framed print (nature scenes or abstract art work well).
- A vintage cutting board leaning against the backsplash.
- A stack of art books or a small sculpture.
Real-life insight: I once staged a home with a reclaimed wood island. We added a small, framed black-and-white photo of a forest—a nod to the wood’s origins. Buyers loved the connection.
6. Maintenance Tips to Keep Your Island Looking Fresh
Staging isn’t a one-time thing. To keep your wood kitchen island looking stunning, regular maintenance is key. Here’s how to protect and preserve it.
Daily Care
- Wipe spills immediately with a damp cloth.
- Use coasters for drinks and trivets for hot pots.
- Avoid harsh cleaners—stick to mild soap and water.
Seasonal Care
- Every 3-6 months, apply a food-safe wood oil or beeswax to nourish the wood.
- Check for scratches or water rings. Light scratches can often be buffed out with steel wool.
- Rotate stools and accessories to prevent wear patterns.
Long-Term Protection
- Reapply a clear sealant every 2-3 years (depending on use).
- Keep the island away from direct sunlight to prevent fading.
- Use felt pads under heavy appliances to prevent dents.
| Maintenance Task | Frequency | Product/Tool Needed |
|---|---|---|
| Wipe spills | Daily | Damp cloth, mild soap |
| Apply wood oil | Every 3-6 months | Food-safe oil (e.g., mineral oil, walnut oil) |
| Buff scratches | As needed | 0000 steel wool, oil |
| Reapply sealant | Every 2-3 years | Polyurethane or tung oil |
Final Thoughts: Your Island, Your Story
Staging a wood kitchen island isn’t about perfection—it’s about connection. It’s about creating a space that feels warm, functional, and uniquely yours. Whether you’re selling your home or just want to fall in love with your kitchen again, remember: the island is more than a surface. It’s a gathering spot, a conversation starter, and a reflection of your style.
So take the time to clear the clutter, layer the lights, and add a touch of green. Let the wood’s grain shine. And don’t forget to sit at your island with a cup of tea and admire your work. Because at the end of the day, the best-staged space is one that feels like home. And that’s something no buyer—or friend—can resist.
Frequently Asked Questions
How do I style a wood kitchen island to make it look modern?
To modernize a wood kitchen island, pair it with sleek bar stools, minimalist hardware, and metallic accents like brass or black iron. Keep clutter off the counter and add a bold fruit bowl or a single statement plant for a fresh, contemporary feel.
What color scheme works best when staging a wood kitchen island?
Neutral tones like white, gray, or beige complement natural wood grain, allowing its warmth to shine. For contrast, add muted blues or greens in textiles or decor to create a balanced, inviting space.
How can I highlight the wood grain when staging a wood kitchen island?
Use soft, directional lighting (like pendant lights) to cast subtle shadows that emphasize the texture. Avoid glossy finishes or busy decor that might distract from the island’s natural grain.
Should I add seating when staging a wood kitchen island?
Yes, stools or chairs in contrasting materials (e.g., leather, metal, or upholstered) add functionality and visual interest. Choose a height and style that complements the island’s design without overcrowding the space.
What decor items should I avoid when staging a wood kitchen island?
Skip bulky appliances, oversized decor, or mismatched items that distract from the island’s natural beauty. Stick to a few curated pieces like a tray, cookbook, or small greenery for a clean, intentional look.
How do I stage a small wood kitchen island without making it look cramped?
Use light-colored stools that tuck neatly underneath and opt for open shelving or glass jars to maintain visibility. A single centerpiece, like a small vase, keeps the surface uncluttered while adding charm.