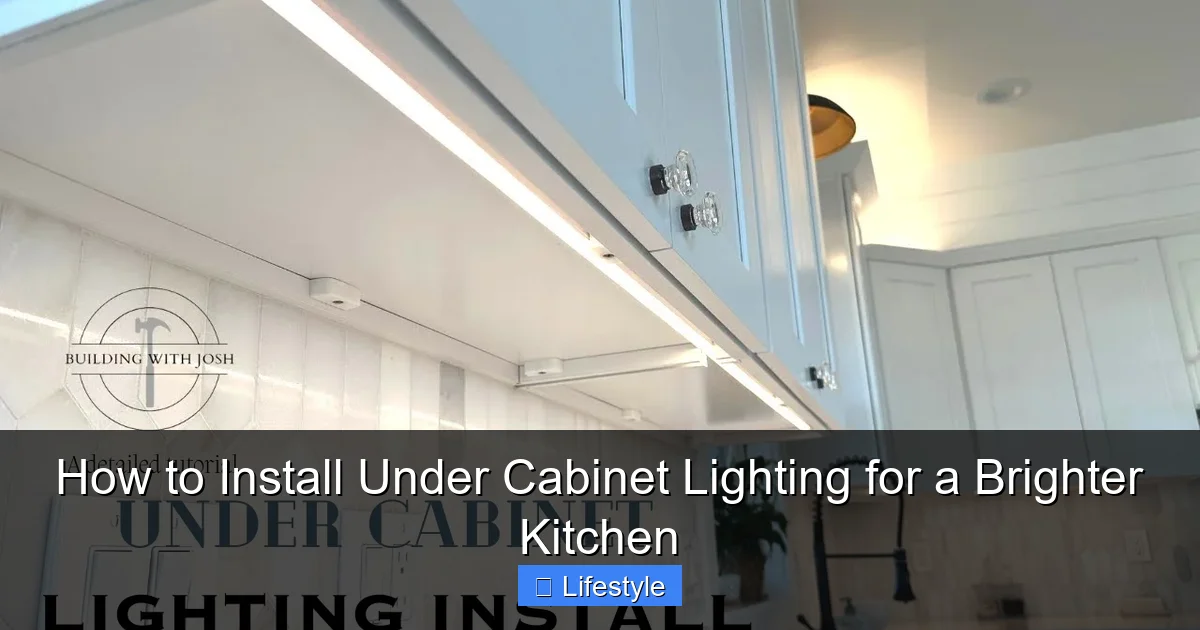
Featured image for this comprehensive guide about How to install under cabinet lighting
Image source: i0.wp.com
Is your kitchen feeling a little dim? Are you constantly squinting to chop vegetables, or finding shadows cast over your beautiful countertops? If so, you’re not alone. Many kitchens suffer from inadequate lighting, especially in task areas. But there’s a brilliant solution that’s both practical and aesthetically pleasing: under cabinet lighting.
This ingenious upgrade can transform your kitchen from functional to fabulous, providing focused task illumination where you need it most, while simultaneously adding a warm, inviting glow that elevates the entire space. It’s a surprisingly accessible home improvement project that yields significant results, making your kitchen more efficient, safer, and infinitely more appealing. Whether you’re a seasoned DIYer or just looking for a straightforward way to enhance your home, learning how to install under cabinet lighting is a skill worth acquiring.
In this comprehensive guide, we’ll walk you through everything you need to know, from choosing the perfect lighting system to the step-by-step installation process. Get ready to banish those countertop shadows and welcome a brighter, more beautiful kitchen!
Quick Answers to Common Questions
Is installing under cabinet lighting a difficult DIY project?
Not at all! Most modern **under cabinet lighting** systems are designed for easy DIY installation, often involving simple adhesive or a few screws, making it a satisfying weekend upgrade for your kitchen.
What are the main types of under cabinet lighting I should consider?
You’ll primarily choose between LED strip lights, puck lights, or light bars. LED strip lights offer continuous, even illumination, while puck lights provide focused spots, giving your **under cabinet lighting** a specific aesthetic.
Do I need an electrician to install under cabinet lighting?
For most low-voltage, plug-in, or battery-operated **under cabinet lighting** kits, absolutely not! However, if you plan to hardwire a system directly into your home’s electrical wiring, it’s best to consult or hire a professional electrician.
How do I power my new under cabinet lighting?
Your **under cabinet lighting** can be powered via a standard wall outlet with a plug-in adapter, hardwired directly into an existing electrical box, or some options even run on batteries for ultimate simplicity.
What’s the very first thing I should do before starting my under cabinet lighting installation?
The absolute first step is to measure your cabinets accurately and plan your layout! Knowing your dimensions ensures you purchase the correct length and number of **under cabinet lighting** fixtures for a perfect fit and even light distribution.
📋 Table of Contents
- Why Under Cabinet Lighting Matters: Benefits You Can’t Ignore
- Choosing the Right Under Cabinet Lighting System
- Essential Tools and Materials for Your Installation
- Step-by-Step Guide: How to Install Under Cabinet Lighting (Plug-in/DIY Focus)
- Step-by-Step Guide: Hardwired Under Cabinet Lighting Installation (Advanced Considerations)
- Troubleshooting Common Issues and Maintenance Tips
- Conclusion: Illuminate Your Kitchen with Confidence
Why Under Cabinet Lighting Matters: Benefits You Can’t Ignore
Under cabinet lighting isn’t just about adding more light; it’s about adding better light. It addresses common lighting deficiencies in kitchens and offers a multitude of benefits that enhance both the functionality and aesthetics of your space.
Learn more about How to install under cabinet lighting – How to Install Under Cabinet Lighting for a Brighter Kitchen
Image source: i0.wp.com
| Lighting Type | DIY Installation Effort | Avg. Material Cost (DIY) | Key Benefit / Feature |
|---|---|---|---|
| Flexible LED Strip Lights | Easy (Peel & Stick, plug-in transformer) | $5-$15 per linear foot | Continuous, customizable light; very low profile; dimmable options. |
| LED Puck Lights | Moderate (Mounting individual fixtures, hiding wires) | $15-$30 per fixture | Targeted spotlighting; ideal for accentuating specific areas; sleek design. |
| LED Bar/Panel Lights | Moderate to Advanced (Screwing in, potentially linking multiple units) | $20-$40 per linear foot | Uniform, bright illumination; professional look; many linkable options. |
| Battery-Operated Stick-On Lights | Very Easy (Peel & Stick, no wiring needed) | $10-$25 per pack/fixture | Ultimate convenience; no tools or wiring; ideal for renters or quick solutions. |
Enhanced Task Lighting
- Eliminates Shadows: Overhead lighting often casts shadows directly onto your work surfaces, making tasks like chopping, stirring, and reading recipes more difficult and less safe. Under cabinet lighting installation directly illuminates these areas, providing bright, even light precisely where it’s needed. This improves visibility and reduces eye strain.
- Improved Safety: A well-lit workspace is a safer workspace. Clear visibility reduces the risk of accidents with sharp utensils or hot surfaces.
- Increased Efficiency: When you can clearly see what you’re doing, you work more efficiently. This translates to a more enjoyable cooking and meal prep experience.
Atmospheric Accent Lighting
- Creates Ambiance: Beyond functionality, under cabinet lighting adds a beautiful glow that defines your kitchen’s aesthetic. It can highlight a decorative backsplash, make your countertops sparkle, and create a warm, inviting atmosphere, especially during evening hours.
- Elevates Design: Good lighting is a cornerstone of interior design. Installing under cabinet lighting can make your kitchen feel more upscale and thoughtfully designed, enhancing the overall appeal of the room. It’s an effective way to showcase your kitchen’s best features.
- Nightlight Functionality: Many homeowners use dimmable under cabinet lights as a subtle nightlight, providing enough illumination to navigate the kitchen without turning on bright overhead lights.
Increased Home Value & Appeal
- Modern Upgrade: Modern homebuyers often look for updated features. A well-lit kitchen with thoughtful lighting design, including under cabinet lights, is a significant selling point. According to a Houzz study, kitchen renovations consistently rank high for increasing home value.
- Perceived Value: Good lighting makes a space feel larger, cleaner, and more luxurious. This perception alone can significantly boost your home’s appeal to potential buyers.
Energy Efficiency
- LED Dominance: The vast majority of modern under cabinet lighting solutions utilize LED technology. LEDs are incredibly energy-efficient, using up to 80% less energy than traditional incandescent bulbs and lasting significantly longer (often 25,000 to 50,000 hours or more).
- Lower Utility Bills: By consuming less electricity, LED under cabinet lighting helps reduce your energy bills, making it an eco-friendly and cost-effective choice in the long run.
- Reduced Heat Output: LEDs produce very little heat compared to older lighting types, which is a benefit in a kitchen environment where temperatures can already rise during cooking.
Choosing the Right Under Cabinet Lighting System
Before you dive into how to install under cabinet lighting, it’s crucial to select the right system for your needs. The market offers a wide variety of options, each with its own pros and cons. Consider these factors carefully:
Learn more about How to install under cabinet lighting – How to Install Under Cabinet Lighting for a Brighter Kitchen
Image source: whatsabyte.com
Types of Lighting Fixtures
When it comes to the actual light source, LEDs are overwhelmingly the most popular and recommended choice for under cabinet lighting due to their efficiency and longevity.
- LED Strip Lights (Tape Lights):
- Pros: Extremely discreet, flexible, can be cut to length, provide continuous, even light. Available in various brightnesses and color temperatures. Easy to install under cabinet lighting with adhesive backing.
- Cons: Requires a power supply/driver. Can be sensitive to improper installation.
- Ideal for: Creating a seamless glow, highlighting backsplashes, DIY-friendly installations.
- LED Puck Lights:
- Pros: Small, circular lights that provide concentrated pools of light. Often available in battery-operated or plug-in versions, making them easy to install under cabinet lighting without complex wiring.
- Cons: Can create noticeable “hot spots” of light, not as uniform as strip lights.
- Ideal for: Spotlighting specific areas, small cabinets, budget-friendly options.
- LED Bar Lights (Linkable Fixtures):
- Pros: Self-contained fixtures, often plug-and-play or designed for easy hardwiring. Provide more robust light output than strip lights and are often more durable. Can be linked together for continuous runs.
- Cons: More visible than strip lights, may have gaps between bars if not properly linked.
- Ideal for: High-traffic task areas, more industrial or modern aesthetics, homeowners who prefer a self-contained unit.
- Fluorescent & Halogen (Less Common Now): While older kitchens might have these, they are largely superseded by LEDs due to higher energy consumption, heat output, and shorter lifespans. We strongly recommend sticking with LED for any new under cabinet lighting installation.
Powering Your Lights: Plug-in vs. Hardwired vs. Battery
This is a critical decision that impacts the complexity of your under cabinet lighting installation.
- Plug-in (Corded):
- Pros: Simplest to install under cabinet lighting for DIYers. No electrical wiring knowledge needed. Just plug into an existing outlet.
- Cons: Visible cords (though can be hidden with clips or cable raceways). Requires an available outlet nearby.
- Ideal for: Renters, budget-conscious projects, quick upgrades.
- Hardwired:
- Pros: Cleanest look with no visible cords. Can be controlled by a wall switch, dimmer, or even smart home system. Provides a permanent, professional finish.
- Cons: Requires electrical wiring knowledge and potentially routing new wiring. May require an electrician, especially if new circuits are needed. More complex to install under cabinet lighting.
- Ideal for: New kitchen builds, major renovations, homeowners seeking a fully integrated solution.
- Battery-Operated:
- Pros: Ultimate simplicity and flexibility. No cords or wiring needed. Can be placed virtually anywhere. Very easy to install under cabinet lighting.
- Cons: Batteries need frequent replacement, typically less bright than wired options, not ideal for continuous task lighting.
- Ideal for: Accent lighting in areas without outlets, small cabinets, temporary solutions, or very infrequent use.
Light Color Temperature (Kelvin)
The color temperature, measured in Kelvin (K), significantly impacts the mood of your kitchen.
- 2700K-3000K (Warm White): Similar to incandescent bulbs, this creates a cozy, inviting, and traditional feel.
- 3500K-4000K (Neutral/Cool White): A balanced light that is excellent for task lighting without being too stark. Often used in modern kitchens.
- 5000K-6000K (Daylight): Bright, crisp light that mimics natural daylight. Great for highly functional task areas where color accuracy is important, but can feel a bit clinical for some.
Many modern LED systems offer adjustable color temperature, allowing you to switch between warm and cool with a remote or app – a fantastic feature to consider if you’re looking to install under cabinet lighting with maximum flexibility.
Dimmability and Smart Features
- Dimmability: Highly recommended. Dimmable lights allow you to adjust the brightness from task lighting to accent lighting, offering versatility throughout the day. Ensure your chosen fixtures and transformer (if applicable) are dimmable, and use a compatible dimmer switch.
- Smart Features: Some under cabinet lighting systems integrate with smart home platforms (Alexa, Google Home, Apple HomeKit) allowing for voice control, scheduling, and app control. This adds convenience and a touch of modern luxury.
Sizing and Placement Considerations
- Length: Measure the length of your cabinets where you want light. For strip lights, aim for continuous runs where possible. For puck lights or bar lights, plan for even spacing, typically 12-18 inches apart.
- Recess vs. Flush Mount: Consider if you want the lights completely hidden or if a visible fixture is acceptable. Most homeowners prefer discreet placement towards the front lip of the cabinet to prevent seeing the light source directly.
- Light Position: Install lights towards the front of the cabinet (closer to the wall side) for task lighting. For purely accent lighting, sometimes a position further back, near the backsplash, creates a nice glow. Experiment before final mounting.
Essential Tools and Materials for Your Installation
Having the right tools and materials on hand will make your under cabinet lighting installation smoother and more efficient. While the exact list may vary slightly depending on your chosen system (plug-in vs. hardwired), here’s a general overview.
Tools You’ll Need
- Measuring Tape: For accurate sizing and placement.
- Pencil: To mark drilling locations and light placement.
- Drill/Driver: With appropriate bits for pilot holes and screws.
- Screwdriver Set: Phillips and flathead.
- Wire Strippers/Cutters: Essential for hardwired installations.
- Voltage Tester: Crucial for hardwired installations to ensure power is off.
- Stud Finder: If you need to mount power supplies or route wires through walls.
- Level: To ensure straight installation of light bars or channels.
- Utility Knife or Scissors: For cutting LED strips or adhesive backing.
- Zip Ties or Cable Clips: For neat cable management.
- Safety Glasses: Always protect your eyes!
Materials to Gather
- Your Chosen Under Cabinet Lighting Kit: Ensure it includes all necessary fixtures, power supplies/transformers, connectors, and mounting hardware.
- Adhesive-Backed Wire Channels/Raceways (Optional but Recommended): For hiding cords, especially in plug-in installations.
- Electrical Tape: For hardwired connections.
- Wire Nuts: For secure hardwired connections.
- Extension Cord (for testing): Useful for temporarily powering plug-in lights before final installation.
- Rubbing Alcohol/Cleaner: To clean surfaces before applying adhesive strips.
Safety First: Crucial Precautions
Safety should be your top priority, especially when working with electricity. Learning how to install under cabinet lighting safely means taking these steps:
- Turn Off Power: For any hardwired installation, ALWAYS turn off the power to the circuit you’ll be working on at your home’s main electrical panel. Verify with a voltage tester that the power is indeed off.
- Read Instructions: Thoroughly read the manufacturer’s instructions for your specific lighting kit. Every system is slightly different.
- Wear Safety Gear: Eye protection is a must. Gloves can also be helpful.
- Don’t Overload Circuits: If you’re hardwiring, ensure your new lights won’t overload an existing circuit. Consult an electrician if unsure.
- When in Doubt, Hire a Professional: If you’re uncomfortable with electrical work, or if your hardwired project involves running new circuits or extensive modifications, don’t hesitate to hire a licensed electrician. This is particularly true for complex hardwired setups to ensure compliance with local electrical codes and for your safety.
Step-by-Step Guide: How to Install Under Cabinet Lighting (Plug-in/DIY Focus)
This section focuses on the more DIY-friendly methods, typically plug-in or low-voltage hardwired kits that don’t require extensive electrical knowledge. These steps will show you how to install under cabinet lighting with relative ease.
Step 1: Planning and Measuring
- Assess Your Layout: Decide which cabinets will receive lighting. Think about task areas (above prep counters) and accent areas.
- Measure Cabinet Lengths: Use your measuring tape to get precise lengths for each section of cabinetry. This helps determine how many light strips, bars, or pucks you’ll need.
- Determine Power Source Location: Locate the nearest available electrical outlet for plug-in systems. For low-voltage hardwired kits, plan where your transformer will be mounted (often inside a cabinet) and where it will tap into an existing power source.
- Test Fit: Before removing any adhesive backing or drilling, temporarily hold your lights in place to visualize the placement and light spread.
Step 2: Preparing the Installation Area
- Clean Surfaces: If using adhesive-backed lights, clean the underside of your cabinets thoroughly with rubbing alcohol and let it dry completely. This ensures maximum adhesion.
- Mark Placement: Use a pencil to mark the exact locations where your lights will be mounted. For strip lights, a single line is sufficient. For puck or bar lights, mark screw hole locations. Remember to position lights towards the front lip of the cabinet to prevent seeing the light source directly.
Step 3: Mounting the Fixtures
- For LED Strip Lights:
- Carefully peel off a small section of the adhesive backing from one end of the strip.
- Press the strip firmly onto your marked line, slowly peeling off the rest of the backing as you go, ensuring a straight and even application.
- Apply firm pressure along the entire length of the strip to ensure good adhesion.
- If your strips are cuttable, use sharp scissors to cut only on the designated copper pads.
- For Puck Lights:
- Mark pilot hole locations for the mounting screws.
- Drill small pilot holes (check manufacturer’s recommendations for drill bit size).
- Secure each puck light in place with the provided screws.
- For Bar Lights:
- Position the bar light and mark screw locations.
- Drill pilot holes.
- Mount the bar light using the provided clips or screws. If linking multiple bars, ensure they are securely connected according to instructions.
Step 4: Connecting the Lights
This step varies greatly depending on your system:
- For Plug-in Systems:
- Connect each light fixture to its corresponding power cord and then to the central power supply/driver.
- Plug the power supply into your chosen wall outlet. Ensure all connections are secure.
- For Low-Voltage Hardwired Kits:
- Mount the transformer inside an adjacent cabinet or a discreet location.
- Connect the low-voltage wires from your light fixtures to the output side of the transformer.
- Carefully connect the line voltage wires from your power source (e.g., existing outlet wiring or a junction box) to the input side of the transformer, following all safety precautions (power off!) and using wire nuts. If unsure, consult an electrician.
Step 5: Cable Management
This step is crucial for a clean, professional look.
- Route Wires Neatly: Use zip ties, cable clips, or adhesive wire channels (raceways) to secure all connecting wires to the underside of the cabinets.
- Hide Wires: Try to run wires along cabinet edges, behind the cabinet frame, or inside the cabinet if possible, to keep them out of sight.
- Avoid Snags: Ensure wires are not hanging loosely where they could get snagged or damaged.
Step 6: Testing and Adjusting
- Turn On Power: Once all connections are made and wires are neatly tucked away, turn the power back on at the circuit breaker.
- Test Lights: Turn on your new under cabinet lighting. Check that all sections are illuminating correctly.
- Adjust as Needed: If using dimmable lights, test the dimmer. Adjust the position of the lights if necessary to get the optimal spread and eliminate any unwanted shadows.
Step-by-Step Guide: Hardwired Under Cabinet Lighting Installation (Advanced Considerations)
Hardwired under cabinet lighting installation offers the cleanest, most integrated look, controlled by a wall switch. However, it requires a deeper understanding of electrical wiring and local codes. If you’re not comfortable with electrical work, it’s highly recommended to consult or hire a licensed electrician for this type of installation to ensure safety and compliance.
Understanding Electrical Codes and Safety
- Local Codes: Electrical codes (like the National Electrical Code in the US) vary by region. Familiarize yourself with your local requirements regarding wiring, junction boxes, and fixture installation.
- Circuit Capacity: Ensure the existing circuit can handle the additional load of your new lights. This is especially important if you’re tapping into an existing outlet or switch box.
- Grounding: All electrical components must be properly grounded to prevent shock hazards.
- ALWAYS De-Energize: Before beginning any work on hardwired circuits, locate the circuit breaker for the area, turn it OFF, and use a voltage tester to confirm no power is present.
Planning Electrical Runs
- Identify Power Source: The most common power sources are an existing wall switch (for existing overhead lights or a dedicated switch) or an existing outlet located inside an upper cabinet.
- Route Wiring: Plan the path for your electrical wiring. This often involves drilling small holes through cabinet stiles or backs, or running wires behind cabinets and through wall cavities. Use appropriate wire gauges (e.g., 14-gauge for typical lighting circuits).
- Junction Boxes: Any splices in line-voltage wiring (120V) must be made inside approved electrical junction boxes. These boxes must remain accessible. Low-voltage wiring typically doesn’t require junction boxes but should still be neatly managed.
- Transformer Placement (for Low Voltage LED): Most LED under cabinet lighting operates on low voltage (12V or 24V DC). This requires a transformer (driver) to convert your home’s 120V AC power to the appropriate low voltage. Plan to mount the transformer in an inconspicuous, accessible location, such as inside an upper cabinet or above the cabinet.
Wiring Connections (Junction Boxes, Transformers, Dimmers)
- Prepare Wires: Carefully strip insulation from the ends of wires using wire strippers.
- Make Connections:
- Line Voltage (120V AC): Connect the black (hot) wire from your power source to the black wire of your transformer (or directly to your 120V fixtures if no transformer is needed). Connect the white (neutral) wire from the power source to the white wire of the transformer/fixture. Connect the bare copper or green (ground) wire to the ground screw in the junction box and to the fixture’s ground wire. Use appropriately sized wire nuts for all connections.
- Low Voltage (from Transformer to Lights): Connect the low-voltage output wires from the transformer to the input wires of your LED light strips/bars. Pay attention to polarity (positive to positive, negative to negative), as low-voltage LEDs are typically DC.
- Install Dimmer (if applicable): If you’re adding a dimmer switch, replace the existing wall switch (if applicable) with a compatible LED dimmer. Follow the dimmer’s wiring instructions carefully.
- Secure Wiring: Once connections are made, carefully tuck wires into the junction box, ensuring no bare wires are exposed. Secure the box cover. Use cable staples or clamps to secure wires running along cabinet undersides or inside walls.
Final Mounting and Testing
The mounting of the light fixtures themselves (LED strips, pucks, bars) will largely follow the same procedures as described in Step 3 of the DIY section. Ensure all fixtures are securely fastened and wires are neatly managed.
- Secure Fixtures: Mount your chosen under cabinet lighting fixtures as previously described, ensuring they are straight and firmly attached.
- Clean Up: Double-check all wiring, connections, and mounting.
- Restore Power: Once everything is secure and enclosed, turn the power back on at the circuit breaker.
- Test Functionality: Test your lights with the wall switch and dimmer (if installed). Ensure all sections light up and operate as expected.
Remember, if at any point you feel out of your depth, it’s always best to call a professional electrician. The cost of a professional installation is a small price to pay for safety and peace of mind.
Troubleshooting Common Issues and Maintenance Tips
Even with careful under cabinet lighting installation, you might encounter a few hiccups. Here’s how to troubleshoot common problems and keep your lights shining brightly.
Lights Not Turning On
- Check Power Source:
- Plug-in: Is the plug securely in the outlet? Is the outlet working (test with another device)?
- Hardwired: Is the circuit breaker ON? Is the wall switch ON? Is the power supply/transformer getting power? Use a voltage tester to verify.
- Inspect Connections: For all systems, check all connectors between light segments, to the power supply, and to the power source. Loose connections are a common culprit.
- Blown Fuse/Faulty Transformer: Some power supplies have internal fuses. Check if it’s blown. Transformers can also fail; if you have a multimeter, you can test its output.
- Faulty Switch/Dimmer: If you’ve installed a new switch or dimmer, ensure it’s wired correctly and is compatible with your LED lights.
- Defective Fixture: Though less common with LEDs, a single light strip or puck could be faulty. If your system allows, try swapping out the suspected faulty component.
Flickering Lights
- Incompatible Dimmer: The most common cause of LED flickering is an incompatible dimmer switch. LEDs require specific “leading edge” or “trailing edge” dimmers (often labeled “LED compatible”). Ensure your dimmer matches your lights.
- Loose Connections: Similar to lights not turning on, loose wires can cause intermittent contact and flickering. Re-check all connections.
- Overloaded Circuit (Hardwired): If other appliances are on the same circuit and cause flickering, you might be overloading the circuit.
- Faulty Driver/Power Supply: A failing LED driver or power supply can cause inconsistent voltage, leading to flickering.
- Voltage Fluctuations: Less common, but sometimes external voltage fluctuations in your home’s electrical system can be a factor.
Uneven Light Distribution
- Light Position: Experiment with the placement of your lights. If they’re too far back, they might create a hot spot on the backsplash. If too far forward, they might create glare. Usually, placing them about 1-2 inches behind the front lip of the cabinet works best.
- Cabinet Lip: If your cabinets have a prominent bottom lip or trim, ensure the lights are recessed enough to be hidden but not so far back that the lip casts a shadow.
- Gaps Between Fixtures: If using puck or short bar lights, ensure they are spaced evenly and close enough to create continuous illumination without dark spots. LED strip lights generally provide the most even distribution.
- Surface Reflectivity: Darker, less reflective countertops will absorb more light, making areas appear dimmer. Consider brighter lights or closer spacing in these areas.
Maintenance Tips for Your Under Cabinet Lighting
- Regular Cleaning: Dust and grease can accumulate on light fixtures, especially in a kitchen. Periodically wipe down your lights with a soft, damp cloth (ensure power is off for hardwired systems). Avoid harsh chemicals that could damage the fixtures.
- Inspect Wiring: Every so often, especially for plug-in systems, check that cords are still securely clipped and not exposed to damage or heat.
- Check Adhesion: For adhesive strip lights, occasionally press along the strip to ensure it’s still firmly attached. If sections are peeling, consider using small clips or a stronger adhesive in specific spots.
- LED Lifespan: While LEDs last a long time, individual diodes can sometimes fail. If a small section of a strip goes out, it’s usually not repairable and the entire strip or segment may need replacement.
- Keep Instructions: Retain the manufacturer’s instructions for your specific lighting kit. They often contain detailed troubleshooting steps and warranty information.
By understanding these common issues and implementing these maintenance tips, you can ensure your beautiful under cabinet lighting provides reliable, stunning illumination for years to come.
Conclusion: Illuminate Your Kitchen with Confidence
Installing under cabinet lighting is one of the most impactful and satisfying home improvements you can undertake for your kitchen. It’s a project that delivers tangible benefits, from enhancing task visibility and safety to transforming the overall ambiance and even boosting your home’s value. With the wealth of energy-efficient LED options available today, there’s a perfect under cabinet lighting solution for every style, budget, and DIY skill level.
We hope this comprehensive guide has empowered you with the knowledge and confidence to tackle your own under cabinet lighting installation. Remember to plan carefully, choose the right system for your needs, prioritize safety, and don’t hesitate to seek professional help for complex electrical work. Once complete, step back and enjoy the glorious, shadow-free glow of your beautifully illuminated kitchen. Get ready to experience your culinary space in a whole new light!
Frequently Asked Questions
What are the best types of under cabinet lighting for kitchens?
LED strip lights, puck lights, and light bars are popular choices for under cabinet lighting. LEDs are highly energy-efficient, offer long lifespans, and provide excellent task lighting or ambient glow. Your selection often depends on the desired aesthetic and brightness level.
Is installing under cabinet lighting a difficult DIY project?
The difficulty of installing under cabinet lighting largely depends on whether you choose a plug-in or hardwired system. Plug-in kits are generally very DIY-friendly, often involving adhesive or simple screws. Hardwired systems, which connect directly to your home’s electrical circuit, are more complex and may require professional help.
Do I need an electrician to install under cabinet lighting?
For plug-and-play under cabinet lighting kits, an electrician is usually not necessary. However, if you’re installing a hardwired system that involves connecting new wiring to your home’s electrical system or modifying existing circuits, it is highly recommended to hire a qualified electrician to ensure safety and compliance with local codes.
Where should I position my under cabinet lights for optimal illumination?
For the best results, position your under cabinet lights slightly towards the front lip of the cabinet, aiming the light towards the back wall. This placement helps to evenly illuminate the countertop surface and minimize harsh shadows from your hands or objects.
How can I hide the wires for a clean under cabinet lighting installation?
To achieve a clean look for your under cabinet lighting, you can use adhesive cable clips or wire channels (raceways) to neatly tuck away wires along the underside of cabinets. For a more integrated approach, wires can sometimes be routed through small drilled holes between cabinets or behind trim, leading to the power source.
Can I connect multiple under cabinet lights together and control them with one switch?
Yes, most under cabinet lighting systems are designed to be expandable, allowing you to link multiple light fixtures together. Often, kits include connecting cables or ports to daisy-chain lights, and they can typically be controlled from a single power source or dimmer switch, provided the total wattage doesn’t exceed the power supply’s capacity.