Featured image for this comprehensive guide about DIY pot rack for a small kitchen
Image source: simplydesigning.net
The culinary heart of any home, the kitchen, often presents a unique challenge, especially when space is at a premium. For many, a small kitchen feels less like a functional workspace and more like a constant game of Tetris, particularly when it comes to managing the ubiquitous collection of pots and pans. They pile up in cabinets, clutter countertops, and make every cooking endeavor feel like an archaeological dig for the right skillet.
If you’re nodding along, sighing at the thought of yet another cabinet door refusing to close due to an overflowing stack of cookware, you’re not alone. Small kitchens can quickly become overwhelmed, leaving you frustrated and yearning for a more organized, efficient space. But what if we told you there’s an elegant, highly effective, and surprisingly simple solution that not only declutters but also adds a touch of personalized style to your kitchen?
Enter the DIY pot rack for a small kitchen. This isn’t just about storage; it’s about reclaiming your kitchen’s potential, transforming it into a streamlined, joyful place to cook. By taking matters into your own hands, you can craft a custom storage solution perfectly tailored to your space, your needs, and your aesthetic preferences, all while saving money. Get ready to banish kitchen chaos and embrace a beautifully organized culinary haven.
Quick Answers to Common Questions
Why should I consider a DIY pot rack for my small kitchen?
Because a DIY pot rack is a fantastic space-saver! It frees up precious cabinet and counter space, making your small kitchen feel much larger and more organized.
What kind of DIY pot rack works best in a tiny kitchen?
Wall-mounted or under-cabinet designs are usually ideal for small kitchens. They utilize vertical space efficiently without obstructing movement, unlike some larger ceiling-mounted options.
Do I need to be a DIY expert to build a DIY pot rack?
Absolutely not! Many DIY pot rack projects are surprisingly simple and beginner-friendly, requiring basic tools and materials you might already have or can easily get.
What are some common materials used for a DIY pot rack?
You can make a sturdy DIY pot rack from things like plumbing pipes, wooden planks, metal grids, or even reclaimed materials. The choice often depends on your kitchen’s style and your budget.
Is a DIY pot rack safe and sturdy enough for all my cookware?
Yes, when properly constructed and securely mounted, a DIY pot rack can be incredibly strong. Always choose appropriate hardware and ensure it’s anchored into studs or with heavy-duty anchors to safely support your pots and pans.
📋 Table of Contents
- Why a DIY Pot Rack is a Small Kitchen’s Best Friend
- Planning Your Perfect DIY Pot Rack: Considerations & Inspirations
- Top DIY Pot Rack Ideas for Small Kitchens (with Step-by-Step Guidance)
- Installation Tips & Safety Precautions for Your DIY Pot Rack
- Maximizing Your Small Kitchen’s Potential Beyond the Pot Rack
- Conclusion
Why a DIY Pot Rack is a Small Kitchen’s Best Friend
In the constant battle against kitchen clutter, a well-placed pot rack can be your most powerful ally. For those grappling with limited square footage, the benefits extend far beyond mere organization, impacting both functionality and the overall ambiance of your cooking space.
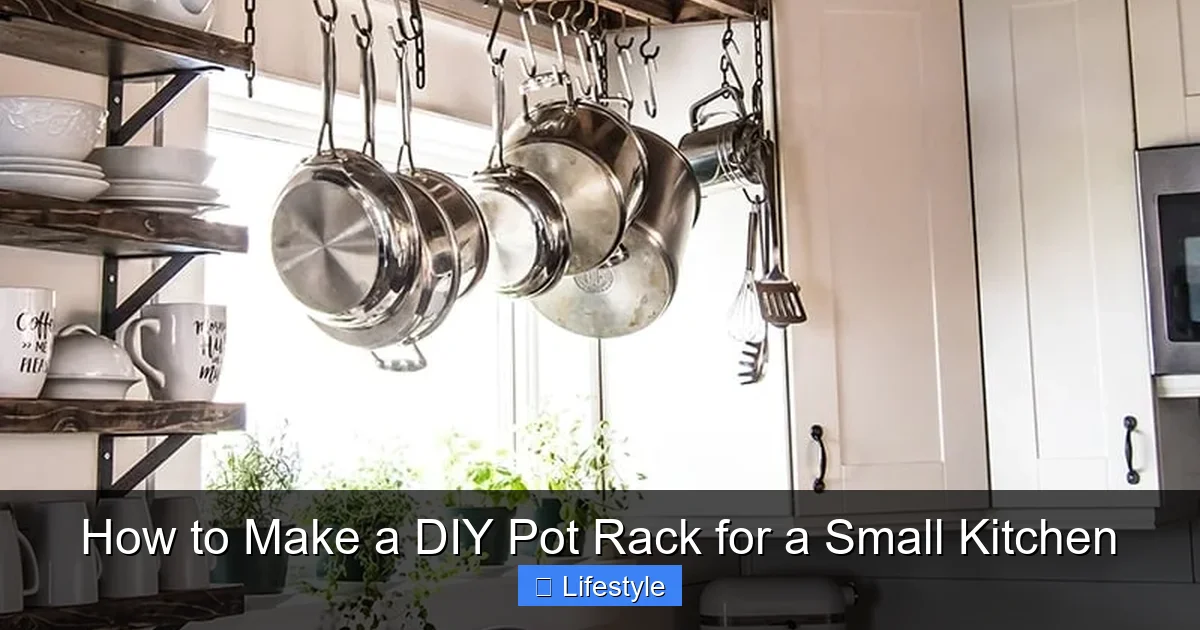
Learn more about DIY pot rack for a small kitchen – How to Make a DIY Pot Rack for a Small Kitchen
Image source: littleyellowwheelbarrow.com
Reclaiming Counter and Cabinet Space
Think about it: where do your pots and pans live right now? For most, it’s either stacked haphazardly in lower cabinets, making them difficult to access, or worse, sprawling across precious counter space, leaving little room for meal prep. A recent survey suggests that up to 70% of homeowners with small kitchens feel their countertops are consistently cluttered, significantly impacting their ability to cook efficiently. A DIY pot rack for a small kitchen immediately frees up these high-value areas. Imagine baking cookies without having to move three saucepans, or chopping vegetables on a clear counter, unimpeded by a stack of frying pans. This simple shift can make your small kitchen feel significantly larger and more inviting, instantly boosting your cooking experience.
| DIY Pot Rack Style | Estimated Material Cost | DIY Difficulty Level | Small Kitchen Benefit |
|---|---|---|---|
| **Wall-Mounted Rail with S-Hooks** | $15 – $40 | Easy | Frees up valuable counter space and drawers, utilizes vertical wall area. |
| **Ceiling-Mounted Wood/Pipe Bar** | $30 – $75 | Moderate | Keeps pots entirely off walls and counters, great for kitchens with high ceilings. |
| **Pegboard Wall Organizer** | $25 – $60 | Easy-Moderate | Highly customizable and flexible; can store pots, pans, lids, and utensils in one compact area. |
| **Under-Cabinet Hanging Rod** | $10 – $30 | Very Easy | Utilizes often-unused space beneath upper cabinets, keeping items within easy reach without cluttering sightlines. |
Enhanced Accessibility and Workflow
Picture this: you’re in the middle of preparing a complex meal, and you need a specific pan. Instead of rummaging through a dark cabinet, bending down, and wrestling with nested cookware, you simply reach up, grab the exact item you need, and continue cooking. This is the power of a pot rack. By keeping frequently used items visible and within arm’s reach, it streamlines your workflow, reduces prep time, and minimizes frustration. For those who spend an average of 37 minutes a day cooking, according to recent statistics, even small improvements in efficiency can lead to a more enjoyable and less stressful culinary routine.
Cost-Effective Customization
While store-bought pot racks are available, they often come with a hefty price tag and might not perfectly fit the unique dimensions or style of your kitchen. A DIY pot rack for a small kitchen offers unparalleled customization at a fraction of the cost. You control the materials, the size, the finish, and the number of hooks, ensuring it integrates seamlessly with your existing decor. Whether your aesthetic is rustic farmhouse, sleek modern, or industrial chic, you can design a pot rack that not only serves a practical purpose but also acts as a stylish focal point, all while working within your budget. This empowers you to create a truly personalized and efficient space without breaking the bank.
Planning Your Perfect DIY Pot Rack: Considerations & Inspirations
Before you dive headfirst into construction, a little thoughtful planning goes a long way. Crafting a truly effective DIY pot rack for a small kitchen requires careful consideration of your space, your specific needs, and your personal style. This foundational step ensures your project is not only successful but also perfectly tailored.
Learn more about DIY pot rack for a small kitchen – How to Make a DIY Pot Rack for a Small Kitchen
Image source: get.pxhere.com
Assessing Your Space and Needs
The first step is a thorough inventory and measurement session. Grab a tape measure and a notepad:
- Measure Available Space: Look for unused wall space (above the sink, next to the stove, an empty stretch of wall) or ceiling space (over an island, peninsula, or even a pathway that won’t impede movement). Note down height, width, and depth constraints.
- Inventory Your Cookware: Count your pots, pans, lids, and frequently used utensils. Consider their weight, size, and handle types. Do you need to hang large Dutch ovens, lightweight frying pans, or a mix of both? This will dictate the strength and design of your rack.
- Identify Potential Locations:
- Ceiling-mounted: Great for kitchens with an island or generous overhead space, maximizing vertical storage.
- Wall-mounted: Ideal for narrow kitchens, maximizing wall space without encroaching on walkways. Can be installed above a backsplash or an empty wall.
- Inside Cabinet/Pantry Door: A less visible but highly effective option for very tiny kitchens.
- Safety First: Crucially, assess the structural integrity of your walls or ceiling. You’ll need to mount your rack securely into studs or use heavy-duty anchors designed for significant weight. A fully loaded pot rack can be surprisingly heavy.
Material Choices and Aesthetic Integration
Your choice of materials will largely define the look and feel of your DIY pot rack for a small kitchen, allowing it to blend seamlessly or stand out as a design feature:
- Wood: Offers a warm, rustic, or farmhouse aesthetic. Reclaimed wood, pallet wood, or simple lumber can be sanded, stained, or painted to match your decor. It’s relatively easy to work with for beginners.
- Metal: Pipes (galvanized, copper, black iron), rebar, or even old bicycle wheels can create an industrial, modern, or even steampunk vibe. These are durable and can hold significant weight but may require specific tools for cutting and assembly.
- Other Upcycled Items: Don’t limit your imagination! Old wooden ladders, strong branches, or even sturdy coat racks can be repurposed. Pegboards offer flexible, customizable storage.
Consider your existing kitchen finishes, cabinet colors, and overall design theme when selecting materials to ensure a cohesive look.
Tools and Supplies Checklist
Having the right tools on hand will make your DIY project smoother and safer. While specific projects will vary, here’s a general checklist:
Essential Tools:
- Measuring tape and pencil
- Stud finder
- Drill and various drill bits
- Level
- Saw (hand saw, jigsaw, or miter saw, depending on material)
- Safety glasses and gloves
Specific Project Supplies:
- Your chosen material (wood, pipes, pegboard, etc.)
- Mounting hardware: Heavy-duty screws, toggle bolts, lag screws (ensure they are appropriate for the weight and your wall/ceiling type)
- Brackets, flanges, or eye hooks for mounting
- Chains or strong rope (for ceiling-mounted racks)
- S-hooks or J-hooks (plenty of them!)
- Finish (sandpaper, stain, paint, sealant)
- Optional: Pipe wrench, metal cutters, sandpaper, wood glue
Gathering these items before you start will prevent frustrating interruptions and keep your project on track.
Top DIY Pot Rack Ideas for Small Kitchens (with Step-by-Step Guidance)
Now for the exciting part – bringing your vision to life! Here are several popular and effective DIY pot rack for a small kitchen ideas, complete with simplified steps to guide you.
The Classic Ceiling-Mounted Wooden Ladder Rack
This timeless design is perfect for kitchens with an island or a peninsula, providing ample overhead storage while creating a focal point. It’s also surprisingly straightforward to construct.
Materials:
- Small wooden ladder (an old one, or new lumber cut to size)
- 4 strong chains (each slightly longer than the desired drop)
- 4 heavy-duty ceiling hooks or eye bolts with toggle anchors (if not mounting into a stud)
- Plenty of S-hooks
- Wood stain/paint, sandpaper (optional)
Steps:
- Prep the Ladder: If using an old ladder, clean it thoroughly, sand any rough spots, and apply a finish (stain, paint, or sealant) to match your kitchen decor. If building from scratch, cut two long side pieces and several shorter rungs, then assemble with screws or wood glue and clamps.
- Attach Chains: Securely attach one end of each chain to the four corners of the ladder. Use strong eye screws or U-bolts that pass through the ladder and are secured with nuts.
- Mark Ceiling Points: Hold the ladder up to the ceiling (with help!) to determine the ideal hanging height. Mark the four points where the ceiling hooks will go. Use a stud finder to locate ceiling joists for maximum security. If no joists are available, use heavy-duty toggle anchors.
- Install Ceiling Hooks: Drill pilot holes and screw the ceiling hooks or eye bolts into place. Ensure they are strong enough to support the weight of the ladder and your heaviest pots.
- Hang the Ladder: Carefully lift the ladder and attach the chains to the ceiling hooks. Use a level to ensure the ladder hangs evenly. Adjust chain lengths as needed.
- Add S-Hooks: Distribute your S-hooks along the rungs of the ladder. Now, hang your pots and pans!
The Space-Saving Wall-Mounted Rail System
Ideal for narrow wall spaces, this option keeps your cookware organized without imposing on overhead space. It’s incredibly versatile and customizable.
Materials:
- Long wooden plank (e.g., 1×4 or 1×6) or metal pipe (galvanized, copper)
- 2-3 sturdy wall brackets (for wood) or pipe flanges (for metal)
- Screws and wall anchors (appropriate for your wall type and weight)
- S-hooks
- Wood stain/paint, sandpaper (for wood); spray paint (for metal, optional)
Steps:
- Prep the Rail: For wood, sand, stain/paint your plank. For metal pipe, clean it and spray paint if desired.
- Measure and Mark: Determine the ideal height and length for your rail. Use a level to mark the drilling points for your brackets or flanges on the wall. Ensure you hit studs if possible, or use heavy-duty wall anchors.
- Install Brackets/Flanges: Drill pilot holes and securely mount the brackets or flanges to the wall.
- Attach Rail: If using wood, securely screw the plank onto the brackets. If using a metal pipe, screw the pipe into the flanges. Ensure it’s sturdy and level.
- Add Hooks: Slide S-hooks onto the rail. Hang your pots, pans, and even some kitchen utensils.
Upcycled Pallet or Crate Pot Rack
For a rustic, budget-friendly, and eco-conscious solution, an old pallet or wooden crate can be transformed into charming kitchen storage.
Materials:
- Clean, sturdy wooden pallet or wooden crate
- Screws, wood glue (optional)
- S-hooks or J-hooks
- Sandpaper, wood stain/paint/sealant
- Mounting hardware (screws for studs or heavy-duty anchors)
Steps:
- Disassemble/Prep Pallet (if applicable): If using a full pallet, you might want to carefully disassemble it to get individual planks, or choose a section of it. Clean and thoroughly sand all surfaces to prevent splinters.
- Design Your Rack:
- For a simple rack: Choose a sturdy pallet plank or the bottom of a crate. Attach hooks directly.
- For a shelf rack: Reassemble pallet planks to create a small, open shelf. You can also mount a wooden crate directly as a shelf.
- Finish: Apply wood stain, paint, or a clear sealant to protect the wood and match your kitchen aesthetic.
- Mount to Wall: Use a stud finder to locate wall studs. Drill pilot holes in your pallet/crate piece and the wall. Securely screw the rack to the wall using long, sturdy screws. If no studs are available, use toggle anchors.
- Add Hooks: Screw J-hooks directly into the bottom of your wooden rack, or hang S-hooks from any crossbars.
The Industrial Pipe Pot Rack
This option brings a sleek, modern, and robust industrial vibe to your kitchen, perfect for holding heavy cast iron cookware.
Materials:
- Galvanized, black iron, or copper pipes (choose desired diameter)
- Pipe fittings: flanges (to attach to wall/ceiling), elbows, tees (to create desired shape)
- Pipe thread sealant tape (Teflon tape)
- Screws for flanges and wall/ceiling anchors
- S-hooks
- Metal cleaner, spray paint (optional, for black iron pipes)
Steps:
- Design and Cut: Plan your pipe configuration (e.g., a straight bar, an L-shape, or a grid). Purchase pre-cut pipe lengths or cut them to size.
- Clean and Finish: Clean pipes thoroughly to remove any grease or residue. If using black iron pipes, you might want to spray paint them to prevent rust or achieve a desired color.
- Assemble Pipes: Apply pipe thread sealant tape to the threads and screw the pipes and fittings together to form your desired rack shape. Hand-tighten, then use a pipe wrench for a secure fit.
- Attach Flanges: Screw the flanges onto the ends of your assembled pipe structure.
- Mark and Mount: Hold the assembled rack in position (get help!). Mark the drilling points for the flanges. Locate wall/ceiling studs, or use heavy-duty anchors. Drill pilot holes.
- Secure Rack: Screw the flanges securely into the wall or ceiling. Ensure the rack is level and extremely sturdy.
- Add Hooks: Hang your S-hooks directly onto the pipe sections.
Pegboard Powerhouse Pot Rack
The ultimate in flexible, customizable storage, a pegboard pot rack can adapt as your cookware collection changes and is excellent for inside pantry doors or empty wall spaces.
Materials:
- Sheet of pegboard (sized to your space)
- Furring strips or thin wood strips (to create space behind pegboard for hooks)
- Screws (for furring strips and pegboard) and wall anchors
- Assorted pegboard hooks (for pots, pans, utensils)
- Paint (optional, for pegboard)
Steps:
- Cut and Paint Pegboard: Cut the pegboard to fit your desired area. Paint it if you want to add a pop of color or match your kitchen.
- Mount Furring Strips: Cut furring strips to fit behind the pegboard edges and any central support points. These create a gap so hooks can be inserted fully. Mount these strips securely to the wall, hitting studs if possible.
- Attach Pegboard: Carefully place the pegboard over the furring strips and screw it into the strips, ensuring it’s secure and flush.
- Insert Hooks: Arrange your pegboard hooks to suit your pots and pans. Experiment with different configurations for optimal accessibility.
Installation Tips & Safety Precautions for Your DIY Pot Rack
The success and safety of your DIY pot rack for a small kitchen hinge critically on proper installation. A rack laden with heavy cookware can be dangerous if not securely mounted. Follow these essential guidelines to ensure your pot rack is both functional and safe.
Locating Studs and Secure Mounting
This is arguably the most crucial step. Kitchen cookware, especially cast iron, is surprisingly heavy. A standard set of pots and pans can easily weigh 50-100 pounds, and sometimes much more. Installing your rack directly into wall or ceiling studs provides the strongest possible anchor point. Every 16 or 24 inches on center, studs are the vertical framing timbers inside your walls and ceilings.
- Use a Stud Finder: Invest in a reliable electronic stud finder. Scan the area where you plan to install your rack, marking the edges and center of any studs found.
- Drill Pilot Holes: Always drill pilot holes smaller than your screw diameter. This prevents wood from splitting and makes driving screws easier.
- Heavy-Duty Anchors for No-Stud Zones: If mounting to drywall where no stud is available, you absolutely must use heavy-duty anchors. Toggle bolts or self-drilling molly bolts are excellent choices, designed to spread the weight across a larger area of the drywall. Never use standard plastic wall anchors for a pot rack.
- Understanding Weight Distribution: For ceiling-mounted racks, ensure the weight is distributed across multiple points, ideally into multiple ceiling joists. For wall-mounted racks, use at least two strong mounting points into studs.
Ergonomics and Accessibility
A well-placed pot rack enhances kitchen efficiency. Consider these ergonomic factors:
- Placement: Position the rack where it won’t impede movement or obstruct cabinet doors. Avoid placing it directly over high-traffic areas where you might bump your head (for ceiling racks). Many find it useful to place a wall-mounted rack near the stove for easy access during cooking.
- Height for Ceiling Racks: The bottom of a ceiling-mounted rack should be high enough to allow comfortable head clearance for the tallest person in your household, but low enough for the shortest person to reach pots without a step stool. A common recommendation is 30-36 inches above a countertop or island, and at least 6.5 feet from the floor in an open pathway.
- Easy Reach: Arrange your most frequently used pots and pans on the most accessible hooks.
Testing the Weight Capacity
Before loading your entire collection of cookware onto your new rack, perform a stress test:
- Gradual Loading: Start by hanging your lighter pots and pans. Observe the rack closely for any signs of strain, wobbling, or creaking.
- Increase Weight: Gradually add heavier items. For ceiling racks, apply a downward force that simulates the weight of your heaviest pots.
- Over-engineer for Safety: It’s always better to over-engineer your pot rack for more weight than you anticipate. If your calculations suggest it can hold 100 lbs, consider it safe for 70-80 lbs to give yourself a safety margin.
Maintenance and Longevity
Once installed, a little maintenance ensures your DIY pot rack for a small kitchen remains functional and attractive for years:
- Regular Cleaning: Dust and grease can accumulate. Wipe down your rack periodically with a damp cloth and mild detergent.
- Check Hardware: Periodically inspect all screws, bolts, and chains for any signs of loosening, rust, or wear. Tighten anything that feels loose.
- Protect Materials: If you used wood, ensure it’s sealed or painted to protect against moisture and grease. Metal racks can be wiped down with mineral oil to prevent rust, especially if they are raw steel or iron.
By adhering to these installation and safety tips, you can enjoy a highly functional and secure pot rack that enhances your small kitchen for years to come.
Maximizing Your Small Kitchen’s Potential Beyond the Pot Rack
While a DIY pot rack for a small kitchen is a phenomenal starting point, true small kitchen mastery comes from embracing a holistic approach to organization. Think beyond just cookware and consider every nook and cranny to unlock your kitchen’s full potential.
Embrace Vertical Space Everywhere
Your walls and unused vertical areas are prime real estate in a small kitchen. Look up, look around – there’s likely more space than you think:
- Floating Shelves: Install open shelves for dishes, spices, or decorative items. This keeps things visible, accessible, and adds visual interest.
- Magnetic Knife Strips: Free up precious drawer space and keep your knives safely and conveniently stored on a magnetic strip mounted to the wall.
- Over-Door Organizers: The inside of pantry doors, cabinet doors, or even the main kitchen door can host slim organizers for spices, foil, plastic wrap, or cleaning supplies.
- Spice Racks: Mount slim spice racks on an empty wall, inside a cabinet door, or use magnetic spice tins on your fridge.
Smart Storage Solutions
It’s not just about adding more storage, but smarter storage. Every item should have a designated, logical home:
- Drawer Dividers: Keep cutlery, utensils, and gadgets neatly organized within drawers, preventing a jumbled mess.
- Pantry Pull-Outs: If you have a pantry, consider installing pull-out shelves or drawers. These make it easier to see and access items at the back, reducing food waste and clutter.
- Nesting Bowls & Stackable Containers: Invest in kitchenware designed to save space. Nesting mixing bowls, measuring cups, and stackable food storage containers are game-changers for compact living.
- Corner Solutions: Utilize lazy susans in corner cabinets for easy access to small appliances or frequently used ingredients.
- Under-Sink Organizers: Use tiered shelves or pull-out baskets under the sink to organize cleaning supplies and prevent bottles from toppling over.
Decluttering and Minimalist Mindset
The most effective organization starts with less stuff. A minimalist approach is incredibly liberating for small kitchens:
- Only Keep What You Use Regularly: Be honest with yourself. If an appliance, dish, or utensil hasn’t been used in six months or a year, consider donating or selling it. Many homeowners are estimated to have up to 20% of kitchen items that are rarely, if ever, used.
- “One In, One Out” Rule: When you buy a new kitchen gadget or dish, commit to getting rid of an old one. This prevents accumulation.
- Regular Audits: Schedule a quarterly or bi-annual kitchen audit. Go through every cabinet and drawer, re-evaluating what you truly need and use.
- Multi-functional Items: Prioritize kitchen tools that serve multiple purposes (e.g., an immersion blender that also chops, a pot that doubles as a serving dish).
By combining the efficiency of a custom DIY pot rack for a small kitchen with these broader organizational strategies, you can transform your cramped cooking space into a highly functional, enjoyable, and beautiful heart of your home.
Conclusion
Conquering the challenge of a small kitchen often feels like an uphill battle, but as we’ve explored, the solution doesn’t always lie in a costly renovation. Sometimes, the most impactful change comes from clever, personalized, and budget-friendly DIY projects. A thoughtfully designed and safely installed DIY pot rack for a small kitchen is more than just a place to hang cookware; it’s a testament to ingenious space utilization, a boost to kitchen efficiency, and a touch of unique style that truly makes your home yours.
You’ve seen how reclaiming counter space, enhancing accessibility, and enjoying cost-effective customization can transform your cooking experience. From rustic wooden ladders to sleek industrial pipes, there’s a pot rack idea perfectly suited for every skill level and aesthetic. Moreover, by extending these principles to vertical storage, smart solutions, and a mindful approach to decluttering, you can maximize every inch of your small kitchen.
Don’t let a lack of space stifle your culinary creativity or enjoyment. Take the leap, gather your tools, and embark on your own DIY journey. Imagine the satisfaction of an organized, inviting kitchen where every pot and pan has its rightful place. It’s time to create the small kitchen of your dreams, one brilliantly organized hook at a time. What kind of DIY pot rack for a small kitchen will you create first? Share your ideas in the comments below!
Frequently Asked Questions
Why is a DIY pot rack a good solution for a small kitchen?
A DIY pot rack is an excellent space-saving solution, freeing up valuable cabinet and counter space in cramped kitchens. It helps organize cookware efficiently, making your small kitchen feel more open and functional by utilizing vertical space.
What materials are typically needed to build a DIY pot rack for a small kitchen?
Common materials include sturdy wood planks, metal pipes, or even old ladders, depending on your desired style and the look you want to achieve. You’ll also need strong hooks (S-hooks work well), chains or mounting brackets, and appropriate hardware like screws and wall anchors for secure installation.
How do I determine the best placement for my DIY pot rack in a small kitchen?
Consider areas like above an island, over a window, or against an unused wall space that won’t interfere with cabinet doors or walking paths. Ensure it’s mounted at a convenient height where pots are easily accessible but won’t bump into heads or other items.
Will a DIY pot rack be strong enough to hold heavy pots and pans safely?
Yes, when constructed properly with the right materials and secure mounting hardware, a DIY pot rack can be very sturdy and safe. Always use anchors appropriate for your wall or ceiling type (e.g., stud or drywall anchors) and ensure all connections are robust to support the weight.
Are there specific styles of DIY pot racks that work best in a small kitchen?
Wall-mounted single-bar designs or compact ceiling-mounted racks are often ideal for a small kitchen as they maximize vertical space without taking up precious floor or counter area. Open shelving with hooks can also offer a versatile, space-efficient solution.
What tools will I need to complete this DIY pot rack project?
Basic tools generally include a drill, a level, a measuring tape, a screwdriver, and potentially a saw if you’re cutting wood or pipes. A stud finder is also highly recommended to ensure you mount your pot rack securely into studs for maximum stability.