
Featured image for this comprehensive guide about how to build kitchen island with seating
Image source: i.pinimg.com
The kitchen isn’t just a place to cook anymore; it’s the heart of the home, a bustling hub for family gatherings, homework sessions, and impromptu coffee chats. And at the center of this evolving space? The mighty kitchen island. But not just any island – we’re talking about one designed specifically with comfort and connection in mind: an island with integrated seating.
Imagine your mornings, not rushed and scattered, but gathered around a beautiful, functional island, sipping coffee while your kids eat breakfast. Picture evenings where friends naturally congregate around the island, enjoying appetizers and conversation while you put the finishing touches on dinner. A kitchen island with seating isn’t just a trend; it’s a lifestyle upgrade, enhancing both the aesthetics and practicality of your culinary domain. If you’ve ever dreamt of having this versatile centerpiece, you’re in the right place. This comprehensive guide will walk you through everything you need to know about how to build kitchen island with seating, turning that dream into a tangible, beloved part of your home.
Embarking on a DIY project like building a kitchen island can feel daunting, but with careful planning, the right tools, and a step-by-step approach, it’s an incredibly rewarding endeavor. Not only will you save on labor costs, but you’ll also create a custom piece that perfectly suits your space, style, and family’s needs. Let’s roll up our sleeves and explore how to build kitchen island with seating that will become the envy of your neighborhood and the cherished focal point of your home.
Quick Answers to Common Questions
Where do I even begin when planning how to build a kitchen island with seating?
Start by measuring your kitchen space carefully to determine the ideal size and placement. Then, sketch out your desired design, considering how many seats you need and what storage features would be most useful for your new kitchen island with seating.
What are the essential tools I’ll need to build a kitchen island with seating?
You’ll definitely want a tape measure, level, saw (circular or miter), drill, and safety gear. Having clamps and a stud finder can also be super helpful for ensuring everything is secure and straight when you build your kitchen island with seating.
How much space do I need for comfortable seating at my DIY kitchen island with seating?
Aim for at least 24-30 inches of width per person and a minimum 12-15 inch countertop overhang for legroom. This ensures everyone has enough space to sit comfortably without bumping elbows at your new kitchen island with seating.
Can a beginner really learn how to build a kitchen island with seating, or is it too complicated?
Absolutely! With a good plan, basic carpentry skills, and a bit of patience, building a kitchen island with seating is a very achievable DIY project. Many pre-made cabinet bases can simplify the process significantly for beginners.
What’s the easiest way to ensure my DIY kitchen island with seating is sturdy?
Focus on a strong base structure using quality lumber or sturdy cabinet frames, and use plenty of screws (not just nails) to join components. Anchoring your new kitchen island with seating to the floor, if possible, provides ultimate stability.
📋 Table of Contents
- Why a Kitchen Island with Seating is a Game Changer
- Planning Your Dream Kitchen Island with Seating
- Essential Tools and Materials for Your DIY Kitchen Island
- Step-by-Step Guide: How to Build Your Kitchen Island Base
- Adding the Seating Component and Finishing Touches
- Safety, Maintenance, and Maximizing Your Island’s Potential
- Conclusion
Why a Kitchen Island with Seating is a Game Changer
A kitchen island with seating offers a multitude of benefits that extend far beyond mere aesthetics. It transforms your kitchen into a multi-functional space, accommodating various activities simultaneously and fostering a more engaging home environment. Understanding these advantages can fuel your motivation to build kitchen island with seating that truly elevates your home.

Learn more about how to build kitchen island with seating – How to Build Kitchen Island with Seating Ideas
Image source: handymantips.org
Enhanced Functionality and Versatility
- Additional Workspace: Perhaps the most obvious benefit, an island provides invaluable extra counter space for food preparation, baking, or laying out a buffet. This is especially crucial in smaller kitchens where every inch counts.
- Casual Dining Area: It offers an informal spot for quick meals, breakfast, or snacks, reducing the need to always set a formal dining table. This encourages family members to gather more often.
- Social Hub: An island with seating naturally draws people in, allowing guests and family members to socialize with the cook without getting in the way. It’s perfect for entertaining and keeping an eye on children while you cook.
- Dedicated Homework/Work Zone: For families, an island can double as a perfect spot for kids to do homework or for adults to work remotely, keeping them close to the family action.
- Integrated Storage: Most kitchen islands incorporate cabinets, drawers, or open shelving, significantly boosting your kitchen’s storage capacity for pots, pans, appliances, cookbooks, or even wine.
Boosting Home Value and Appeal
According to a 2021 study by the National Association of Home Builders (NAHB), 76% of home buyers consider a kitchen island an essential or desirable feature. Furthermore, a well-designed kitchen renovation, including a functional island, can offer an ROI of up to 70-80% on resale, making it a smart investment. A custom-built island demonstrates attention to detail and a commitment to quality, significantly enhancing your home’s appeal to potential buyers.
| Island Aspect | Standard Recommendation/Detail | Impact on Seating Experience |
|---|---|---|
| Countertop Overhang Depth | 10-15 inches (25-38 cm) minimum | Provides adequate legroom for comfortable sitting; prevents knees from hitting the island base. |
| Island Countertop Height | 36 inches (91 cm) for counter height; 42 inches (107 cm) for bar height | Determines the appropriate stool/chair height required for comfort (e.g., 24-26″ for 36″ counter). |
| Width per Seating Position | 24-30 inches (61-76 cm) per person | Ensures comfortable elbow room and prevents overcrowding; crucial for determining total island length. |
| Clearance Behind Seating | 36-48 inches (91-122 cm) for traffic flow | Allows people to easily pull out chairs/stools and walk behind seated individuals without obstruction. |
| Base Cabinet Depth | 24 inches (61 cm) standard | Forms the core structure; the seating overhang extends beyond this depth; affects internal storage. |
Customization and Personal Style
When you build kitchen island with seating yourself, you have complete control over its design. You can select materials, colors, and finishes that perfectly match your existing décor or create a striking focal point. From rustic farmhouse to sleek modern, your DIY island can be a unique reflection of your personal style, something off-the-shelf options rarely achieve.
Planning Your Dream Kitchen Island with Seating
The success of your DIY project hinges entirely on meticulous planning. Before you cut a single piece of wood, you need to thoroughly consider your space, needs, and desired aesthetic. This planning phase is crucial to successfully build kitchen island with seating that perfectly fits your home.
Learn more about how to build kitchen island with seating – How to Build Kitchen Island with Seating Ideas
Image source: i.pinimg.com
Assessing Your Space and Layout
- Clearance is Key: This is paramount. You need ample space around the island for comfortable movement and appliance access. A general rule of thumb is to allow at least 36 inches (90 cm) of clear walkway space around all sides of the island. If two work zones face each other (e.g., sink and range), aim for 42-48 inches (105-120 cm).
- Size and Scale: The island should be proportionate to your kitchen. A too-large island will overwhelm the space, while a too-small one might look out of place. Use painter’s tape on the floor or cardboard boxes to visualize the island’s footprint.
- Location of Utilities: If you plan to incorporate a sink, dishwasher, cooktop, or electrical outlets, consider the existing plumbing and wiring. Running new lines can add significant complexity and cost, so plan accordingly.
Designing for Seating
The seating component is what makes your island truly special. Proper planning ensures comfort and functionality.
- Counter Height vs. Bar Height:
- Counter Height (approx. 36 inches/90 cm): This is the standard kitchen counter height. It feels integrated and comfortable for most people using standard counter-height stools (seat height 24-26 inches/60-66 cm).
- Bar Height (approx. 42 inches/105 cm): This creates a more distinct bar area, often seen with two-tiered islands. Requires taller bar stools (seat height 28-30 inches/70-76 cm).
- Overhang Requirements: For comfortable seating, you need adequate knee space.
- Counter Height: A minimum of 12-15 inches (30-38 cm) overhang is recommended.
- Bar Height: A minimum of 10-12 inches (25-30 cm) overhang is sufficient due to the higher seating position.
- Seating Width: Allow at least 24 inches (60 cm) of linear counter space per person for comfortable dining.
Material Selection and Budget
Your choice of materials will impact both the cost and the aesthetic of your island. Consider your overall kitchen style and practical needs.
- Base Materials:
- Plywood (Cabinet Grade): Durable, stable, and excellent for painted finishes. Offers good structural integrity.
- MDF (Medium-Density Fiberboard): Smooth finish, good for painting, but less water-resistant and structurally weaker than plywood.
- Solid Wood: Premium option, great for stained finishes, but more expensive and can warp.
- Existing Cabinets: Repurposing base cabinets can be a cost-effective and simpler way to build kitchen island with seating, especially if you’re matching existing cabinetry.
- Countertop Materials:
- Laminate: Most affordable, wide variety of patterns, but less durable.
- Butcher Block: Warm, natural, can be refinished, moderate cost. Requires regular oiling.
- Quartz: Durable, non-porous, wide range of colors, mid-to-high cost.
- Granite: Durable, natural stone, unique patterns, mid-to-high cost. Requires sealing.
- Concrete: Industrial look, DIY-friendly for skilled individuals, can be customized.
Establish a realistic budget early on. Factor in materials for the base, countertop, hardware (hinges, drawer slides), trim, electrical components (if applicable), and finishing supplies (paint, stain, sealant).
Essential Tools and Materials for Your DIY Kitchen Island
Having the right tools and materials is half the battle when you build kitchen island with seating. This checklist will help you gather everything you need before you begin construction, ensuring a smoother, more efficient building process.
Basic Carpentry Tools
- Tape Measure
- Pencil
- Safety Glasses and Hearing Protection
- Level (long and short)
- Speed Square or Combination Square
- Circular Saw or Table Saw (for cutting large panels)
- Miter Saw (for precise crosscuts and angles on trim)
- Drill/Driver with various bits (pilot holes, driving screws)
- Pocket Hole Jig (e.g., Kreg Jig) – highly recommended for strong, concealed joints
- Orbital Sander and Sandpaper (various grits)
- Clamps (various sizes)
- Stud Finder (if anchoring to walls or floor)
- Utility Knife
- Caulk Gun
Core Materials List (Adjust Quantities Based on Design)
- Plywood (3/4″ cabinet-grade recommended): For side panels, back, shelving, and internal supports.
- 2×4 Lumber: For framing the base and any internal structural support.
- 1xX Lumber: For trim, face frames, and drawer/door components.
- Cabinetry Components (if using existing base cabinets): Base cabinets, end panels, toe kick material.
- Countertop Material: Your chosen option (butcher block, laminate, quartz, etc.).
- Fasteners:
- Wood Screws (various lengths, e.g., 1 1/4″, 2 1/2″)
- Pocket Hole Screws (if using a Kreg Jig)
- Construction Adhesive (e.g., Liquid Nails)
- Finish Nails (for trim work)
- Hardware:
- Cabinet Hinges (if building doors)
- Drawer Slides (if building drawers)
- Cabinet Pulls/Knobs
- Corbels or Brackets (for countertop overhang support)
- Finishing Supplies:
- Wood Filler
- Caulk (paintable)
- Primer (if painting)
- Paint or Wood Stain/Sealer
- Polyurethane or other protective topcoat (especially for butcher block)
- Electrical/Plumbing (if applicable):
- Electrical Box and Outlets
- Wire
- Conduit (if needed)
- Pipes, fittings, P-trap, faucet, sink basin (for plumbing)
Before purchasing, create a detailed cut list and material quantity estimate based on your design plans. This will prevent multiple trips to the hardware store and help manage your budget effectively for your custom kitchen island with seating.
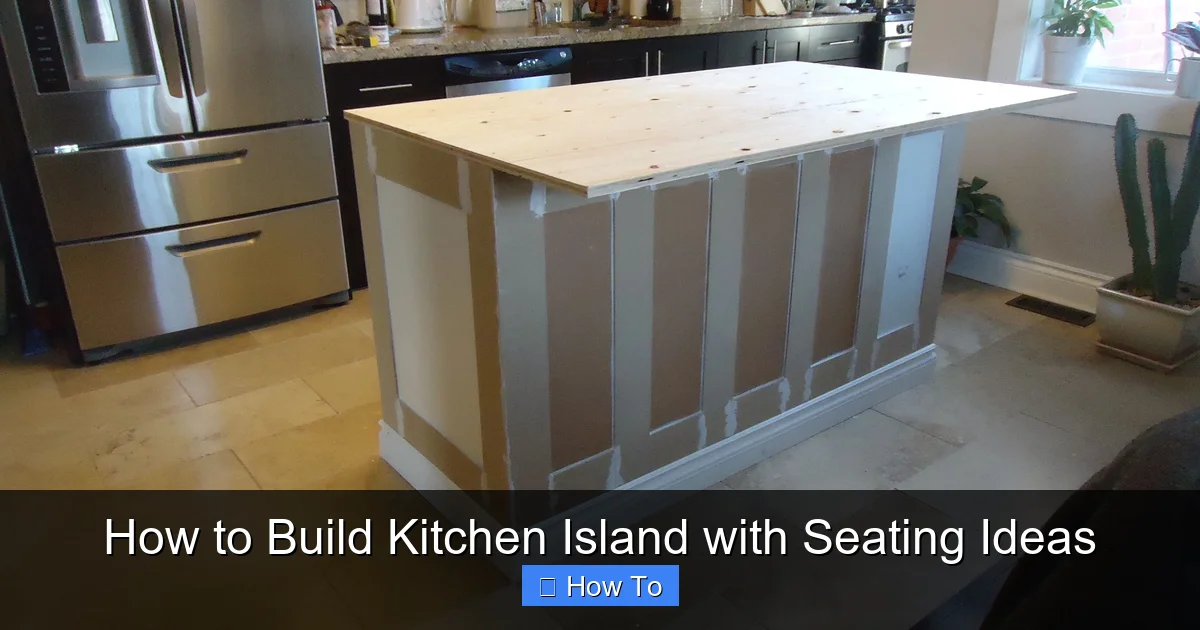
Step-by-Step Guide: How to Build Your Kitchen Island Base
This section outlines the fundamental steps to construct the core structure of your kitchen island. Remember, precision in measuring and cutting is paramount for a professional finish when you build kitchen island with seating.
1. Prepare Your Workspace and Cut Materials
- Clear the Area: Ensure you have a clean, level, and well-lit workspace.
- Measure and Mark: Transfer all your dimensions from your detailed plan onto your plywood and 2x4s. Double-check every measurement.
- Cut Panels: Using your circular saw or table saw, cut the plywood for the sides, back, bottom, and any internal shelves or dividers. Cut the 2x4s for the base frame and internal supports.
- Label Pieces: As you cut, label each piece clearly (e.g., “Left Side,” “Right Side,” “Bottom,” “Shelf 1”) to avoid confusion during assembly.
2. Construct the Base Frame (Toe Kick)
The base frame provides support and creates the toe kick area. This is a critical first step to ensure your custom kitchen island with seating is stable.
- Cut 2x4s to create a rectangular frame for the bottom of your island. This frame should be slightly smaller than your main island footprint to allow for the toe kick recess (typically 3-4 inches deep and 3.5 inches high).
- Assemble the frame using wood screws and wood glue. Ensure it is perfectly square using a speed square.
- If desired, add a plywood bottom panel to this frame for extra stability and to create a floor for the internal cabinetry.
3. Assemble the Side Panels and Internal Structure
This is where your island starts to take shape.
- Attach Side Panels to Base: Stand your side plywood panels upright on the base frame. Secure them to the base frame using wood screws driven from the inside of the base frame into the bottom edge of the plywood panels. Use wood glue for added strength.
- Add Internal Dividers/Shelves: Depending on your design, install internal plywood dividers or shelves. Use pocket hole joinery for strong, concealed connections, or use cleats (small strips of wood) screwed to the side panels to support shelves.
- Install Back Panel: Once internal components are in place, attach the back plywood panel. For an island that will be seen from all sides, the back panel should be finished plywood or decorative paneling.
- Square and Brace: Continuously check that your structure is square using your level and speed square. Add temporary braces if needed to hold pieces in place while glue dries or screws are driven.
4. Install Face Frames and Trim
Face frames and trim give your island a finished, professional look.
- Face Frames: If you’re building traditional cabinet doors and drawers, install 1×2 or 1×3 lumber strips around the front openings to create face frames. These provide a solid surface for attaching hinges and drawer slides.
- Toe Kick Finishes: Attach finished plywood or decorative trim to the exposed toe kick area of the base frame.
- Corner and Edge Trim: Add decorative trim to corners and edges to cover plywood edges and provide a more polished appearance. Secure with finish nails and wood glue.
5. Integrate Electrical and Plumbing (If Applicable)
If your island will have outlets, a sink, or a cooktop, now is the time to rough in the necessary wiring and plumbing. *Crucially, if you are not experienced with electrical or plumbing work, hire licensed professionals for these steps to ensure safety and compliance with local codes.*
- Electrical: Run conduit and wires from the floor or ceiling into the island base. Install electrical boxes for outlets or appliance connections.
- Plumbing: Install supply lines, drain lines, and rough-in fittings for your sink or dishwasher.
At this point, you have a solid, functional island base. It’s now ready for the countertop, seating elements, and final finishing touches that will truly bring your kitchen island with seating to life.
Adding the Seating Component and Finishing Touches
With the base structure complete, it’s time to focus on the elements that make your island a comfortable and inviting spot for gathering: the seating area and the final aesthetic touches. This is where your custom kitchen island with seating truly takes its final form.
1. Installing the Countertop
The countertop is not just functional; it’s a major visual component. Ensure it’s installed securely and level.
- Preparation: Ensure the top of your island base is level and free of debris.
- Dry Fit: Carefully place the countertop on the island base to check for fit and alignment. Mark any areas that need adjustment.
- Secure the Countertop:
- Wood/Laminate: Secure from underneath using L-brackets or wood screws driven up through the island’s top support frame into the underside of the countertop. Avoid piercing through the top surface!
- Stone (Quartz/Granite): This often requires professional installation due to weight and fragility. They will use adhesive and sometimes clips to secure it.
- Support Overhang: For any significant overhang (e.g., for seating), install corbels, brackets, or a hidden steel support frame *before* placing the countertop. These supports are essential to prevent sagging and ensure safety.
2. Creating the Seating Area
The overhang you planned for is now ready for stools.
- Choose Stools: Select stools that match your chosen counter or bar height. Ensure they fit comfortably under the overhang and allow for easy movement. Consider backless stools for a sleeker look or stools with backs for more comfort.
- Consider Footrests: If your stools don’t have built-in footrests, you might consider adding a rail or footrest to the island base itself for added comfort, especially for taller bar-height seating.
3. Cabinetry, Drawers, and Doors
If your island design includes storage, now is the time to complete these elements.
- Install Drawer Slides: Mount drawer slides according to manufacturer instructions, ensuring they are level and aligned.
- Build and Install Drawers: Construct your drawer boxes, fit them with bottoms, and attach them to the slides.
- Hang Doors: Attach hinges to doors and then mount doors to the island base, ensuring proper alignment and gap spacing.
- Add Hardware: Install cabinet pulls and knobs on all doors and drawers.
4. Plumbing and Electrical Hook-ups
If you roughed in plumbing and electrical, it’s time for the final connections. *Again, if you are not qualified, hire professionals for these crucial steps.*
- Plumbing: Install the sink basin (if applicable), connect the faucet, P-trap, and ensure all connections are watertight. Test for leaks.
- Electrical: Install outlets, light fixtures, or appliance connections. Ensure all wiring is safely enclosed and tested.
5. Finishing Touches (Painting, Staining, Sealing)
This stage transforms raw materials into a beautiful, finished product.
- Sanding: Thoroughly sand all wood surfaces. Start with a coarser grit (e.g., 100-120) and progress to finer grits (e.g., 180-220) for a smooth finish. Remove all dust.
- Filling and Caulking: Fill any nail holes or imperfections with wood filler. Caulk any gaps or seams that require it (e.g., where trim meets panels).
- Priming: If painting, apply a high-quality primer. This ensures good adhesion and a smooth topcoat.
- Painting/Staining: Apply your chosen paint or stain. For paint, several thin coats are better than one thick coat. For stain, follow manufacturer instructions, wiping off excess.
- Sealing/Topcoat: Apply a protective topcoat (e.g., polyurethane, lacquer, or a food-safe sealant for butcher block). This protects the finish and makes it easier to clean. For butcher block, repeated oiling is essential for maintenance.
Congratulations! You’ve successfully completed the construction and finishing of your bespoke kitchen island with seating. Take a step back and admire your handiwork.
Safety, Maintenance, and Maximizing Your Island’s Potential
Building your own kitchen island is a significant achievement, but the journey doesn’t end with the final coat of paint. To ensure its longevity, safety, and maximum utility, consider these important aspects.
Prioritizing Safety During and After Construction
Safety should always be your top concern.
- During Construction:
- Always wear safety glasses when cutting, drilling, or sanding.
- Use hearing protection with loud power tools.
- Ensure blades are sharp and tools are in good working order.
- Never force tools; let the tool do the work.
- Work in a well-ventilated area, especially when painting or staining.
- If installing electrical or plumbing, consult or hire certified professionals.
- Post-Construction Safety:
- Secure Anchorage: If your island is large or heavy, ensure it is securely anchored to the floor, especially if it’s freestanding. This prevents tipping, which can be a safety hazard, particularly with children around.
- Stable Seating: Ensure your chosen stools are stable and appropriate for the island height.
- Electrical Safety: If you installed outlets, ensure they are GFCI protected, especially near a sink.
Maintaining Your Custom Kitchen Island
Regular maintenance will keep your island looking great for years to come.
- Countertop Care:
- Butcher Block: Requires regular oiling (e.g., with mineral oil) every few weeks initially, then monthly, to prevent drying and cracking. Wipe spills immediately.
- Laminate: Easy to clean with mild soap and water. Avoid abrasive cleaners or cutting directly on the surface.
- Stone (Granite/Quartz): Wipe with a damp cloth and mild cleaner. Granite often requires periodic sealing (annually or bi-annually) to maintain its stain resistance. Quartz is non-porous and doesn’t require sealing.
- Base and Finish:
- Wipe down painted or stained surfaces with a damp cloth.
- Avoid harsh chemicals that could damage the finish.
- Touch up any chips or scratches in the paint or stain as needed.
- Hardware: Periodically check that screws on hinges, drawer slides, and pulls are tight.
Maximizing Your Island’s Potential: Smart Storage and Accessories
Your island is more than just a surface; it’s a hub for efficiency. Here’s how to build kitchen island with seating that’s not just functional, but optimized:
- Smart Storage Solutions:
- Pull-Out Trash/Recycling Bins: Integrate hidden bins for a cleaner, more organized kitchen.
- Deep Drawers: Perfect for pots, pans, and small appliances.
- Open Shelving: Ideal for displaying cookbooks, decorative items, or easy-access frequently used items.
- Wine Racks: A built-in wine rack adds a touch of sophistication and convenience.
- Charging Station: Integrate a pop-up or hidden charging station for phones and tablets.
- Strategic Accessories:
- Cutting Board Inset: Create a dedicated, integrated cutting board section.
- Hooks: Install hooks on the side for towels or pot holders.
- Spice Racks: Narrow pull-out spice racks can be incredibly useful.
- Cookbook Holders: A small ledge or holder for cookbooks or tablets can be invaluable.
- Lighting: Consider pendant lighting above your island. It adds ambient light, task lighting, and enhances the island’s visual appeal.
Typical Kitchen Island Dimensions & Seating Requirements
To help visualize and plan your project, here’s a table outlining common dimensions and seating considerations for a kitchen island with seating:
| Island Feature | Standard Counter Height Island (36″ High) | Standard Bar Height Island (42″ High) | Minimum Recommendation | Optimal Recommendation |
|---|---|---|---|---|
| Island Height (Floor to Top) | ~36 inches (90 cm) | ~42 inches (105 cm) | Matches adjacent counters | Matches adjacent counters or higher tier |
| Countertop Overhang for Seating | 10-12 inches (25-30 cm) | 8-10 inches (20-25 cm) | 10 inches (25 cm) | 12-15 inches (30-38 cm) |
| Seating Width Per Person | 24 inches (60 cm) | 24 inches (60 cm) | 20 inches (50 cm) | 24-30 inches (60-75 cm) |
| Stool Seat Height | 24-26 inches (60-66 cm) | 28-30 inches (70-76 cm) | 10-12 inches (25-30 cm) below counter | 10-12 inches (25-30 cm) below counter |
| Clearance Around Island | 36-48 inches (90-120 cm) | 36-48 inches (90-120 cm) | 36 inches (90 cm) | 42-48 inches (105-120 cm) |
| Typical Island Depth (Excl. Overhang) | 24-30 inches (60-75 cm) | 24-30 inches (60-75 cm) | 24 inches (60 cm) | 30 inches (75 cm) |
This table serves as a general guide. Always tailor your dimensions to your specific space, the people who will be using the island, and your desired aesthetic for your DIY kitchen island with seating.
Conclusion
Building a custom kitchen island with seating is more than just a home improvement project; it’s an investment in your lifestyle, your home’s functionality, and its enduring appeal. From the initial planning stages, meticulously measuring every dimension, to the careful selection of materials and the final brushstrokes of paint, each step contributes to creating a personalized centerpiece that truly reflects your taste and meets your family’s unique needs.
While the process requires patience, attention to detail, and a willingness to learn, the satisfaction of standing back and admiring a beautiful, functional piece you built with your own hands is immeasurable. You’ve transformed a vision into a tangible asset, providing not just extra counter space and storage, but a vibrant social hub where memories will be made for years to come.
So, take the leap! Armed with this comprehensive guide on how to build kitchen island with seating, your tools, and a healthy dose of determination, you’re well-equipped to tackle this rewarding DIY challenge. Embrace the journey, enjoy the process, and soon you’ll be gathering around your magnificent, custom-built kitchen island – the true heart of your home.
Frequently Asked Questions
What are the essential first steps when planning to build a kitchen island with seating?
Focus on measuring your kitchen’s available space and considering the primary function of your kitchen island with seating. Determine how many people you want to accommodate and ensure there’s enough clearance around all sides for comfortable movement.
How much overhang and knee space do I need for comfortable seating at my kitchen island?
For comfortable counter-height seating (36 inches high), aim for at least a 15-inch overhang and 12-15 inches of clear knee space. If you’re building a bar-height island (42 inches high), a 12-inch overhang is generally sufficient, also with 12 inches of knee space.
What are the best materials to use when building a durable kitchen island with seating?
Plywood or MDF are excellent choices for the base cabinetry, offering stability and a smooth finish for paint or veneer. For the countertop, consider durable options like quartz, granite, or butcher block, which can withstand daily use and complement your kitchen’s aesthetic.
How much does it typically cost to build a kitchen island with seating myself?
The cost can vary widely, from a few hundred dollars for a basic DIY build using affordable materials to several thousand for custom designs with high-end countertops and features. Budget for materials like lumber, countertop slabs, hardware, and any finishing touches like paint or trim.
What clever storage solutions can I incorporate into my kitchen island with seating?
Maximize functionality by including drawers, open shelving, or cabinets on the non-seating sides of the island. Consider pull-out spice racks, waste bins, or even a small appliance garage to keep your countertops clutter-free.
What tools and skills do I need to build a kitchen island with seating as a DIY project?
Basic woodworking skills like measuring, cutting, drilling, and joining are essential, along with a good understanding of framing. You’ll need tools such as a circular saw, drill, level, measuring tape, and possibly a Kreg jig for strong joints.