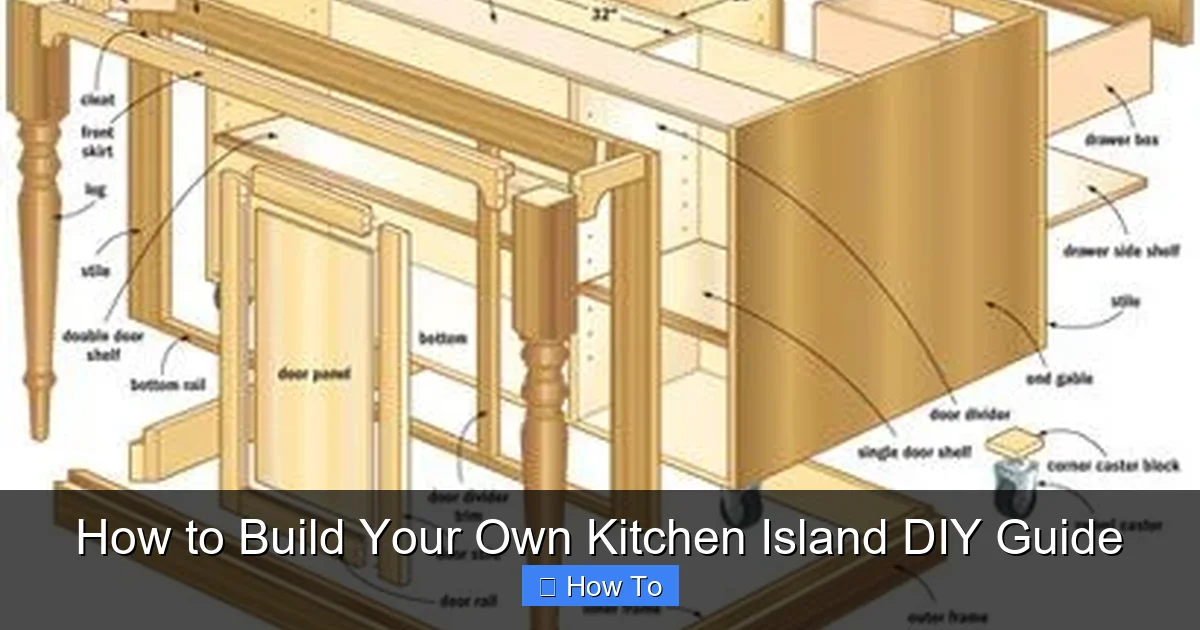
Featured image for this comprehensive guide about how to build your own kitchen island
Image source: i.pinimg.com
The kitchen isn’t just a place to cook; it’s the heart of the home, a gathering spot, a homework station, and often, the center of your social life. And at the heart of many modern kitchens? The island. A versatile centerpiece, a well-designed kitchen island can transform your culinary space, offering additional counter space, storage, seating, and even integrated appliances. While a pre-made island might seem like the easiest route, there’s immense satisfaction and significant savings to be had when you decide to build your own kitchen island.
Imagine a custom-designed piece that perfectly fits your kitchen’s aesthetic, meets your specific needs, and comes in at a fraction of the cost of a store-bought or professionally installed alternative. This isn’t just a pipe dream; it’s a totally achievable DIY project! With a little planning, some basic tools, and a willingness to learn, you can create a functional and beautiful custom kitchen island that will be the envy of your friends and family. This comprehensive guide will walk you through every step, from initial concept to the final finishing touches, empowering you to tackle this rewarding home improvement.
Whether you’re looking to expand your countertop real estate, add extra storage for pots and pans, create a breakfast bar, or simply enhance the visual appeal of your kitchen, building your own island is an excellent investment. It’s a project that not only adds tangible value to your home but also provides immense personal satisfaction. So, roll up your sleeves, because we’re about to embark on an exciting journey to design and build your own kitchen island, tailored perfectly to your home.
Quick Answers to Common Questions
Can I really build my own kitchen island if I’m not a pro?
Absolutely! With a good plan and a little patience, many DIYers successfully build beautiful kitchen islands. This guide will break down the steps to make it manageable for beginners.
What are the essential tools I’ll need for this kitchen island project?
You’ll typically need basics like a tape measure, saw (circular or miter), drill, and a level. For a really professional finish on your kitchen island, consider adding a Kreg jig for strong, hidden joinery.
How much should I budget to build a custom kitchen island?
Costs can vary widely, but expect to spend anywhere from $200-$1000+, depending on your chosen materials and features like a butcher block top or built-in cabinets. Planning your materials carefully is key to managing your kitchen island budget.
How do I decide on the right size for my new kitchen island?
Start by measuring your kitchen’s available space, ensuring at least 36-42 inches of clearance around all sides for comfortable movement. Consider your intended use – will it be for prep, dining, or storage – when designing the dimensions of your kitchen island.
What kind of materials are best for a durable, good-looking kitchen island?
Plywood (especially hardwood plywood) and solid wood are excellent choices for the base, offering strength and stability for your kitchen island. For the countertop, options range from butcher block for warmth to laminate or even tile for durability and style.
📋 Table of Contents
- Why Build Your Own Kitchen Island? The Benefits of a DIY Project
- Planning Your Dream Kitchen Island: Design, Dimensions, and Functionality
- Gathering Your Tools and Materials: What You’ll Need
- Step-by-Step Construction: Building the Core of Your Kitchen Island
- Finishing Touches: Countertops, Facing, and Features
- Budgeting Your DIY Kitchen Island: A Cost Comparison
- Conclusion: Your Kitchen’s New Heart, Built by You
Why Build Your Own Kitchen Island? The Benefits of a DIY Project
Choosing to build your own kitchen island over buying one off the shelf or hiring a professional comes with a plethora of advantages that extend beyond just cost savings. This isn’t merely about constructing a piece of furniture; it’s about crafting a central hub for your home that perfectly aligns with your lifestyle and decor.
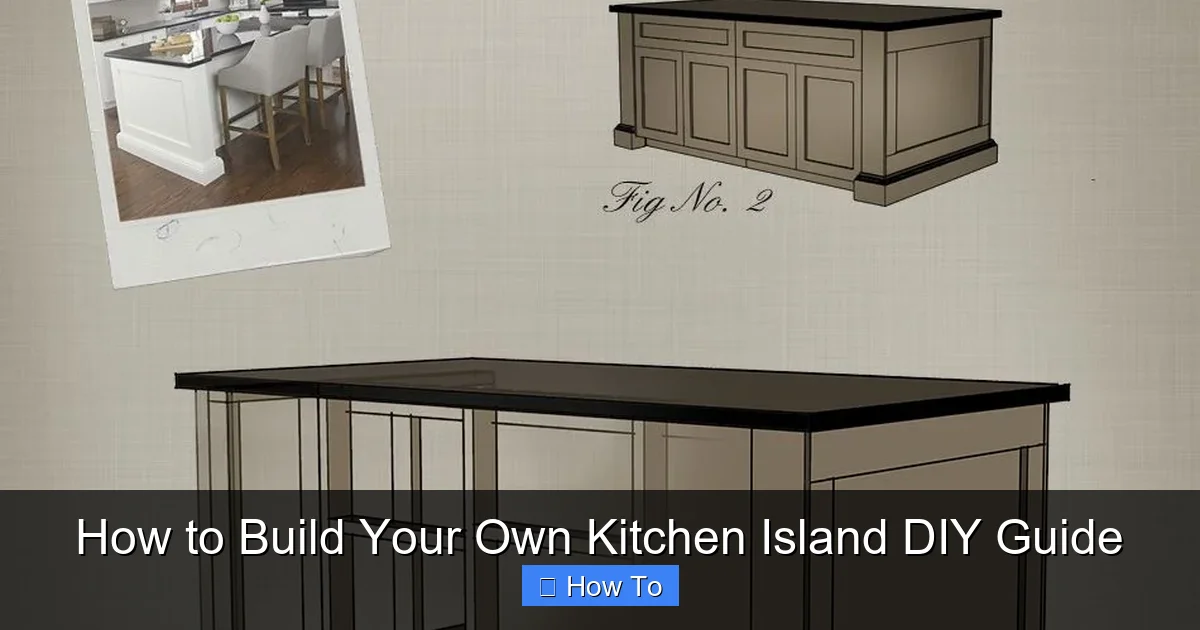
Learn more about how to build your own kitchen island – How to Build Your Own Kitchen Island DIY Guide
Image source: i.pinimg.com
Unmatched Customization and Personalization
One of the most compelling reasons to undertake a DIY kitchen island project is the freedom of customization. When you design your own kitchen island, you’re not limited by standard sizes, finishes, or functionalities. Do you need extra-deep cabinets for specialized appliances? A specific countertop material to match existing finishes? Integrated pet food bowls? A pull-out trash bin? A breakfast bar at a precise height for your family? All of these can be incorporated into your unique kitchen island plans.
| Project Aspect | DIY Build (Estimated) | Pre-Built/Custom (Comparison) | Key Takeaway / Factor |
|---|---|---|---|
| Estimated Cost | $300 – $1500 (Materials only: lumber, countertop, hardware) | $800 – $5000+ (Includes labor, often less customizable) | Significant savings for DIY, especially on labor costs. |
| Time Commitment | 2-5 Full Days (Design, construction, finishing) | Hours (Assembly/Installation), weeks for delivery | DIY requires more direct work time; pre-built means less waiting for delivery. |
| Skill Level Required | Basic-Intermediate Carpentry (Measuring, cutting, assembly, finishing) | Minimal (Basic assembly or professional installation) | DIY demands hands-on skills; great for learning new trades. |
| Customization & Design | Unlimited (Size, shape, features, materials, finish) | Limited to standard models or very high cost for custom | Perfect for unique kitchen layouts and personal aesthetic preferences. |
| Tools & Resources | Miter/Circular Saw, Drill, Sander, Level, Measuring Tape, Safety Gear | Screwdriver, wrench (for assembly if applicable) | DIY requires an initial tool investment or rental; basic tools suffice for pre-built. |
- Tailored Dimensions: Fit awkward spaces perfectly or maximize a large area.
- Personalized Storage: Design drawers, shelves, and cabinets exactly how you need them.
- Aesthetic Harmony: Match the island’s style, color, and materials to your existing kitchen decor seamlessly.
- Unique Features: Add integrated outlets, bookshelves, wine racks, or a small prep sink.
Significant Cost Savings
Let’s talk numbers. The cost of a new kitchen island can range dramatically. Pre-made islands from big box stores can start at a few hundred dollars but often lack quality or specific features. Custom-built islands by professionals can easily run into thousands, or even tens of thousands, of dollars depending on materials and complexity. By undertaking a DIY kitchen island build, you primarily pay for materials, which can lead to savings of 30-70% compared to professional installation.
According to Remodeling Magazine’s 2023 Cost vs. Value Report, minor kitchen remodels can have an ROI of over 70%. While a kitchen island is only one component, a well-executed custom kitchen island can significantly contribute to your home’s appeal and resale value, providing a high return on investment for your time and material costs.
The Satisfaction of a Job Well Done
There’s an undeniable sense of accomplishment that comes with stepping back and admiring something you’ve built with your own hands. A kitchen island project is not just about the end product; it’s about the journey of learning new skills, solving challenges, and bringing a vision to life. This personal investment makes your kitchen island more than just a piece of furniture; it becomes a testament to your creativity and effort.
Enhanced Functionality and Efficiency
A well-planned kitchen island can drastically improve the functionality of your kitchen. It can create a natural workflow triangle between the sink, stove, and refrigerator, provide a dedicated prep area, or offer additional seating for casual meals and entertaining. By carefully considering your kitchen’s layout and your family’s needs during the kitchen island design phase, you can create a highly efficient space that makes cooking and entertaining a joy.
Planning Your Dream Kitchen Island: Design, Dimensions, and Functionality
Before you even think about cutting wood, the most crucial step is thorough planning. This phase will dictate the success and satisfaction of your entire kitchen island construction. Take your time here; a well-thought-out plan saves headaches (and money) down the line.
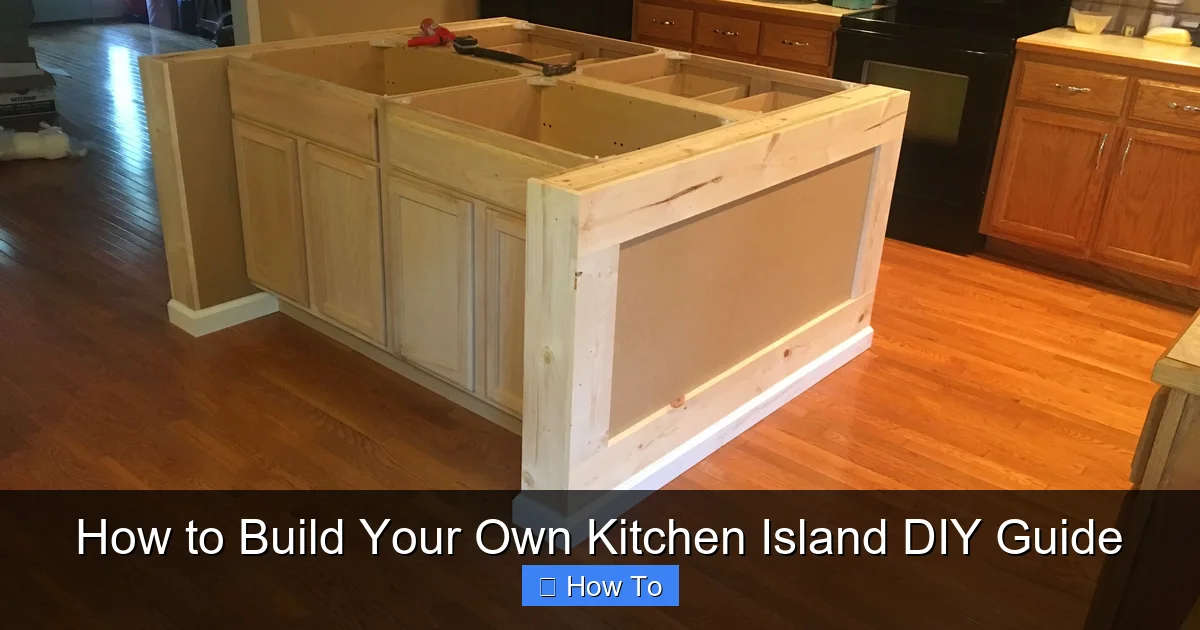
Learn more about how to build your own kitchen island – How to Build Your Own Kitchen Island DIY Guide
Image source: i.pinimg.com
Defining Your Kitchen Island’s Purpose and Design
What do you want your island to do? This question is central to its design. Is it primarily for food prep, additional storage, a dining area, or a combination? Sketch out various ideas, consider your lifestyle, and how your family uses the kitchen.
- Food Preparation: Needs ample clear counter space, possibly a small prep sink, and easy access to utensils.
- Storage: Focus on cabinets, drawers, open shelving, or a mix. Consider specialized storage like spice racks or pull-out pantries.
- Dining/Seating: Requires an overhang for legroom (typically 12-18 inches for comfortable seating), and consideration for chair/stool height.
- Appliance Integration: Will it house a cooktop, microwave, dishwasher, or beverage fridge? This will impact electrical and plumbing requirements.
Crucial Dimensions and Layout Considerations
This is where the tape measure becomes your best friend. Proper sizing ensures your island is functional without hindering movement.
- Kitchen Clearance: Aim for at least 36-42 inches of clear walkway space around all sides of your island, especially between the island and other fixed objects like counters, walls, or appliances. This is critical for safety and ease of movement.
- Island Size: A good rule of thumb for a minimum functional island size is 24×48 inches, but this can vary. Maximize its size while respecting the clearance rule.
- Height: Standard counter height is 36 inches. If you plan for a breakfast bar, you might opt for a two-tier design with a raised bar height (42 inches) for casual dining.
- Overhang: If adding seating, plan for a countertop overhang of at least 12 inches for comfortable legroom.
Pro Tip: Use painter’s tape on your kitchen floor to outline your proposed island dimensions. Walk around it, open appliance doors, and simulate daily activities. This visual and physical representation will help you identify potential issues before you start building.
Gathering Inspiration and Drawing Up Plans
Look at magazines, Pinterest, and home improvement websites for inspiration. Collect images of islands you like. Once you have a general idea, start drawing detailed plans. This doesn’t have to be architectural-grade; a clear, scaled sketch with measurements is sufficient. Consider software tools for 3D modeling if you’re comfortable, but graph paper and a ruler work just as well.
Your plan should include:
- Overall dimensions (length, width, height).
- Internal layout (cabinet sizes, drawer locations, shelving).
- Electrical outlets and plumbing lines (if applicable).
- Specific materials for the base, countertop, and any facing.
Gathering Your Tools and Materials: What You’ll Need
A successful kitchen island project hinges on having the right tools and quality materials. Before you begin, gather everything you need to avoid interruptions. This list is comprehensive but can be adjusted based on your specific kitchen island construction approach.
Essential Tools for Your DIY Kitchen Island
Most of these tools are standard for general carpentry and home improvement tasks. If you don’t own them, consider renting or borrowing for bigger items.
- Measuring & Marking: Tape measure, speed square, level (long and short), pencil, chalk line.
- Cutting: Circular saw (with a guide or straight edge), miter saw (for accurate crosscuts), jigsaw (for curves or cutouts).
- Drilling: Cordless drill/driver, drill bit set (various sizes), countersink bit.
- Fastening: Impact driver (optional, but highly recommended), clamps (various sizes), stud finder (if attaching to floor/wall).
- Safety Gear: Safety glasses, hearing protection, work gloves, dust mask.
- Hand Tools: Hammer, utility knife, sandpaper/sander, caulk gun, spirit level, framing square.
- Specialty Tools (depending on design): Router (for edge profiles), biscuit joiner or pocket hole jig (for stronger joints).
Key Materials for Your Kitchen Island Build
The materials you choose will impact the island’s durability, appearance, and overall cost. Select wisely based on your budget and desired aesthetic.
- Framing Lumber: 2x4s or 2x6s for the base frame, providing structural integrity.
- Plywood: ¾ inch plywood (furniture grade or cabinet grade) for the cabinet boxes, shelves, and any structural panels. ½ inch plywood for drawer bottoms or backing.
- Cabinetry: If using pre-fabricated base cabinets, purchase these based on your design.
- Facing/Finishing Material: Hardwood plywood, beadboard panels, shiplap, drywall (if painting), or decorative panels to cover the raw frame.
- Countertop Material: Butcher block, laminate, tile, granite, quartz, concrete – choose based on durability, aesthetics, and budget.
- Fasteners: Wood screws (various lengths), nails, cabinet screws, pocket hole screws (if using a Kreg Jig).
- Adhesives: Wood glue, construction adhesive (for countertops), caulk.
- Finishing Supplies: Primer, paint, stain, polyurethane, sandpaper, brushes, rollers.
- Hardware: Cabinet hinges, drawer slides, cabinet pulls/knobs, leg levelers (optional but recommended).
- Electrical/Plumbing (if applicable): Electrical wire, outlets, junction boxes, plumbing lines, sink, faucet.
Pro Tip: Always buy slightly more material than you think you’ll need (e.g., 10-15% extra). Mistakes happen, and it’s better to have a little leftover than to run out in the middle of a project.
Step-by-Step Construction: Building the Core of Your Kitchen Island
With your plans finalized and materials gathered, it’s time to get to the exciting part: building the core of your kitchen island. We’ll focus on a cabinet-style island, which is popular for its storage capacity and relatively straightforward construction.
Phase 1: Building the Base Frame and Cabinet Boxes
This is the foundation of your island. Precision here is key for a stable and square structure.
- Cut Your Lumber: Using your detailed plans, cut all 2x4s for the base frame and plywood pieces for your cabinet boxes. Label them clearly.
- Assemble the Base Frame:
- Create two rectangular frames for the top and bottom of your base using wood screws and wood glue for extra strength. Ensure they are perfectly square.
- Connect these frames with vertical 2x4s at each corner and at intervals where cabinet sections will meet. Use a level to ensure all verticals are plumb.
- Add cross-bracing as needed for stability. This frame provides a sturdy foundation and defines the island’s footprint.
- Construct Cabinet Boxes: If you’re building custom cabinets, assemble them now.
- Cut your ¾-inch plywood panels for the sides, tops, bottoms, and shelves of each cabinet section.
- Use pocket hole joinery or dado joints with wood glue and screws to assemble the boxes. Ensure they are square.
- Add a ½-inch plywood back panel for rigidity.
- Install Cabinet Boxes onto the Frame: Carefully position your assembled cabinet boxes onto the base frame. Secure them to the frame using screws from the inside of the cabinets into the frame members. Ensure they are level and plumb. If you’re using pre-made base cabinets, simply arrange and secure them to each other and the floor (if desired).
- Secure to the Floor (Optional but Recommended): For maximum stability, especially for larger islands or those with heavy countertops, consider anchoring your island to the floor. Use L-brackets or screws through the base frame into the subfloor. Always check for electrical wires or plumbing pipes before drilling into the floor.
Phase 2: Adding Internal Structure and Features
Now, build out the internal components as per your design.
- Add Shelving and Dividers: Install adjustable shelf pins or fixed shelf supports within your cabinet boxes. Add any internal dividers for specialized storage.
- Drawer Boxes: Construct your drawer boxes using ½-inch plywood for sides and ¾-inch plywood for the front/back, and ½-inch plywood for the bottom. Ensure they are perfectly square.
- Install Drawer Slides: Mount high-quality drawer slides to the inside of your cabinet boxes and to the sides of your drawer boxes. Test for smooth operation before proceeding.
- Rough-in Electrical and Plumbing (if applicable): If your island will have outlets, a cooktop, or a sink, now is the time to run the necessary electrical wiring and plumbing lines. This is often best left to licensed professionals to ensure safety and compliance with local codes.
Key Construction Tip: Throughout the assembly process, constantly check for squareness and levelness. Small errors early on can compound into major problems later.
Finishing Touches: Countertops, Facing, and Features
With the structural core of your island complete, it’s time to bring your vision to life with facing, a beautiful countertop, and any desired additional features. This is where your custom kitchen island truly starts to shine.
Applying the Facing and Trim
The facing covers the raw plywood or lumber frame, giving your island its finished aesthetic. This could be beadboard, shiplap, decorative panels, or hardwood plywood.
- Cut and Fit Panels: Measure and cut your chosen facing material to fit each exposed side of the island. Account for any necessary cutouts for outlets or appliance openings.
- Attach Facing: Secure the panels to the island frame using wood glue and finish nails. Ensure the panels are flush and transitions are smooth. If using decorative panels, carefully align them.
- Add Trim and Molding: Install base molding around the bottom and any decorative trim pieces to hide seams or enhance the design. Crown molding or flat stock can be added to the top edge below the countertop for a more polished look.
- Sanding and Prep for Finishing: Fill all nail holes with wood putty and sand the entire surface smooth. This step is critical for a professional-looking finish.
Finishing the Surface: Painting or Staining
The finish protects the wood and gives your island its final color.
- Clean and Prime: Wipe down the island to remove all dust. Apply a high-quality primer, especially if you’re painting over raw wood or plywood.
- Paint or Stain: Apply your chosen paint or stain according to the manufacturer’s instructions. Use multiple thin coats for the best results, lightly sanding between coats if recommended.
- Apply Top Coat: If staining, or if your paint requires it, apply a protective top coat like polyurethane. This will protect your island from wear and tear, especially in a high-traffic area like the kitchen.
Countertop Installation
The countertop is a major visual element and functional surface. The installation method will vary greatly depending on the material.
- Prepare the Surface: Ensure the top of your island is clean, level, and free of debris.
- Install Countertop:
- Butcher Block/Laminate: These can often be cut to size on-site and secured from underneath with screws through the cabinet top rails into the countertop. Use construction adhesive for added security.
- Stone (Granite, Quartz, Marble): These are extremely heavy and typically require professional templating and installation. They are usually set on a thin bead of silicone adhesive. Do NOT attempt to install heavy stone countertops without proper help and equipment.
- Tile: Install a cement backer board first, then lay your tiles using thin-set mortar, followed by grouting.
- Seal the Countertop: Many countertop materials (especially natural stone and butcher block) require sealing to protect against stains and moisture. Follow the manufacturer’s recommendations.
Adding Doors, Drawers, and Hardware
These final details complete your island’s functionality and aesthetic.
- Install Doors: Attach your cabinet doors using hinges. Adjust hinges to ensure proper alignment and smooth operation.
- Install Drawer Fronts: Attach the finished drawer fronts to your drawer boxes. Adjust as needed to ensure even gaps between all drawers and doors.
- Attach Hardware: Install your chosen cabinet pulls and knobs on all doors and drawers. Take care to measure consistently for a uniform look.
Congratulations! Your DIY kitchen island is now ready to become the focal point of your kitchen, a testament to your hard work and creativity.
Budgeting Your DIY Kitchen Island: A Cost Comparison
One of the primary motivations for many homeowners to build their own kitchen island is the significant cost savings. Understanding where your money goes and how DIY compares to professional options is crucial for effective budgeting.
Factors Influencing Your Kitchen Island Cost
Several variables will impact the final price tag of your kitchen island project:
- Size and Complexity: Larger islands with more features (e.g., sink, cooktop, custom storage) will naturally cost more due to increased material and potential labor (for professionals).
- Materials Chosen: This is arguably the biggest cost driver.
- Framing: 2x4s are relatively inexpensive. Using pre-made cabinets will increase initial cost but reduce build time.
- Plywood: Cabinet-grade plywood is more expensive than construction-grade but offers a superior finish.
- Facing: Simple paint-grade plywood or beadboard is cheaper than solid hardwood panels.
- Countertop: Laminate and butcher block are budget-friendly. Tile is mid-range. Natural stone (granite, quartz) and solid surface materials are at the higher end.
- Finishes: High-quality paints, stains, and protective topcoats add to the cost but ensure durability.
- Hardware: Cabinet hinges, drawer slides, and pulls range from basic to premium, impacting the budget.
- Appliance/Plumbing Integration: Adding a sink, cooktop, or dishwasher requires not only the appliance cost but also potential professional installation for plumbing and electrical work.
Estimated Cost Breakdown for a DIY Kitchen Island
Here’s a general breakdown of where your money might go for a mid-sized DIY kitchen island (e.g., 3×5 feet with basic cabinets and storage). These are estimates and can vary widely by region and material choice.
Table: Estimated DIY Kitchen Island Costs (Excluding Appliances/Pro Labor)
| Category | Typical DIY Cost Range | Notes |
|---|---|---|
| Lumber (2x4s, Plywood) | $150 – $400 | Depends on size, grade of plywood. |
| Facing Material | $100 – $350 | Beadboard, shiplap, hardwood plywood. |
| Countertop Material | $200 – $1,000+ | Laminate < Butcher Block < Tile < Quartz/Granite (DIY friendly options). Professional stone installation will add significantly. |
| Hardware (Hinges, Slides, Pulls) | $75 – $300 | Quality drawer slides can be a significant cost. |
| Finishing Supplies (Paint/Stain, Poly, Putty, Sandpaper) | $50 – $200 | Good quality finishes are worth the investment. |
| Miscellaneous (Screws, Glue, Caulk, etc.) | $30 – $100 | Small items add up! |
| Total Estimated DIY Cost (Excluding appliances/pro labor) | $605 – $2,350+ | Can be lower with salvaged materials; much higher with premium finishes. |
DIY vs. Professional Installation: A Cost Comparison
While the DIY cost might seem substantial, let’s put it into perspective:
- Pre-made Islands: Basic, smaller islands can be found for $300 – $1,500. However, they often lack customization, quality, or the size you need.
- Custom-Built by a Professional: A custom kitchen island built and installed by a contractor or cabinetmaker can range from $2,500 to $10,000+, depending on materials, size, and features. This includes labor, which typically accounts for 40-60% of the total project cost.
By choosing to build your own kitchen island, you are essentially saving on all labor costs, which can represent thousands of dollars. This allows you to potentially invest more in higher-quality materials for the same overall budget or simply pocket the savings.
Cost-Saving Tip: Look for reclaimed wood for butcher block tops, salvaged cabinets, or remnant pieces of stone from countertop fabricators. These can drastically reduce material costs for your kitchen island project.
Conclusion: Your Kitchen’s New Heart, Built by You
Embarking on a journey to build your own kitchen island is more than just a home improvement project; it’s an investment in your home’s functionality, aesthetics, and your personal skill set. From the initial spark of an idea to the final turn of a screw, this comprehensive guide has walked you through every critical step, demonstrating that a beautiful, functional, and highly personalized kitchen island is well within your reach.
You’ve learned the myriad benefits of choosing the DIY route, from significant cost savings and unparalleled customization to the immense satisfaction of creating something with your own hands. We’ve meticulously covered the crucial planning phase, emphasizing the importance of design, dimensions, and functionality to ensure your island perfectly suits your needs. You’re now equipped with a clear understanding of the tools and materials required, and a detailed, step-by-step construction process to guide you through the core build and the all-important finishing touches.
Remember, while the process requires patience and attention to detail, the rewards are immeasurable. Not only will you have a stunning, perfectly tailored custom kitchen island that enhances your kitchen’s workflow and appeal, but you’ll also gain valuable carpentry skills and the pride of accomplishment that comes from tackling such a substantial home improvement project. So, take the leap, embrace the challenge, and soon you’ll be enjoying the new heart of your home – an island built entirely by you!
Frequently Asked Questions
Where should I begin when planning to build my own kitchen island?
Start by carefully measuring your available space to determine the maximum suitable dimensions for your kitchen island. Then, define its primary function – will it be for food prep, dining, storage, or a combination? This will dictate the design, features, and overall size of your custom kitchen island.
What are the typical material costs for building a DIY kitchen island?
The cost to build a kitchen island varies widely depending on the materials you choose, especially for the countertop and cabinetry. You could spend a few hundred dollars for a basic unit made from stock cabinets and a laminate top, or over a thousand for custom-built components and high-end surfaces like butcher block or quartz.
What essential tools will I need to build a kitchen island?
For most DIY kitchen island projects, you’ll need a tape measure, level, drill, and a saw (a circular or miter saw is highly recommended). Depending on the complexity, you might also find a pocket hole jig, router, or a finish nailer beneficial for professional-looking results when you build your kitchen island.
How difficult is it to build a kitchen island for a beginner DIYer?
Building a basic kitchen island from pre-made cabinet bases can be a manageable project for a confident beginner with some basic carpentry skills. However, constructing a custom, freestanding kitchen island completely from scratch with intricate details, drawers, or electrical hookups will require more advanced woodworking experience and tools.
How do I ensure my custom kitchen island is stable and secure?
Ensuring the stability of your kitchen island is paramount for safety and longevity. Use sturdy framing materials, strong joinery techniques (like screws, bolts, or pocket holes), and if the design allows, securely anchor the base to the floor. Always build on a level surface and check for plumb and square throughout the construction.
Can I incorporate storage, seating, or electrical outlets into my DIY kitchen island?
Absolutely! Designing your kitchen island to include features like cabinets, open shelving, or an overhang for seating is a common and practical approach. Adding electrical outlets for small appliances or charging requires careful planning and may necessitate professional electrical work to ensure safety and adherence to building codes.